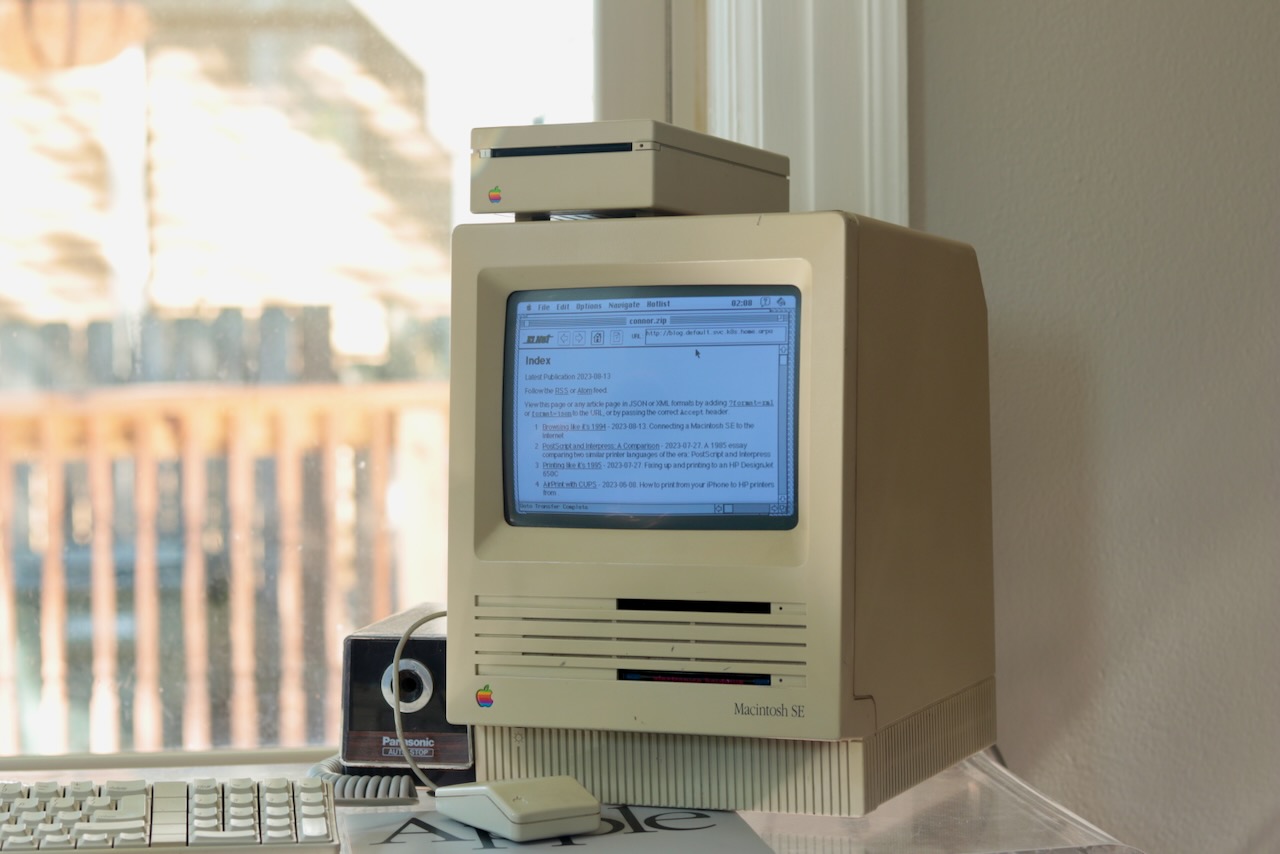
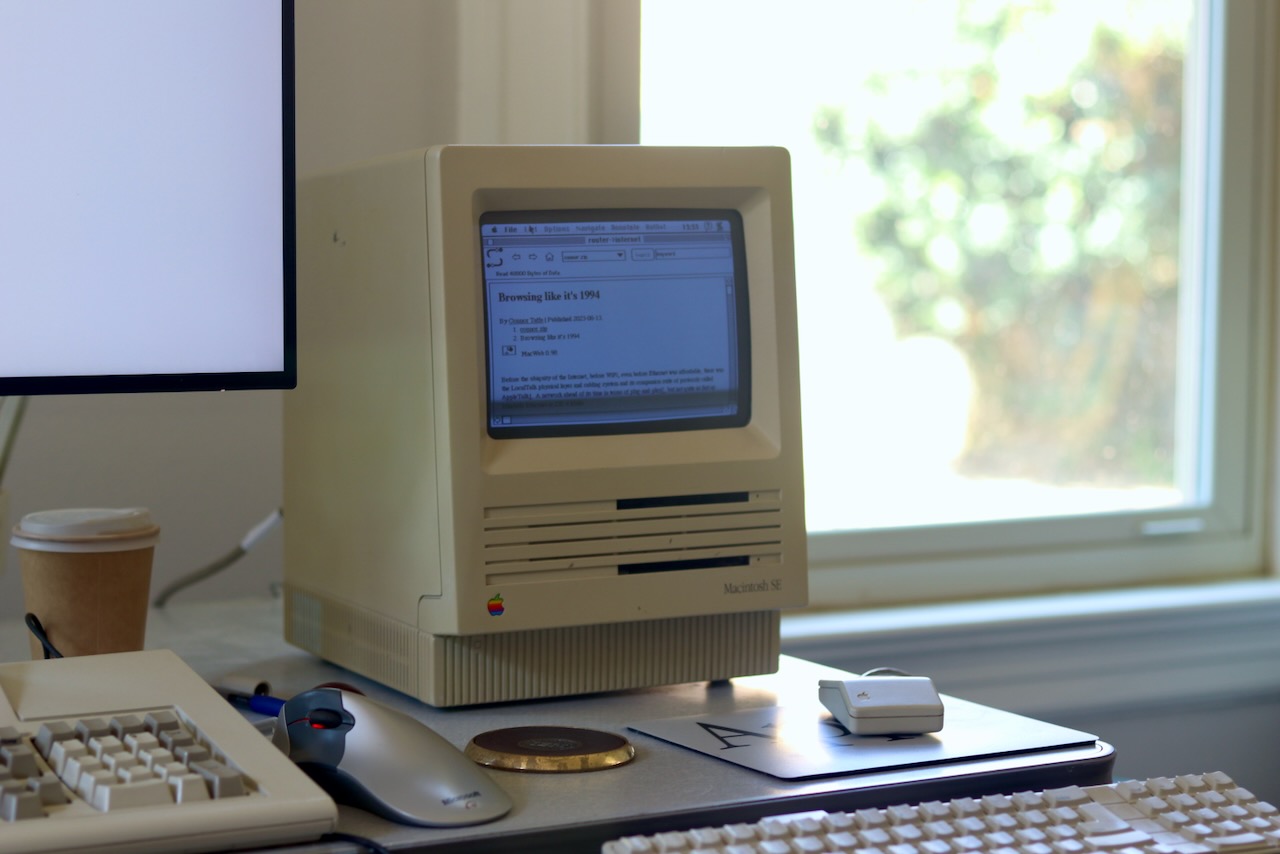
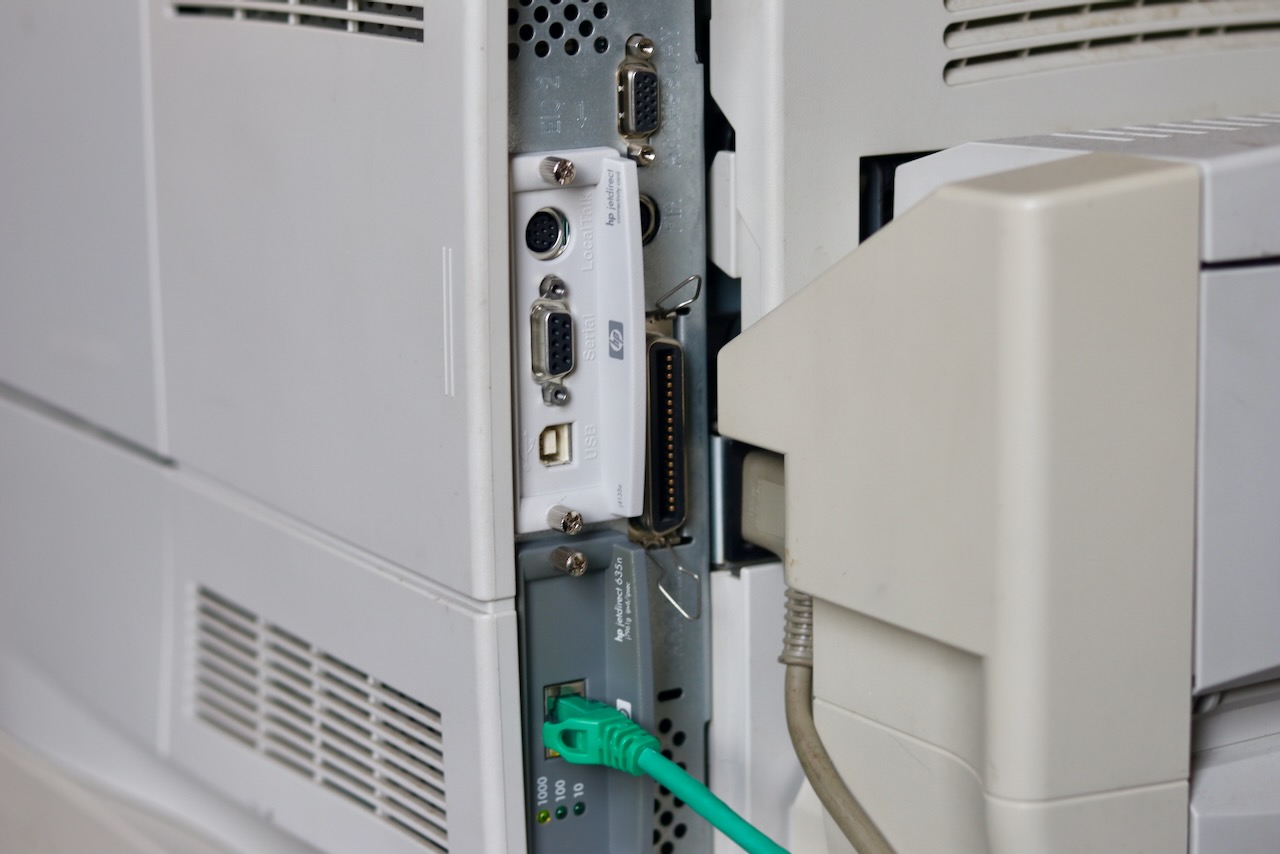
https://connor.zip/atomconnor.zipA software engineer's scratchpad.https://connor.zip/resources/images/turtle.png2025-10-15T00:00:00-05:00https://connor.zip/posts/2025-10-15-rose-rosette-diseaseRose Rosette DiseaseConnor Taffe2025-10-15T00:00:00-05:00Rose Rosette Disease affecting roses in Little Rock
Over the last few years, we've greatly improved the landscaping of our home in downtown Little Rock. This year, we decided to dilineate the beds from the yard to reduce difficulty trimming and handling weeds. Instead of using a metal or plastic border, we simply used a hose pipe to trace out a snaking border line for several beds, and dug a trench using a square transfer shovel. The trench is about four inches deep, and angled on one side, which allows for the mulch to fall into the trench and cuts the roots of the grass. We lined the beds with builder's paper or newspaper to stop the weeds, then shoveled on a few inches of mulch. In all we made around half a dozen trips to the nursury to buy black dyed cedar mulch, each time filling the bed of my '96 Toyota Tacoma with about a cubic yard of material.
The beds turned out beautifully, but the paper did not stop the bermuda grass from tunneling up to the surface. Next year, I'll use a sturdier biodegradeable barrier like cardboard. This season I'll try sethoxydim such as in Fertilome Over The Top II.
A blooming pink and yellow rose
The pride of our front garden this fall was our collection of rose bushes on each side of the front sidewalk, which exploded with vibrant blooms of all colors as the weather cooled. We received many compliments from our neighbors on them, and each morning I would step out with my coffee and just stand around them, taking in the colors. But alas, all things come to an end.
A Death Sentence for Roses
In researching garden plants for my zone, I learned about Rose Rosette Disease. This is a virus which infects roses, causing shoots, mottled leaves, reddish discoloration, excessive thorniness, and a tell-tale "witches' broom" formation where many branches arise out of one point. It is spread from rose to rose by tiny eriophyid mites which ride on the wind or blown by leaf-blowers. Unfortunately, some of my roses were already affected by the virus. By the time symptoms appear, it's likely the entire plant is already infected with the virus, which travels through its vascular system even into the roots -- plants can be asymptomatic for up to six months after infection. There is no cure for the virus, once infected the only course of action is to dig up the entire plant, bag it, and dispose of it in the garbage where it won't infect another rose. Our local nursury Good Earth has a short article on RRD: Identification, Symptoms, and Treatment, including alternative plants.
My approach has been to prune infected canes to the ground, and spray all my roses every few days with a 2oz/gallon neem oil solution to control the mites, and vigilantly inspect new growth for symptoms. There is anecdotal evidence that aggresive pruning of infected canes may prevent the entire rose from becoming infected if done in time. We already dead-head regularly, but have begun disenfecting our clippers with bleach between bushes to prevent transfer of mites.
In a recent walk around the neighborhood, I recognized a staggering rate of infection. Out of seven rose bushes on my block, each one exhibits symptoms. Some have been exhibiting symptoms for some time, while others are just starting to show symptoms. Mites from these roses are likely what infected mine, it only takes an hour for a mite to transfer the virus, after being blown by the wind or leaf blowers.
A witches' broom formation
I spoke with Derek Reed at the Pulaski County Master Gardeners Association, and he shared two fact sheets, which I'll provide here:
Rose Rosette disease is very common in our area unfortunately. A large part of this issue is due to lack of awareness. Rose bushes get it and then it is spread by mites. Part of the issue is an infected plant may not show symptoms. Once infected it is best to remove the entire plant. Unfortunately, since it is a virus it infects the entire system and is not localized. So while you [can remove] the symptoms by pruning the plant is still infected. Any mites that are living on that bush can still transmit it to other plants.
To control the mites chemically, a dormant oil can be applied prior to bud break. Neem oil, insecticidal soap, a miticide, sulfur and those insecticides with the active ingredients bifenthrin, deltamethrin, and permethrin can be applied as contact insecticides in the spring following bud break. Systemic insecticides with the active ingredients imidacloprid and dinotefuran can also be used against the pest and should be applied in the spring.
Resistance
Research2 has shown that rose varieties native to North America are resistant to the RRD virus, and some varieties related to these or a resistant Asian variety, R. Rugosa, show resistance as well. These native roses generally have a flatter flower reminiscent of a blackberry, however several hybrids are beautiful garden roses such as John Davis Hardy Rose, Thérèse Bugnet Rugosa Rose, Moore’s Striped Rugosa, Bonica, Morden Blush, and Winnipeg Parks.
In researching this, I discovered Ralph Moore created the resistant Fuzzy Wuzzy Red and Moore's Striped Rugosa, is creator of the entire category of moss roses (see Ralph Moore: Father of the Miniature Rose), and donated funds and rose germplasm to the Rose Breeding and Genetics Program at Texas A&M University. He also created the Mermaid rose, a more manageable climbing rose related to the invasive McCartney Rose (R. bracteata), this enabled him to produce more beautiful crosses such as the Pink Powderpuff as detailed in Rosa Bracteata: a Vicious, Feral Beauty, Tamed at Last! -- unfortunately there is not yet scientific study of these roses' resistance.
To help improve awareness, I've created a Symptomatic Rose Map, and will be sharing an information packet including the above fact sheets with rose growers in my neighborhood. I am not an expert, not all diagnoses will be accurate.
Among those with no or low symptom development are nine species accessions. Accessions of five North American species (R. arkansana, R. carolina, R. folialosa, R. virginiana, and R. woodsii) and one Asian species (R. rugosa) belong to two closely related sections, Carolinae and Cinnamomeae. Previous work has reported that accessions of several North American species from the subgenus Carolinae (R. arkansana, R. blanda, R. carolina, R. californica, and R. palustris) did not show symptom development when they were grafted with infected buds, indicating that there are strong sources of resistance to RRD among this group of rose species native to North America.
Another large group of accessions with low symptom development is the hybrids with R. rugosa (‘John Davis’, ‘Fuzzy Wuzzy Red’, Moore’s Striped Rugosa (‘MORbeauty’), Purple Pavement (‘HANpur’), ‘Sir Thomas Lipton’, Star Delight (‘MORstar90’), and ‘Therese Bugnet’).
The final two accessions that developed no or low symptoms of RRD over the 3-year trial were the floribunda rose Chuckles (‘SIMmimi’) and the miniature rose Fairy Moss (MORfairpol’)
Based on current data, the following rose cultivars have shown no symptoms or detectable virus: ‘R. arkansana FF,’ ‘R. bracteata RM,’ ‘Fuzzy Wuzzy Red,’ ‘Purple Pavement,’ ‘Morden Blush,’ ‘Chuckles,’ ‘Sir Thomas Lipton’ and selections of ‘R. virginiana FF,’ ‘R. folialosa ARE,’ ‘R. carolina FF’ and ‘R. woodsii RVR.’
These species were incorporated by crosses with a local accession of R. arkansana as well as through his use of the roses ‘Prairie Princess’ and ‘Assinboine’. ‘Morden Blush’ and ‘Winnipeg Parks’ showed few symptoms, whereas ‘Morden Centennial’ and ‘Morden Fireglow’ showed moderate symptom development.
Those cultivars showing moderate RRD symptoms without a positive RRV diagnosis were ‘Caldwell Pink’, ‘Lafter’, Manetti, ‘Morden Fireglow’, and Sorcerer (‘SAVasorc’). These roses generally developed rosettes of an RRV infection but not until late in the trial.
In each of the native varieties, R. abbreviates "rosa," part of the scientific name, and the letters which follow the name indicate the source of each specimen:
https://connor.zip/posts/2025-05-03-runeRuneConnor Taffe2025-05-03T00:00:00-05:00How "rune" came to mean a Unicode code point
I'm taking a break from social media and focusing more on consuming written word, through books and web feeds via NewNewsWire. One of those feeds is Scour, an aggregation of my imported feeds automatically filtered based on interests -- especially useful for high-volume feeds like HN. This week my feed contained Adam Pritchard's article on limiting string length which contained this note:
Note that in Go, a Unicode code point is typically called a “rune”. (Go seems to have introduced the term for the sake of brevity. I certainly appreciate that, but I’m going to stick with universal terms here.)
An Earth Rune from the 2007-era version of the online role-playing game Runescape
When was the term "rune" introduced, and why? I thought I had seen it outside of Go, and did some digging.
“Code point” is a bit of a mouthful, so Go introduces a shorter term for the concept: rune. The term appears in the libraries and source code, and means exactly the same as “code point”, with one interesting addition.
The Go programming language was created by a group including Rob Pike, Ken Thompson, and Russ Cox; all Bell Labs alumni who had collaborated on the Plan 9 operating system -- see Go at Google: Language Design in the Service of Software Engineering. Rob Pike is also the author of the Plan 9 editor Acme, from which I write this, which Russ Cox ported to UNIX (along with many Plan 9 utilities) in plan9port. Their experience on Plan 9 and Inferno meant many ideas from the Plan 9 C compiler and languages like Alef made it into Go -- the linker architecture, channels, the significance of capitalization, the focus on simplicity, the usage of "little languages," etc.
Plan 9 was also where UTF-8 was originally implemented, motivated by the difficulties with UTF-16 -- as Rob Pike writes in UTF-8 turned 20 years old:
UTF was awful. It had modulo-192 arithmetic, if I remember correctly, and was all but impossible to implement efficiently on old SPARCs with no divide hardware. Strings like "/*" could appear in the middle of a Cyrillic character, making your Russian text start a C comment. And more. It simply wasn't practical as an encoding: think what happens to that slash byte inside a Unix file name.
Subject: UTF-8 history
From: "Rob 'Commander' Pike" <r (at) google.com>
Date: Wed, 30 Apr 2003 22:32:32 -0700 (Thu 06:32 BST)
To: mkuhn (at) acm.org, henry (at) spsystems.net
Cc: ken (at) entrisphere.com

Looking around at some UTF-8 background, I see the same incorrect
story being repeated over and over.  The incorrect version is:
	1. IBM designed UTF-8.
	2. Plan 9 implemented it.
That's not true.  UTF-8 was designed, in front of my eyes, on a
placemat in a New Jersey diner one night in September or so 1992.

What happened was this.  We had used the original UTF from ISO 10646
to make Plan 9 support 16-bit characters, but we hated it.  We were
close to shipping the system when, late one afternoon, I received a
call from some folks, I think at IBM - I remember them being in Austin
- who were in an X/Open committee meeting.  They wanted Ken and me to
vet their FSS/UTF design.  We understood why they were introducing a
new design, and Ken and I suddenly realized there was an opportunity
to use our experience to design a really good standard and get the
X/Open guys to push it out.  We suggested this and the deal was, if we
could do it fast, OK.  So we went to dinner, Ken figured out the
bit-packing, and when we came back to the lab after dinner we called
the X/Open guys and explained our scheme.  We mailed them an outline
of our spec, and they replied saying that it was better than theirs (I
don't believe I ever actually saw their proposal; I know I don't
remember it) and how fast could we implement it?  I think this was a
Wednesday night and we promised a complete running system by Monday,
which I think was when their big vote was.

So that night Ken wrote packing and unpacking code and I started
tearing into the C and graphics libraries.  The next day all the code
was done and we started converting the text files on the system
itself.  By Friday some time Plan 9 was running, and only running,
what would be called UTF-8.  We called X/Open and the rest, as they
say, is slightly rewritten history.

Why didn't we just use their FSS/UTF?  As I remember, it was because
in that first phone call I sang out a list of desiderata for any such
encoding, and FSS/UTF was lacking at least one - the ability to
synchronize a byte stream picked up mid-run, with less that one
character being consumed before synchronization.  Becuase that was
lacking, we felt free - and were given freedom - to roll our own.

I think the "IBM designed it, Plan 9 implemented it" story originates
in RFC2279.  At the time, we were so happy UTF-8 was catching on we
didn't say anything about the bungled history.  Neither of us is at
the Labs any more, but I bet there's an e-mail thread in the archive
there that would support our story and I might be able to get someone
to dig it out.

So, full kudos to the X/Open and IBM folks for making the opportunity
happen and for pushing it forward, but Ken designed it with me
cheering him on, whatever the history books say.

-rob
That email chain includes the proposed FSS-UTF (File System Safe UTF) standard:
 The proposed UCS transformation format encodes UCS values in the range
 [0,0x7fffffff] using multibyte characters of lengths 1, 2, 3, 4, and 5
 bytes.  For all encodings of more than one byte, the initial byte
 determines the number of bytes used and the high-order bit in each byte
 is set.

 An easy way to remember this transformation format is to note that the
 number of high-order 1's in the first byte is the same as the number of
 subsequent bytes in the multibyte character:

    Bits  Hex Min  Hex Max         Byte Sequence in Binary
 1    7  00000000 0000007f 0zzzzzzz
 2   13  00000080 0000207f 10zzzzzz 1yyyyyyy
 3   19  00002080 0008207f 110zzzzz 1yyyyyyy 1xxxxxxx
 4   25  00082080 0208207f 1110zzzz 1yyyyyyy 1xxxxxxx 1wwwwwww
 5   31  02082080 7fffffff 11110zzz 1yyyyyyy 1xxxxxxx 1wwwwwww 1vvvvvvv

 The bits included in the byte sequence is biased by the minimum value
 so that if all the z's, y's, x's, w's, and v's are zero, the minimum
 value is represented.	In the byte sequences, the lowest-order encoded
 bits are in the last byte; the high-order bits (the z's) are in the
 first byte.

 This transformation format uses the byte values in the entire range of
 0x80 to 0xff, inclusive, as part of multibyte sequences.  Given the
 assumption that at most there are seven (7) useful bits per byte, this
 transformation format is close to minimal in its number of bytes used.
Importantly, it enables us to seek to the middle of a file or stream and read valid characters, or to handle a corrupted character:
All of the sequences synchronize on any byte that is not a Tx byte.
We can highlight the differences from FSS-UTF using RFC 3629, which uses the same tabular format:
The table below summarizes the format of these different octet types.
The letter x indicates bits available for encoding bits of the
character number.

Char. number range  |        UTF-8 octet sequence
   (hexadecimal)    |              (binary)
--------------------+---------------------------------------------
0000 0000-0000 007F | 0xxxxxxx
0000 0080-0000 07FF | 110xxxxx 10xxxxxx
0000 0800-0000 FFFF | 1110xxxx 10xxxxxx 10xxxxxx
0001 0000-0010 FFFF | 11110xxx 10xxxxxx 10xxxxxx 10xxxxxx
Notably:
The format is (as of RFC 3629, the first in the series which is not purely informational) limited to four bytes.
Each subsequent byte has two leading bits, 10, which is required to distinguish them from a leading byte.
The first prefix is 110 not 10, also to enable distinguishing leading and following bytes.
These changes lead to a less dense representation where three bytes store exactly 16 bits and four bytes can store 21 bits.
In Rob Pike's paper on their implementation, Hello World, lies the first mention of Rune I could find:
On the semantic level, ANSI C allows, but does not tie down, the notion of a wide character and admits string and character constants of this type. We chose the wide character type to be unsigned short. In the libraries, the word Rune is defined by a typedef to be equivalent to unsigned short and is used to signify a Unicode character.
It seems likely that "rune" originated here, as its a kind of synonym for character (char). Later, ISO C99 Standard: 7.24 introduced "extended multibyte and wide character utilities" including the wchar_t type, see The wchar_t mess. ISO C99's locale functionality can also be surprising, see this HN post on how isspace() changes with locale.
Interestingly, in Plan 9 C they used an unsigned short (16-bits), but in Go the type is instead a signed int (32-bits) to support additional code points added since 1992. Remember, this encoding was meant to replace a two-byte encoding for exactly 16 bits of data (the Basic Multilingual Plane). In the original email, Ken notes:
The 4, 5, and 6 byte sequences are only there for political reasons. I would prefer to delete these.
And aligned with that, the paper mentions:
UTFmax = 3, /* maximum bytes per rune */
Three bytes could represent a maximum of 16 bits, while four bytes can represent a maximum of 21 bits. In Go, UTFMax = 4, and a rune is equivalent to a signed 32-bit integer. In plan9port, UTFmax = 4, and Rune is an unsigned integer -- a change Russ Cox made in late 2009. The Linux man page utf-8(7) notes that ISO 10464 defined UCS-2, a 16-bit code space, and UCS-4, a 31-bit code space; which justifies the signed 32-bit integer representation.
So, we've established Rune as existing at least as early as 1992 when UTF-8 was introduced, and was inherited by Go through its Plan 9 C lineage. Was it in use elsewhere in 1992? Searching the internet, I get a few hits:
The setrunelocale() function and the other non-ANSI rune functions were inspired by Plan 9 from Bell Labs.
And further notes:
The 4.4BSD "rune" functions have been deprecated in favour of the ISO C99 extended multibyte and wide character facilities and should not be used in new applications.
Anything that requires heavy wizardry or black art to parse: core dumps, JCL commands, APL, or code in a language you haven't a clue how to read. Compare casting the runes, Great Runes.
Special display characters (for example, the high-half graphics on an IBM PC).
The Plan 9 rune functionality was incorporated into 4.4 BSD by Paul Borman, and became the ancestor to many of the uses of the term outside of the direct Plan 9 lineage. He would later join Google and contribute to the Go programming language 2. In machine/ansi.h, we can see that rune_t is defined as an int instead of as a unsigned short, with the following justification:
/*
 * Runes (wchar_t) is declared to be an ``int'' instead of the more natural
 * ``unsigned long'' or ``long''.  Two things are happening here.  It is not
 * unsigned so that EOF (-1) can be naturally assigned to it and used.  Also,
 * it looks like 10646 will be a 31 bit standard.  This means that if your
 * ints cannot hold 32 bits, you will be in trouble.  The reason an int was
 * chosen over a long is that the is*() and to*() routines take ints (says
 * ANSI C), but they use _RUNE_T_ instead of int.  By changing it here, you
 * lose a bit of ANSI conformance, but your programs will still work.
 *
 * Note that _WCHAR_T_ and _RUNE_T_ must be of the same type.  When wchar_t
 * and rune_t are typedef'd, _WCHAR_T_ will be undef'd, but _RUNE_T remains
 * defined for ctype.h.
 */
The files e.g. rune.h, runetype.h all bear the copyright notice:
This code is derived from software contributed to Berkeley by Paul Borman at Krystal Technologies.
A Krystal hamburger location
The only information I can find on Krystal Technologies is that it once owned krystal.com, and was later dragged into a dispute with the Krystal hamburger chain in 2000 (seven years after its mention in the rune files) which ended in a settlement.
FreeBSD still uses the rune types, e.g. in utf8.c, to provide wide character support for the UTF-8 locale.
The Unicode and ISO 10646 standards do not contain the term "rune" either. I reached out to Rob Pike on Bluesky to ask if "rune" did originate in Plan 9:
Actually Ken Thompson suggested it while the two of us were brainstorming for a type name that wasn't 'char'. He said triumphantly and I immediately agreed we had it.
Oh yes, and it was the name we needed in Plan 9 for UTF and ISO 10646, before Unicode and UTF-8 and decades before Go.
And later, Rob posted a confirmed origin date, thanking Geoff Collyer3 for searching through the Plan 9 dump:
The Plan 9 C source files /sys/src/libc/port/rune appeared in the daily backup on Dec 9, 1991, so the name was coined on the evening of the 8th.
So the term "rune" is over thirty years old, and has made its way from Plan 9 into 4.4 BSD and then several UNIX variants and C libaries, into Go and then into .NET, and through ports of libutf into Android.
Epilogue
Thanks to Adam Pritchard for noting some spelling errors on this post, which motivated me to write a small spelling utility for Acme, Spell, which wraps aspell's peculiar ispell-compatible output:
Button 2 clicking Spell in a window's tag opens a new +Spell window (or reuses an existing one) for the current directory, and writes misspelled words prefixed by its address. To navigate to a misspelled word, simply button 3 click on the address and make the correction.
The diner was the Corner Café in New Providence, New Jersey. We just called it Mom's, to honor the previous proprietor. I don't know if it's still the same, but we went there for dinner often, it being the closest place to the Murray Hill offices. Being a proper diner, it had paper placemats, and it was on one of those placemats that Ken sketched out the bit-packing for UTF-8. It was so easy once we saw it that there was no reason to keep the placemat for notes, and we left it behind. Or maybe we did bring it back to the lab; I'm not sure. But it's gone now.
Geoff Collyer was a member of the technical staff at Bell Labs. He recently spoke about Plan 9 on 64-bit RISC-V. ↩︎
https://connor.zip/posts/2025-04-23-noaa-receiptsNOAA Weather ReceiptsConnor Taffe2025-04-23T00:00:00-05:00Printing NOAA weather alerts on a receipt printer in near real-time
This weekend we had a bout of bad weather. Our secondhand NOAA weather radio sounded off repeatedly, local weather broadcasters breathlessly reported rotational formations on television, iPhone's buzzed with emergency alerts, and city sirens sounded announcing a Tornado Warning. Each of these mechanisms bases their operation on the National Weather Service forecast office in Little Rock (LZK), a part of the National Oceanic and Atmospheric Administration.
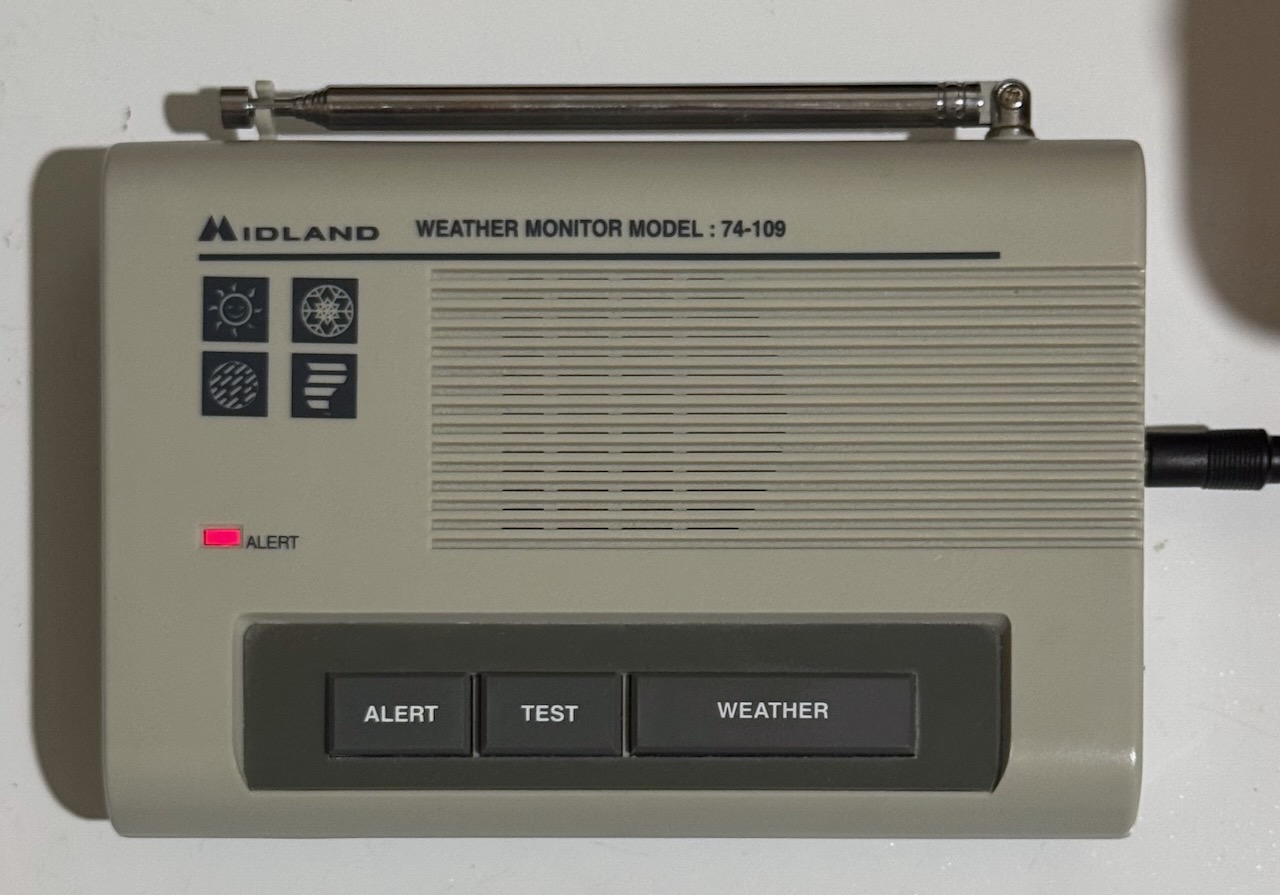
Midland Weather Monitor Model 74-109
NWS makes some of the most important information available through alerts which are broadcast over weather radio following the classic tone. Our weather radio listens for these tones and either blinks an alarm light, emits a siren, or tunes into the broadcast for a preset time before returning to ready mode. What if we could retrieve this information programmatically, and print it out on some sort continuous feed paper?
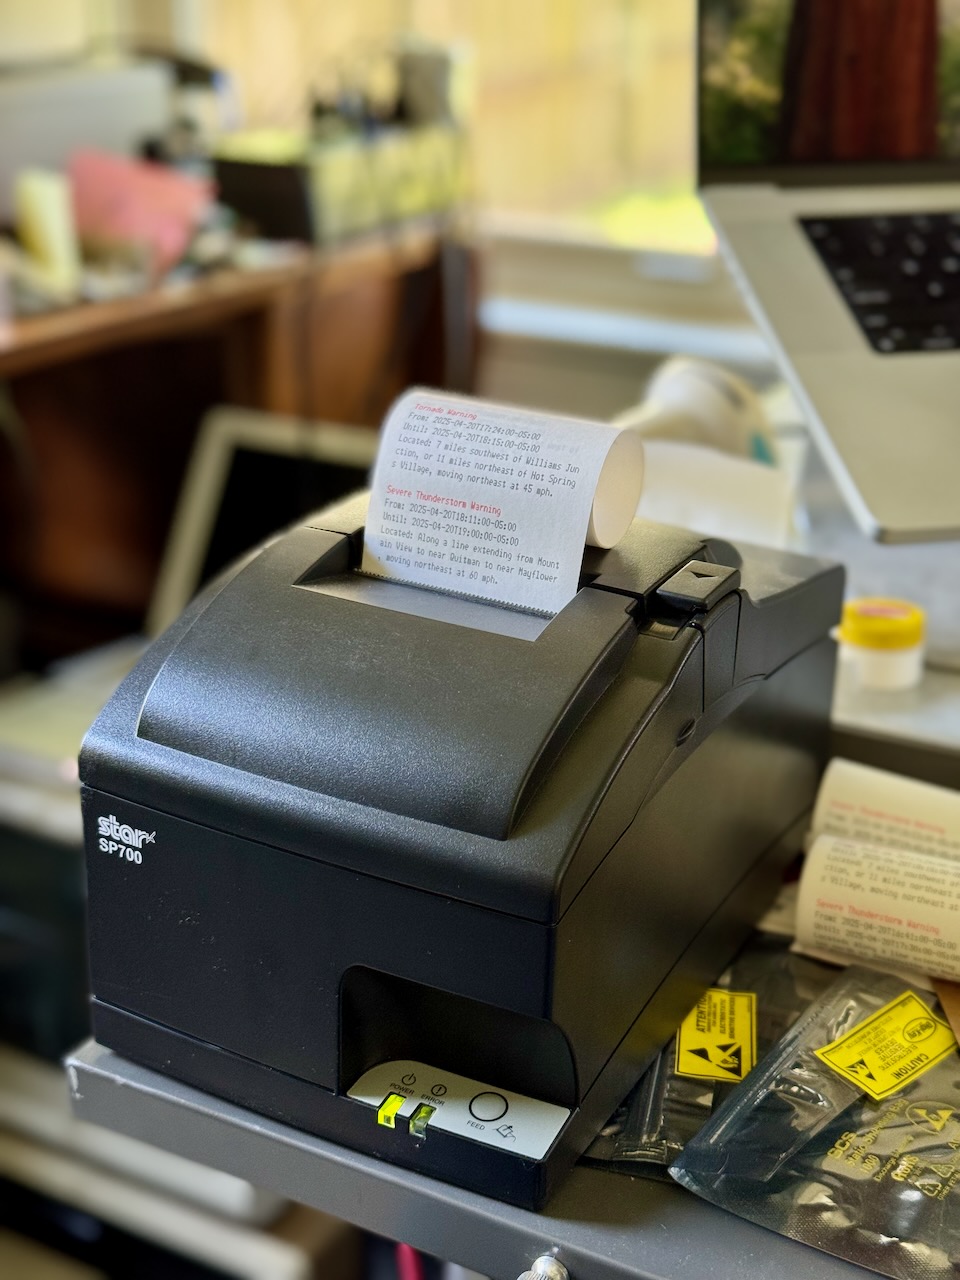
Star SP-700
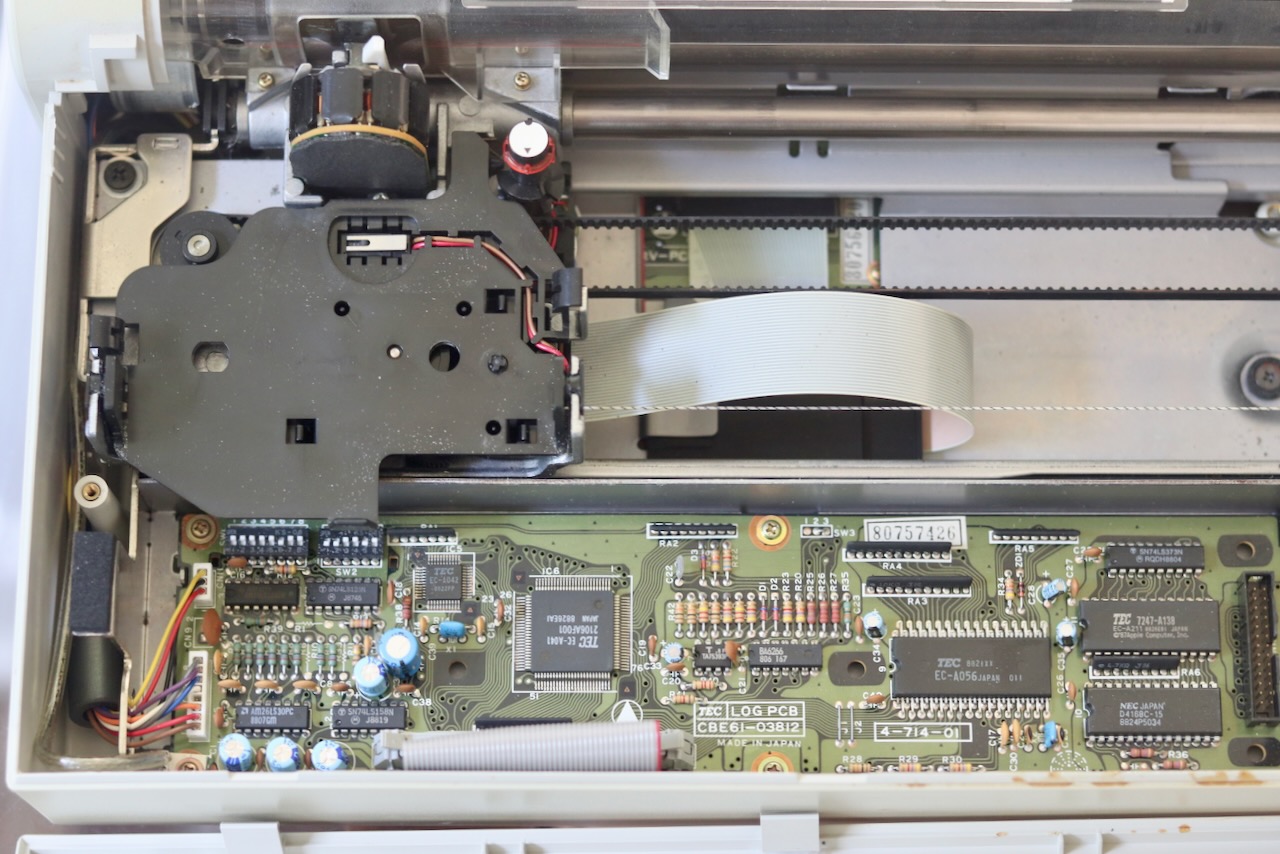
Star SP-700 receipt printer with printed weather alerts
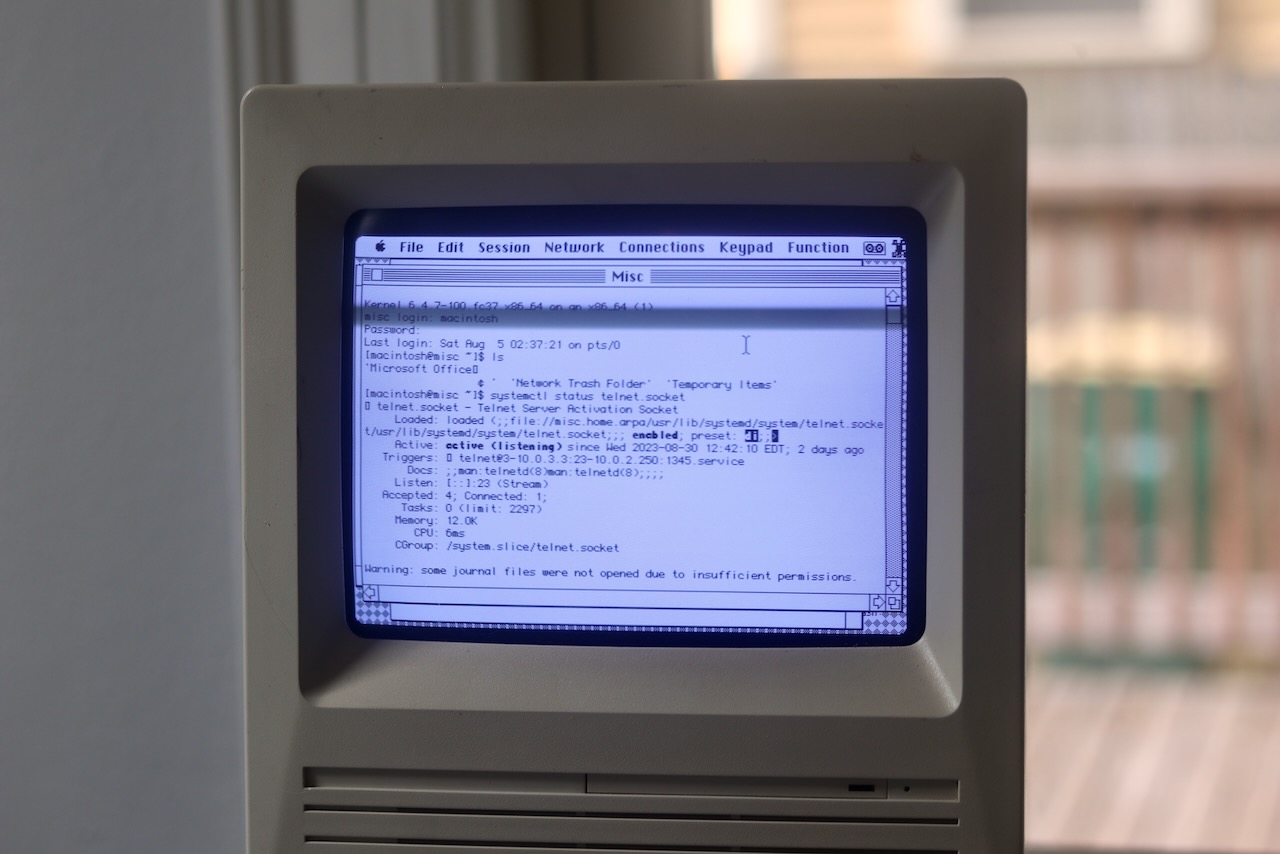
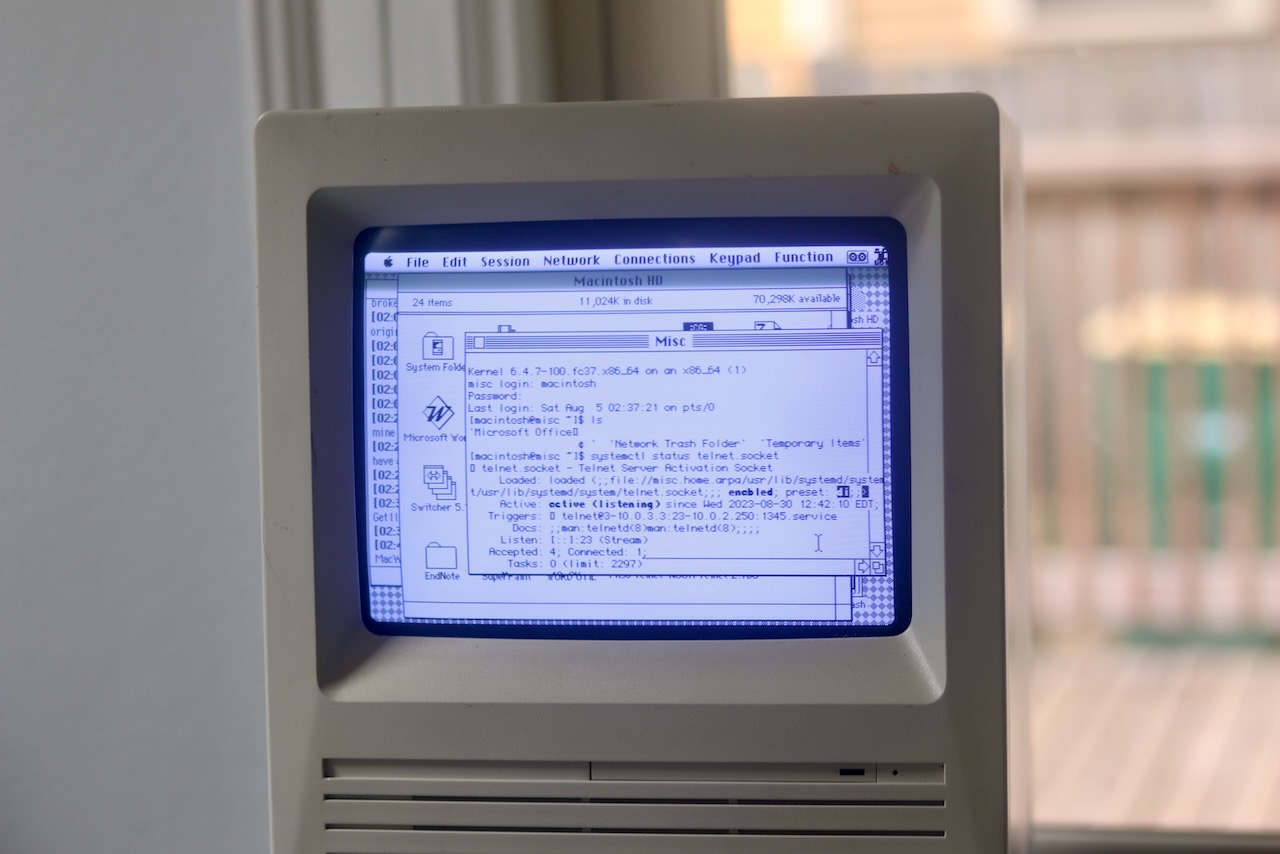
Months ago, I had stumbled upon a Star SP-700 high speed, two color, matrix printer at Goodwill; including the 10/100 Base-T interface module which allows for networking. The network interface provides an interactive web interface, support for DHCP, TLS, SNMP, FTP, and even telnet. And, because this is not a thermal receipt printer, there's no risk of BPS exposure.
Star SP-700 Web Interface
A telnet configuration session:
; telnet star-sp700.home.arpa
Trying 10.0.3.21...
Connected to star-sp700.home.arpa.
Escape character is '^]'.

Welcome to IFBD-HE07/08 TELNET Utility.
Copyright(C) 2005 Star Micronics co., Ltd.

<< Connected Device >>
    Device Model: SP742 (STR-001)
    NIC Product : IFBD-HE07/08
    MAC Address : 00:11:62:23:D2:E4

login: root
Password: ******
Hello root

=== Main Menu ===
  1) IP Parameters Configuration
  2) System Configuration
  3) Change Password
  5) SNMP
 96) Display Status
 97) Reset Settings to Defaults
 98) Save & Restart
 99) Quit

Enter Selection:
Like FTP, telnet support is surprisingly common on printer network cards, for example the HP LaserJet card. Another similarity, the Star SP-700 supports raw TCP/IP printing on port 9100, which in its case is plain ASCII text punctuated with control codes and using \r\n for line termination. The SCP700 Series Programmer's Manual enumerates the supported escape sequences in chapter nine. In my program, I used:
Sequence
Description
<ESC> "4"
Select highlight printing (red text)
<ESC> "4"
Cancel highlight printing
<ESC> "E"
Select emphasized printing (bold text)
<ESC> "F"
Cancel emphasized printing
NOAA API
NOAA makes these alerts available through a well-documented public API, which supports several response formats including two variants of JSON and Atom. The Atom feed contains standard fields, so it should be compatible with a RSS feed reader like NetNewsWire, however it isn't because it expects the Accept header to contain application/xml+atom or it defaults to GeoJSON. A simple proxy which sets the Accept header should make this possible though.
I opted for the JSON-LD option, which provides us with hyperlinked @ids and references to other objects, which can be fetched simply by following those links. We can even navigate it in our browser, but we'll see the default GeoJSON format; for instance here are the active alerts. Since the entire API is based on JSON-LD, the GeoJSON response still contains links.
By polling the active alerts endpoint, we can fetch an up-to-date set of alerts for events such as Tornado Warnings, Tornado Watches, Severe Thunderstorm Warnings, etc. Here is an example event pulled from that endpoint:
{
"@id":"https://api.weather.gov/alerts/urn:oid:2.49.0.1.840.0.2cb9a691a88714bdb5bbad42d2e4f414e66cb1d6.001.1",
"@type":"wx:Alert",
"id":"urn:oid:2.49.0.1.840.0.2cb9a691a88714bdb5bbad42d2e4f414e66cb1d6.001.1",
"areaDesc":"Faulkner, AR; Pulaski, AR; Saline, AR",
"geometry":"POLYGON((-92.67 34.51,-92.73 34.55,-92.47 34.9099999,-92.14 34.67,-92.67 34.51))",
"geocode":{"SAME":["005045","005119","005125"],"UGC":["ARC045","ARC119","ARC125"]},
"affectedZones":["https://api.weather.gov/zones/county/ARC045","https://api.weather.gov/zones/county/ARC119","https://api.weather.gov/zones/county/ARC125"],
"references":[],
"sent":"2025-04-20T18:31:00-05:00",
"effective":"2025-04-20T18:31:00-05:00",
"onset":"2025-04-20T18:31:00-05:00",
"expires":"2025-04-20T19:15:00-05:00",
"ends":"2025-04-20T19:15:00-05:00",
"status":"Actual",
"messageType":"Alert",
"category":"Met",
"severity":"Extreme",
"certainty":"Observed",
"urgency":"Immediate",
"event":"Tornado Warning",
"sender":"w-nws.webmaster@noaa.gov",
"senderName":"NWS Little Rock AR",
"headline":"Tornado Warning issued April 20 at 6:31PM CDT until April 20 at 7:15PM CDT by NWS Little Rock AR",
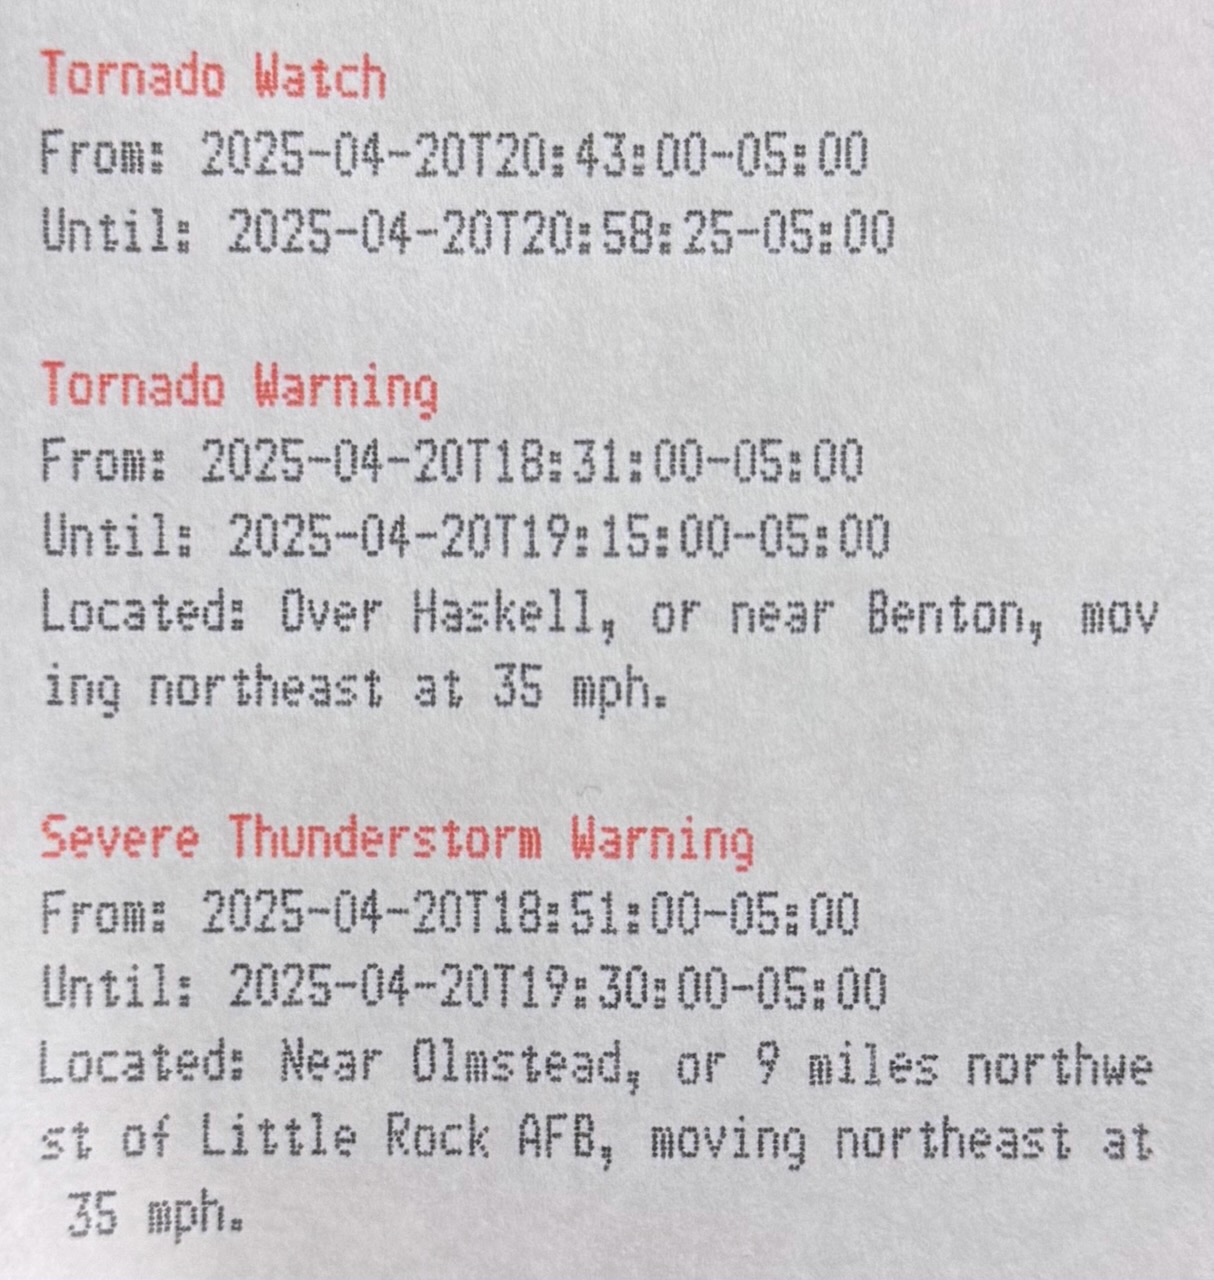
"description":"TORLZK\n\nThe National Weather Service in Little Rock has issued a\n\n* Tornado Warning for...\nSouthwestern Faulkner County in central Arkansas...\nCentral Saline County in central Arkansas...\nCentral Pulaski County in central Arkansas...\n\n* Until 715 PM CDT.\n\n* At 630 PM CDT, a severe thunderstorm capable of producing a tornado\nwas located over Haskell, or near Benton, moving northeast at 35\nmph.\n\nHAZARD...Tornado.\n\nSOURCE...Radar indicated rotation.\n\nIMPACT...Flying debris will be dangerous to those caught without\nshelter. Mobile homes will be damaged or destroyed.\nDamage to roofs, windows, and vehicles will occur. Tree\ndamage is likely.\n\n* Locations impacted include...\nAlexander... Otter Creek...\nHiggins... College Station...\nNatural Steps... Cammack Village...\nSouthwest Little Rock... Bauxite...\nIronton... Argenta...\nQuapaw Quarter... Vimy Ridge...\nHillcrest Neighborhood... Chenal Valley...\nWar Memorial Stadium... Bryant...\nPinnacle Mountain State Park... Maumelle...\nThe Heights... Shannon Hills...",
"instruction":"TAKE COVER NOW! Move to a basement or an interior room on the lowest\nfloor of a sturdy building. Avoid windows. If you are outdoors, in a\nmobile home, or in a vehicle, move to the closest substantial shelter\nand protect yourself from flying debris.",
"response":"Shelter",
"parameters":{"AWIPSidentifier":["TORLZK"],"WMOidentifier":["WFUS54 KLZK 202331"],"eventMotionDescription":["2025-04-20T23:30:00-00:00...storm...240DEG...30KT...34.54,-92.64"],"maxHailSize":["0.00"],"tornadoDetection":["RADAR INDICATED"],"BLOCKCHANNEL":["EAS","NWEM"],"EAS-ORG":["WXR"],"VTEC":["/O.NEW.KLZK.TO.W.0091.250420T2331Z-250421T0015Z/"],"eventEndingTime":["2025-04-21T00:15:00+00:00"],"WEAHandling":["Imminent Threat"],"CMAMtext":["NWS: TORNADO WARNING in this area til 7:15 PM CDT. Take shelter now. Check media."],"CMAMlongtext":["National Weather Service: TORNADO WARNING in this area until 7:15 PM CDT. Take shelter now in a basement or an interior room on the lowest floor of a sturdy building. If you are outdoors, in a mobile home, or in a vehicle, move to the closest substantial shelter and protect yourself from flying debris. Check media."]},
"replacedBy":"https://api.weather.gov/alerts/urn:oid:2.49.0.1.840.0.79caba517735181c1a45b17add84f4df80cd7466.001.1",
"replacedAt":"2025-04-20T18:55:00-05:00"
}
Under description and instructions, we can see text which is likely meant for the computerized voice synthesis program used by the NWS weather radio broadcasts. Most of this message is the same between similar events, however the "located over Haskell, or near Benton, moving northeast at 35 mph" is not present elsewhere in the message. We can speculate that it is built from lookup tables based on the eventMotionDescription information. We can also see specific subsections mentioned "Southwestern Faulkner County", "Central Saline County", which are possibly created by analyzing how the geometry polygon intersects these regions; the affectedZones only gives us a county-level list.
Program
I've been learning and using the Acme editor lately, part of plan9port, and as part of that I've been using the rc shell to write shell scripts. As outlined in the paper, rc solves some of the issues which make using bash a pain, notably the rules around quoting and handling spaces in variables. I'll introduce the program in pieces.
For the second, we first pass ?area=AR to the API (as seen above), and then use jq to filter using the affectedZones array after we've determined our zone URL, mine is Pulaski County or https://api.weather.gov/zones/county/ARC119.
For the third, we use a combination of jq wrangling and join. First, we output each entry as a sorted, tab separated file containing two fields: the value of @id, and the full JSON representation of the entry. We store the file in a state directory, with the name new:
Next, we join the new entries with a file of previously seen @ids, print lines with keys only found in the new file (previously unseen), and drop the key column to create a ndjson formatted stream.
if (! test -f state/seen)
    touch state/seen

join -v1 -t '	' state/new state/seen \
    | cut -f2
Now that we have our set of alerts, we can format them for printing using the escape codes mentioned above:
    | jq \
    --raw-output \
    '"\u001b4\u001bE\(.event)\u001b5\u001bF\r\nFrom: \(.effective)\r\nUntil: \(.expires)\(.description | [scan("(was|were) located ([^\\.]+.)")] as $location | if ($location | length > 0) then $location[0][1] | gsub("\n"; " ") | sub("(?<a>^[a-z])"; "\(.a|ascii_upcase)") | "\r\nLocated: \(.)" else "" end)\r\n"'
We need to dive into this jq query a bit. The first line is easy enough:
\u001b4\u001bE\(.event)\u001b5\u001bF\r\n
The unicode sequence for ESC (0x1b) is \u001b, it is followed by 4, E, then the value of event which is our header, e.g. "Tornado Warning", then 5, F, which disable the first two respectively. The line is terminated by \r\n. The next two lines are just as simple, but we have some complex logic for description.
\(.description | [scan("(was|were) located ([^\\.]+.)")] as $location | if ($location | length > 0) then $location[0][1] | gsub("\n"; " ") | sub("(?<a>^[a-z])"; "\(.a|ascii_upcase)") | "\r\nLocated: \(.)" else "" end)
All this happens within a \() which is how expressions are interpolated into strings, we pipe the value of description, a long text field, into scan. The scan function applies a regular expression and emits the capture groups as a stream. In our case, the regular expression (was|were) located ([^\\.]+.) matches text like "as located over Haskell, or near Benton, moving northeast at 35 mph," stopping at the first period. The first parenthetical is used to group the or of "was" and "were." The second wraps a regular expression which uses a inverse character class containing only a . (escaped with \, which is itself escaped with \) -- this matches one or more characters which are not a period. Followed by the metacharacter ., which could match any character but must be a period in this case. We wrap this entire scan in an array [...] -- this will either be [["was", "over Haskell, or near Benton, moving northeast at 35\nmph."]] on a match (doubly nested) or [] on no match.
To capture all the matches for each input string, use the idiom [ expr ], e.g. [ scan(regex) ]. If the regex contains capturing groups, the filter emits a stream of arrays, each of which contains the captured strings.
We set this to a variable so it can be referenced multiple times in the rest of the rule, $location. Next, we check the length of the array -- if there is a match it will be length one (one array of matches), otherwise zero. In the case we have matched to some location information, we replace any newlines with spaces using gsub, then we replace the first character with its uppercase representation using sub and a named capture group a. Finally, we add a new line with our location information preceded by a field name, otherwise we print no line at all.
Finally, we use our own tcpw command, which simply writes to a TCP socket at a given address. Think nc or dial from plan9port, but which doesn't wait for the connection to close.
Since we use the rc shell, we need to include plan9port in our docker image. Doing so is fairly straightforward using the golang image for alpine, simply install a few prerequisites, clone the repository, add the bin to your $PATH, and run the install script:
FROM golang:1.24.2-alpine3.21

RUN apk add --no-cache \
	jq \
	curl \
	git \
	build-base \
	linux-headers \
	perl

# Install plan9port (works as of 9da5b4451365e33c4f561d74a99ad5c17ff20fed)
ENV PLAN9=/usr/src/plan9port
ENV PATH="$PATH:$PLAN9/bin"
WORKDIR /usr/src/plan9port
RUN git clone https://github.com/9fans/plan9port.git . && \
	./INSTALL
My standard deploy script works as follows:
#!/usr/bin/env rc
flag e +
flag x +

tag=`{git rev-parse --short HEAD}
image='us-south1-docker.pkg.dev/homelab-388417/homelab/weather'

# Build image
docker buildx build --platform linux/amd64 . --tag $image:$tag
docker tag $image:$tag $image:latest
docker push --quiet $image:$tag
docker push --quiet $image:latest

yq 'setpath(["spec", "template", "spec", "containers", 0, "image"]; "'$image:$tag'")' <k8s/deployment.yaml | kubectl apply -f -
We first grab the current commit hash to use for a tag, then we build and push the image. Finally, we use yq to replace the container image and pass to kubectl for application to the cluster.
In Acme, ensure BUILDKIT_PROGRESS=plain is set so that the output can be seen clearly in win.
https://connor.zip/posts/2025-01-01-tv-tunerTV TunerConnor Taffe2025-01-28T00:00:00-05:00Watching over-the-air broadcast TV with Tvheadend
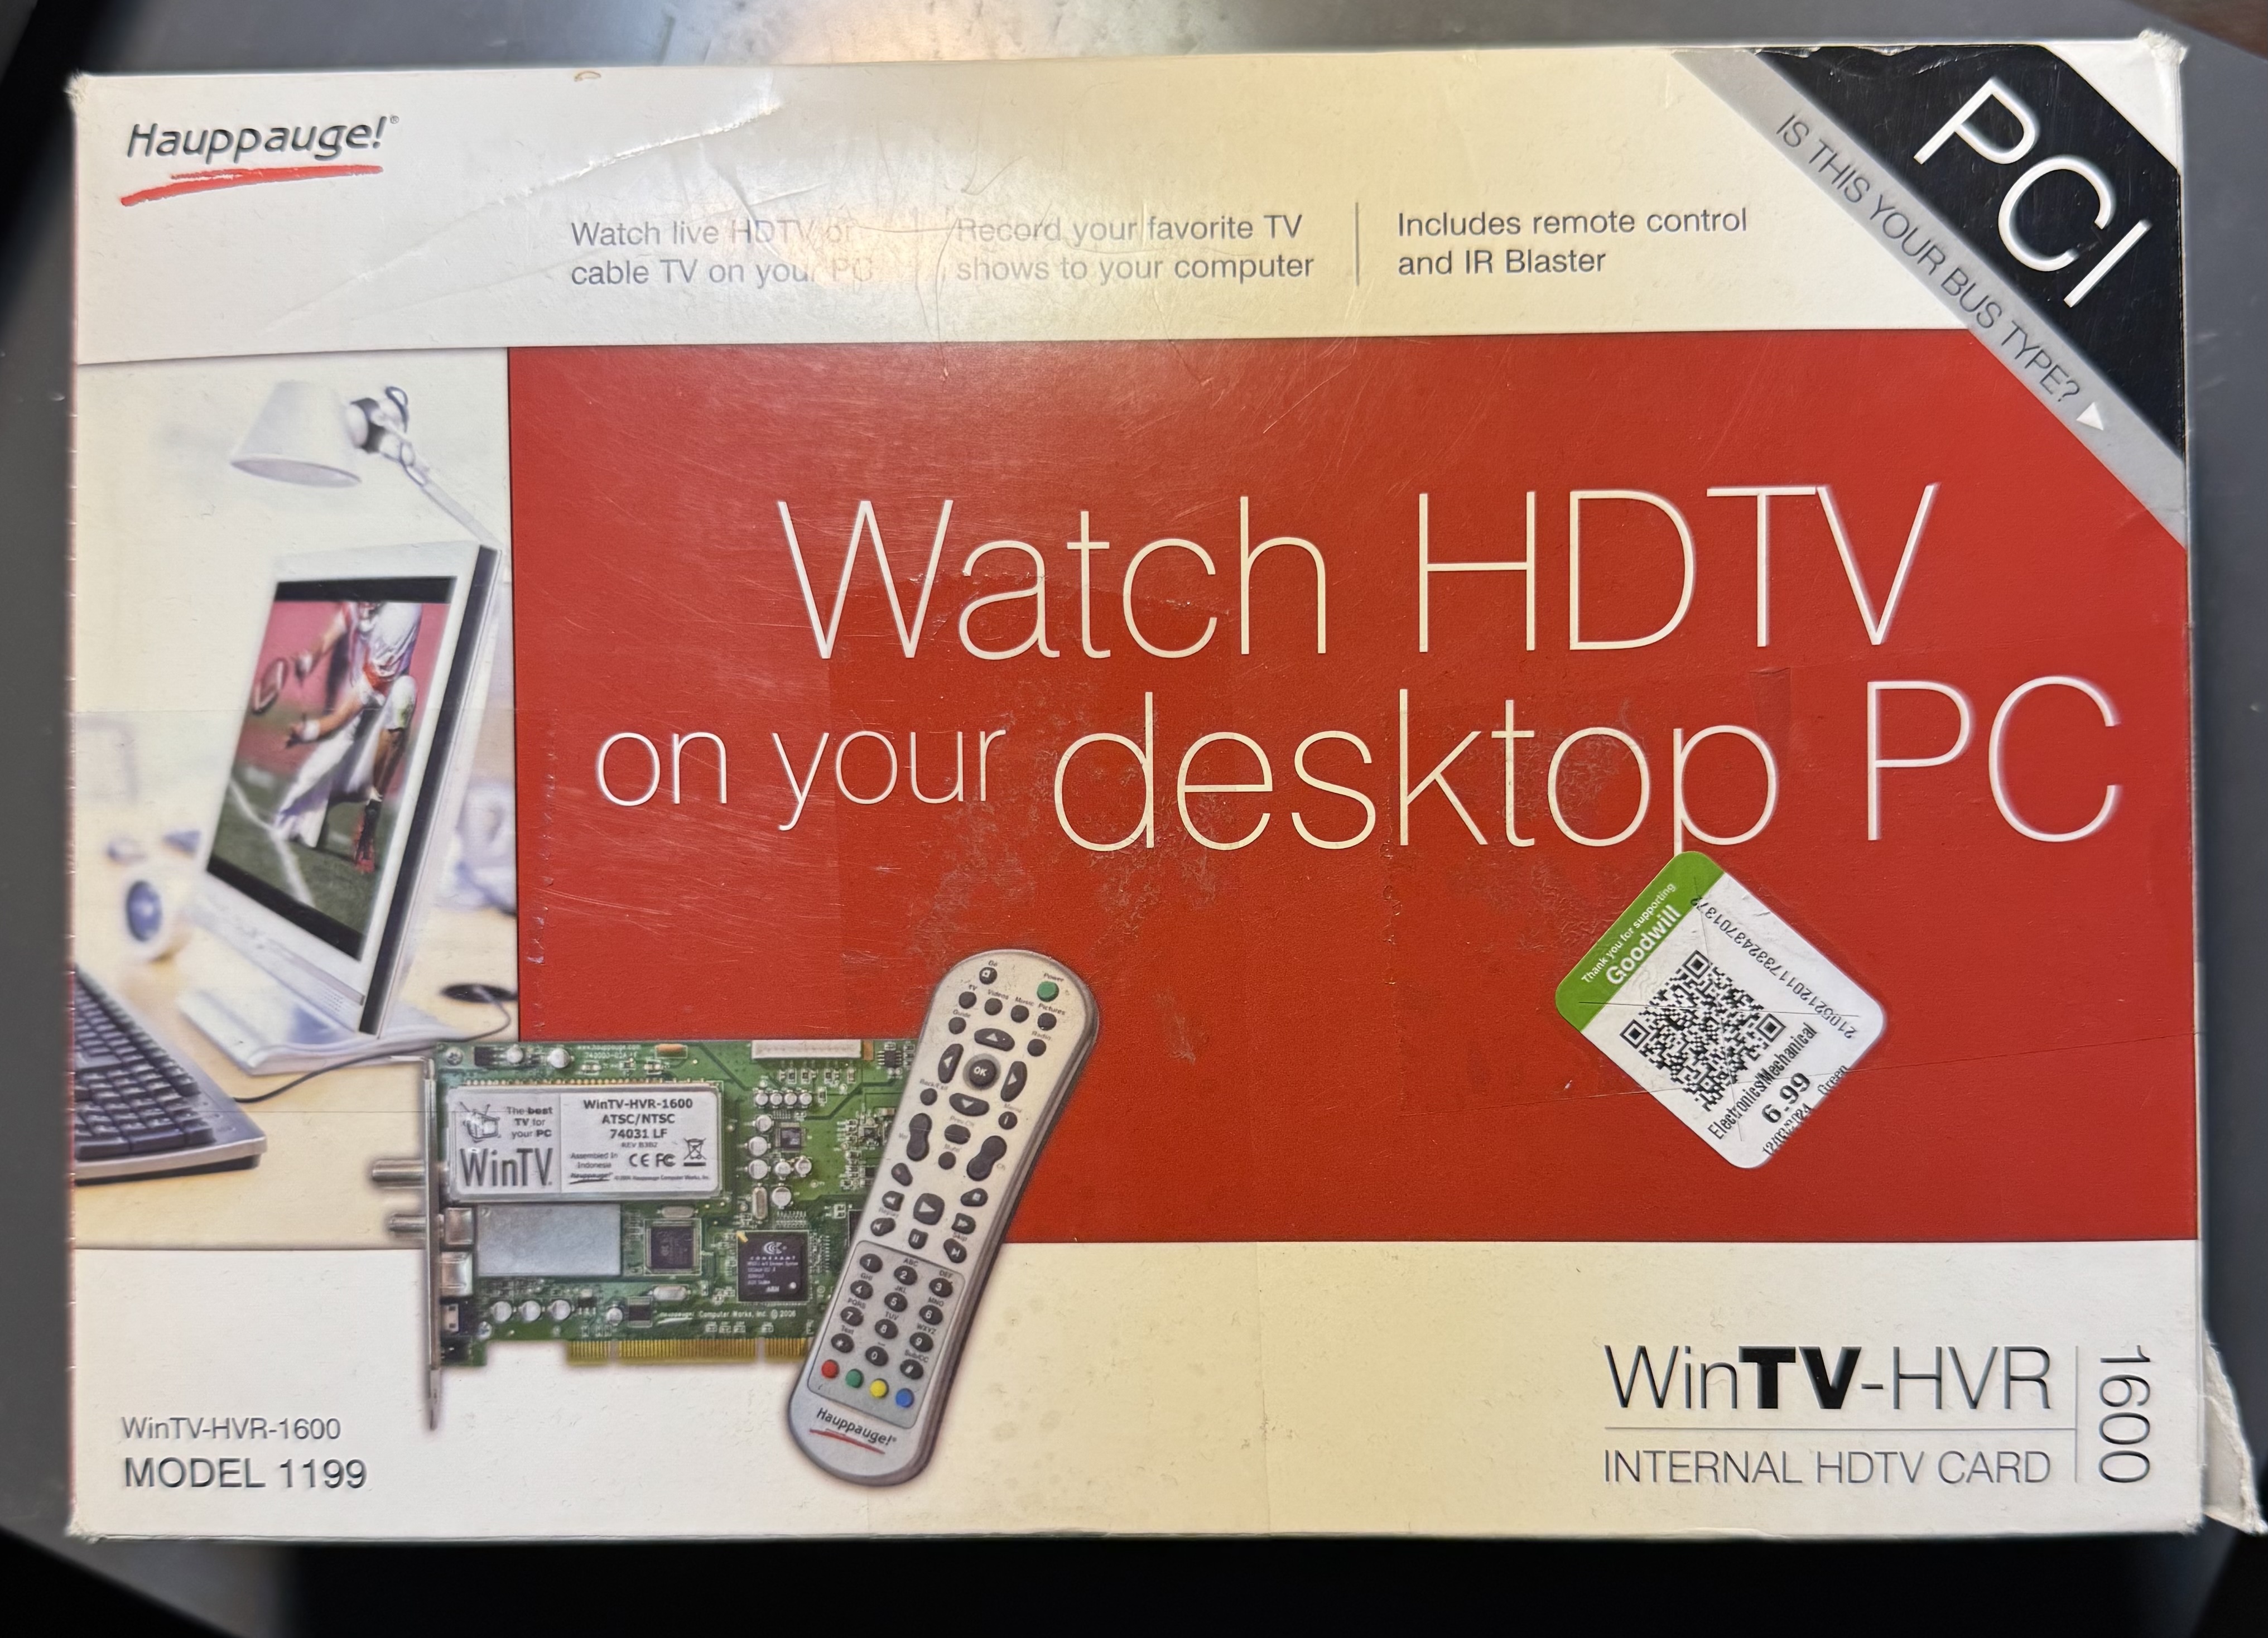
I recently stumbled upon a boxed Hauppauge WinTV-HVR-1600 PCI TV Tuner card at Goodwill, and wondered if I could use it broadcast live TV over my network. I installed it into an available PCI slot on an old Dell Optiplex 755, and attached an antenna.
Hauppauge WinTV-HVR 1600 box
We can see the card is recognized over PCI:
; lspci | grep video
03:00.0 Multimedia video controller: Conexant Systems, Inc. CX23418 Single-Chip MPEG-2 Encoder with Integrated Analog Video/Broadcast Audio Decoder
We can then see the cx18 driver for that chip loaded on boot:
Then do a scan, in this case outputting a channel list in VLC playlist format:
; sudo w_scan2 -c US -L > chans.xspf
TVHeadEnd
Tvheadend is an open source TV streaming and recording service. To install tvheadend on Ubuntu, follow the Linux Install Documentation, which amounts to running:
Inspect the script to ensure it hasn't been tampered with. It adds the tvheadend/tvheadend repository at /etc/apt/sources.list.d/tvheadend-tvheadend.list, installs their GPG signing key, and ensures some dpkg components like apt-transport-https are installed.
Then install tvheadend:
sudo apt install tvheadend
You will be prompted for a superuser username and password for the web interface. The tvheadend service is started by default:
systemctl status tvheadend.service
To see the full logs:
journalctl -u tvheadend.service
Which reminds us of the port tvheadend is listening on:
Jan 15 01:10:52 typhoon systemd[1]: Started tvheadend.service - Tvheadend - a TV streaming server and DVR.
Jan 15 01:10:52 typhoon tvheadend[14972]: config: Using configuration from '/var/lib/tvheadend'
Jan 15 01:10:52 typhoon tvheadend[14972]: http: Starting HTTP server 0.0.0.0:9981
Jan 15 01:10:52 typhoon tvheadend[14972]: htsp: Starting HTSP server 0.0.0.0:9982
To allow apps which don't support our self-signed CA which we'll use with a reverse proxy below, we need to enable listening on 0.0.0.0, and add a firewall rule. Define a new application profile in /etc/ufw/applications.d/tvheadend:
[Tvheadend]
title=Tvheadend TV streaming server
description=Tvheadend is the leading TV streaming server for Linux.
# HTTP, HTSP
ports=9981,9982/tcp
Now, the mDNS record generated by the Avahi integration for autodiscovery will match the available ports. Apps like TvhClient on iOS can auto-discover the server using this record. Ideally we would load the self-signed certificate onto the iOS device, then modify the Avahi configuration to reflect the reverse proxied ports 80 and 443 with _http._tcp and _https._tcp. I'm not certain how to handle the HTSP port.
Continue through the wizard's setup process, associate your card (mine is detected as a Samsung S5H1409 QAM/8VSB) with an ATSC-T network, then associate that network with the us-ATSC-center-frequencies-8VSB mux. Once the setup is complete, a scan will commence which takes several minutes. I don't have cable, so the ATSC-C (cable) network is not useful.
From the UI, under the Configuration tab, you can see the relevant objects:
Under DVB Inputs, TV adapters: the Linux /dev/dvb/adapter0 device and the Samsung S5H1409 frontends for ATSC-T (terrestrial) and ATSC-C (cable).
Under DVB Inputs, Networks: the ATSC-T and ATSC-C networks which each adapter is associated with.
Under DVB Inputs, Muxes: a list of frequencies, each associated with a network.
Under DVB Inputs, Services: a list of channels with their number and name, each associated with a mux. For each mux with a successful scan, there will be an associated service. The Map Services operation will create a channel for each service.
Under Channel / EPG, Channels: a list of channels, each associated with a service. These are the channels which you will see in your Tvheadend clients.
Under Channel / EPG, EPG Grabber Modules: the list of Electronic Program Guide grabber modules. The Guide is constructed from either over-the-air EPG information from the default EIT module, or from service such as XMLTV using the xmltv commands.
The files under /var/lib/tvheadend/ represent each of these objects.
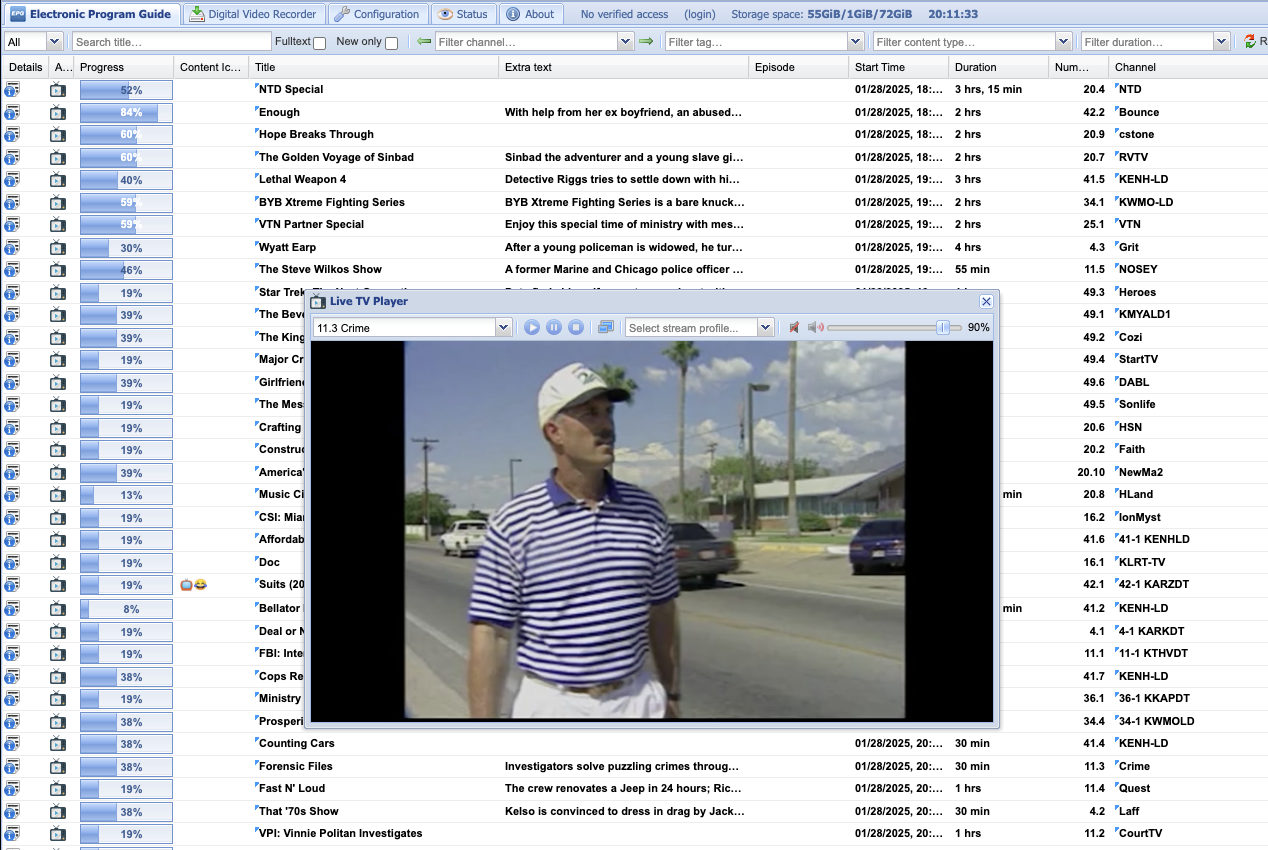
The Web UI uses a transcoding profile, webtv-h264-aac-matroska, to transform the raw stream from the tuner into a stream playable in the browser. This extra processing lead to stuttering and audio issues. Using a client like TvhClient on iOS which uses VLC to process the raw stream on-device provides the best experience.
Tvheadend UI displaying a broadcast channel stream of Forensic Files
Tvheadend supports MPEG-TS encoded over-the-network streams, however guide (EPG) information must be provided by another source, e.g. XMLTV. See an example of some of these channels at tv.garden. Some IPTV channels are documented at iptv-org/iptv, available as m3u files. Each m3u file contains URLs which point to yet more m3u or m3u8 (UTF-8) files, this continues recursively until a file contains a sequence of .ts (MPEG-TS) files. Tvheadend supports some of these streams by default, but can support more with the help of ffmpeg using pipe:// URIs:
The /var/lib/tvheadend/ffmpeg-wrapper-m3u.sh script to rewrite m3u files:
#!/usr/bin/env bash
set -euo pipefail

curl -sSL "$1" | awk '/^#/ { print; next } { print "pipe:///var/lib/tvheadend/ffmpeg-wrapper.sh", $0 }'
And the /var/lib/tvheadend/ffmpeg-wrapper.sh script which re-encodes MPEG-TS streams:
Under Configuration, DVB Inputs, Networks, choose Add and then select IPTV Automatic Network. Name the network, e.g. iptv-org/pbs, toggle Enabled and Create Bouquet, set the maximum number of input streams to 20 to prevent over-loading the system with scans (or uncheck scan after creation), in the URL field place pipe:///var/lib/tvheadend/ffmpeg-wrapper-m3u.sh followed by a space and the URL of your m3u file, for example the raw link to the Github us_pbs.m3u file, https://raw.githubusercontent.com/iptv-org/iptv/refs/heads/master/streams/us_pbs.m3u.
The system will pipe the m3u file through our ffmpeg-wrapper-m3u.sh script, which will rewrite each m3u8 URL entry with a pipe:///var/lib/tvheadend/ffmpeg-wrapper.sh URI to reformat the stream. Then, the system scans each channel and determines if it contains a broadcast. If it does, a mux and a corresponding service are created. Under Configuration, DVB Inputs, Services select Map Services to create channels from each service.
Now, these additional IPTV channels will be available as channels in clients, but without guide information.
Broadcastify
As an example, using ffmpeg we can add audio-only MPEG-A streams to Tvheadend. On broadcastify.com, you can locate these streams once playing in your browser's network tab. They are in the form, https://broadcastify.cdnstream1.com/{id}, where {id} is the feed number.
Under Configuration, DVB Inputs, Networks, choose Add then select IPTV. Name the network, e.g. IPTV Manual Network, toggle Enabled. This network can be reused for any manually added IPTV streams in future.
Navigate to the Muxes tab, choose Add. For Network select our newly created IPTV Manual Network, then set EPG Scan to Disabled since this channel has no EPG information. Under URL place pipe:///var/lib/tvheadend/ffmpeg-wrapper.sh https://broadcastify.cdnstream1.com/{id} replacing {id} with your feed id. Set the Mux and Service name with the name of the feed. Click Create.
The new Mux should be automatically scanned. On your server, you should see this scan under journalctl -fu tvheadend.service.
Navigate to Services, you should find a new channel with the name set in step two. Choose Map Services, then Map Selected Services, then locate your service. Click Map Services.
Under Configuration, Channel / EPG, Channels, you should see your new service as a channel.
On your client, you'll now see the new channel using the service name set in step two. Playing the channel will stream the MPEG-A stream through ffmpeg to create an MPEG-TS steam for Tvheadend.
Reverse Proxy
For my purposes, I want the HTTP interface to listen on localhost and to proxy to it from nginx listening on the HTTP standard port 80. That way, I can assign dvr.home.arpa to this machine and have that host route to the tvheadend web interface. To do that, we can edit $OPTIONS used by the systemd service at /etc/default/tvheadend and add the --bindaddr option specified in man tvheadend to look as below:
OPTIONS="-u hts -g video --bindaddr 127.0.0.1"
Then edit the config at /var/lib/tvheadend/config, gleaning some documentation from config.c. Enabling proxy allows for X-Forwarded-For support.
To serve HTTPS on 443 via nginx, we need certificates. I use cfssl as described in my post on PKI, after adding servers/typhoon/typhoon.home.arpa.json and adding the expected cert and key files as make targets, we simply run make to construct the certs and back them up.
Remember to add the intermediate and root certificates to form the full chain:
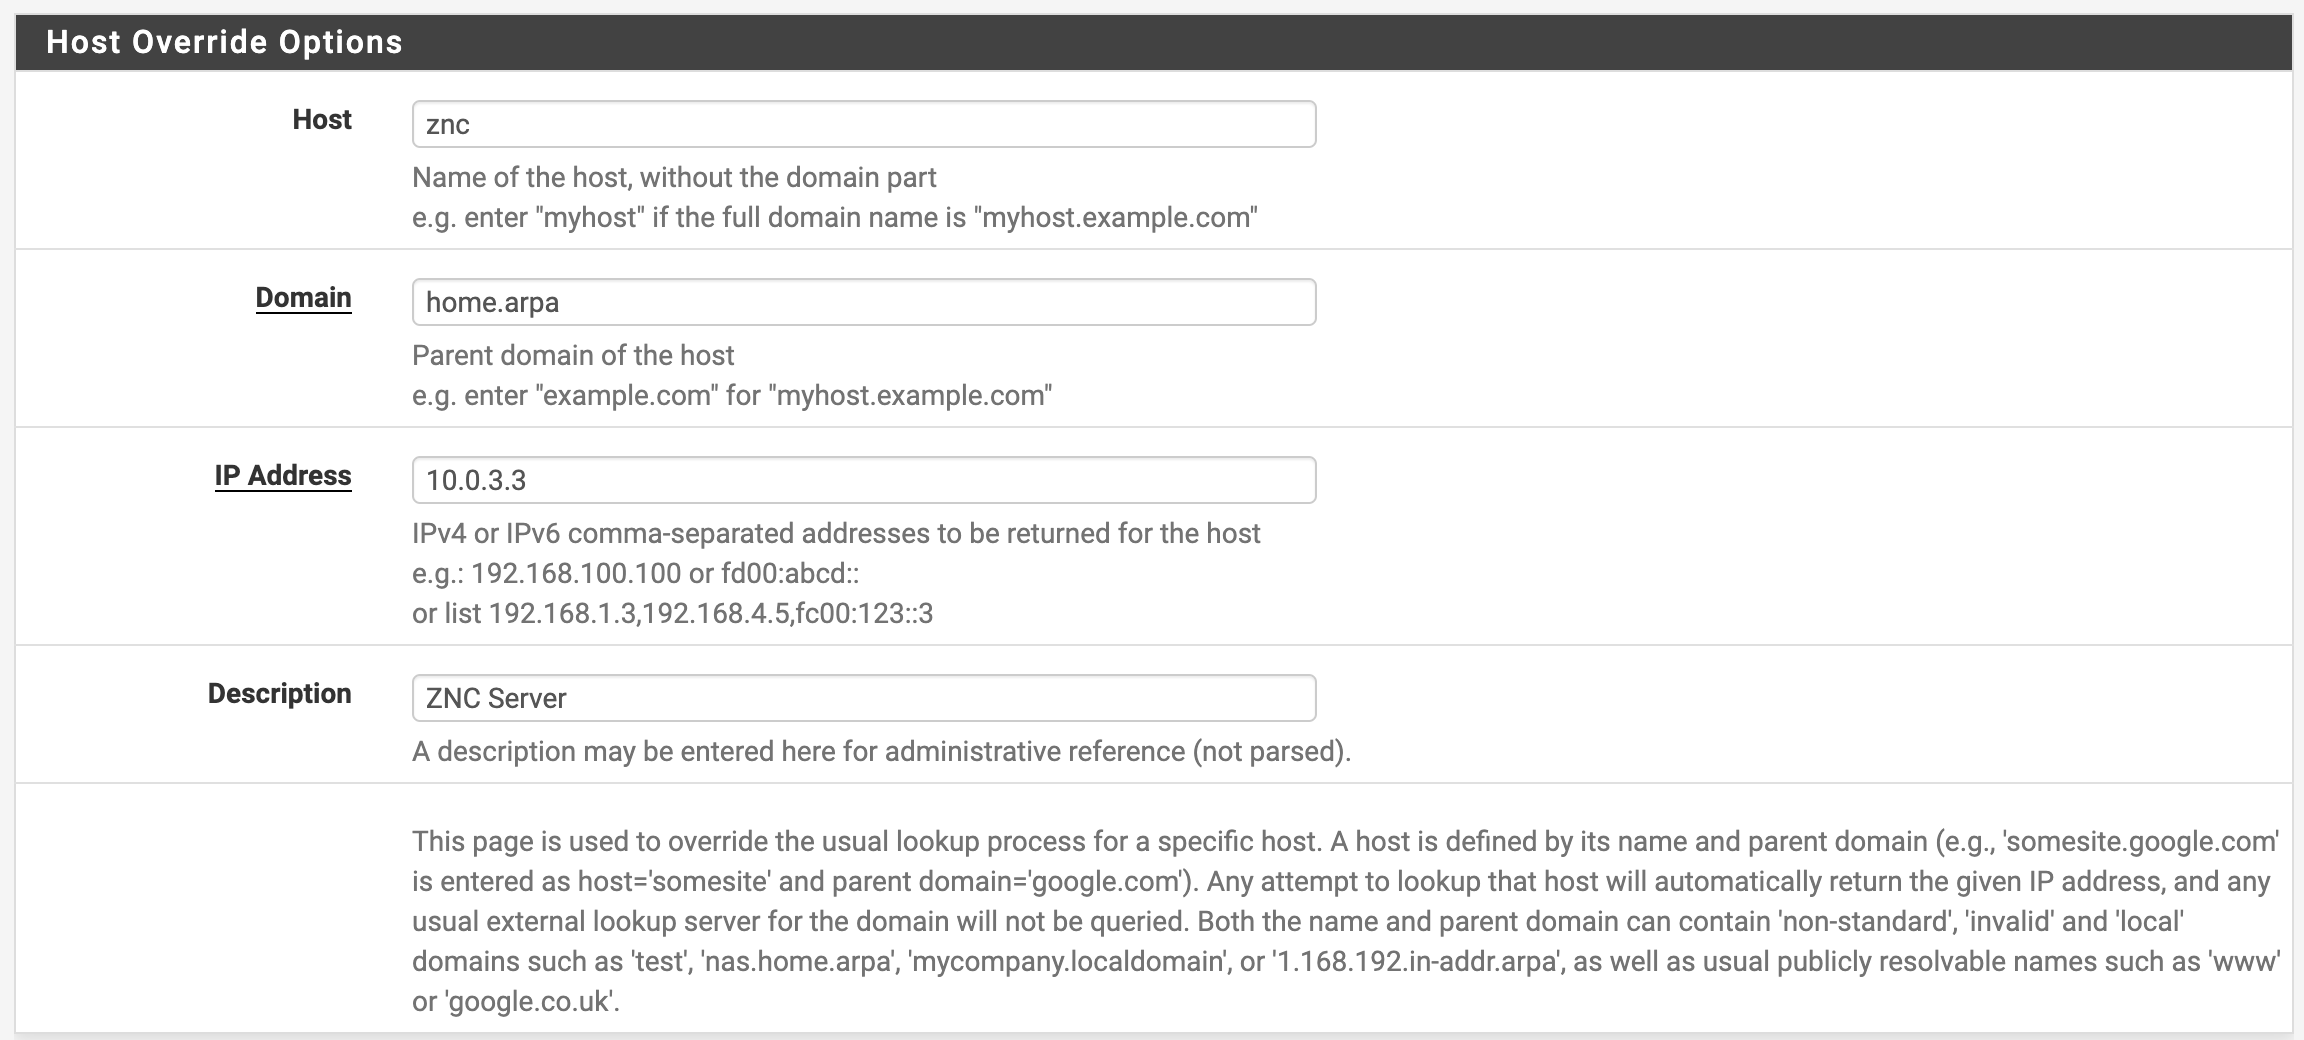
After adding a host override in pfSense to point dvr.home.arpa at the IP statically assigned through DHCP to our desktop, we can navigate to dvr.home.arpa.
https://connor.zip/posts/2024-12-22-add-network-interfaceAdd a Network Interface with UbuntuConnor Taffe2024-12-22T00:00:00-05:00Configuring a PCIe 10GbE SFP+ card to DHCP at boot time
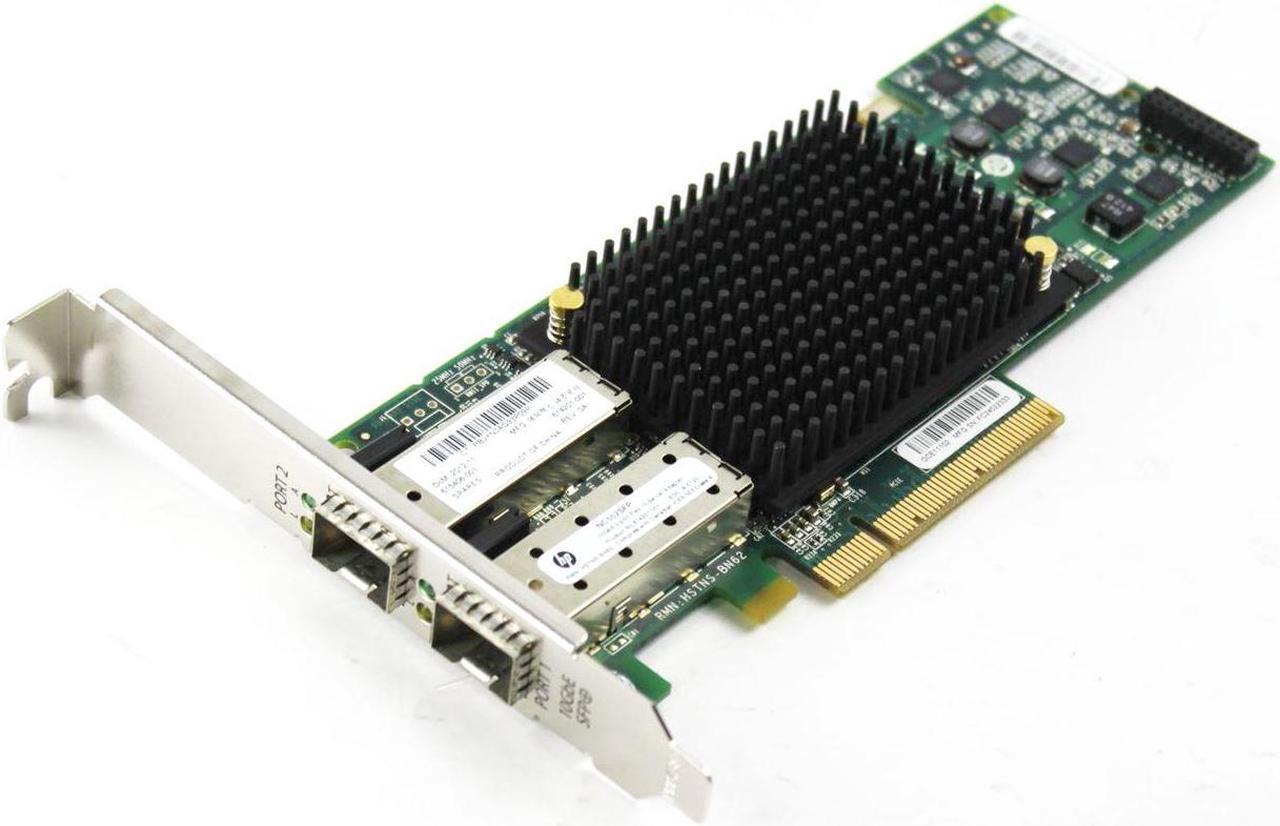
I recently needed to add a new network card to a Dell Optiplex 755 running Ubuntu Server. It has an integrated GbE port, but I'd already run fiber to this corner of the room and had a spare PCIe HP NC552SFP 10GbE 2-port SFP+ card, sporting a couple of Cisco SFP-10G-SR SFP+ modules. This combo is an affordable way to use 10GbE fiber at home, at $12/card and $8/module.
HP NC552SFP 10GbE 2-port SFP+ card
After adding the card and rebooting the machine, it connected via the existing USB WiFi adapter, but not the 10GbE interface. The interface is shown under ip addr as enp1s0f0 and enp1s0f1 (one interface per port), but doesn't have an address assigned -- meaning Linux recognizes and supports the card but hasn't DHCP'd on that interface. Running sudo dhclient assigns it an address.
Ubuntu uses netplan, to add a new interface which will come up and DHCP on boot, we need to add it to the config at /etc/netplan. One way to do this is via the netplan command.
To add a new dual-port 10GbE SFP+ card, we can use:
sudo netplan set "ethernets.enp1s0f0={dhcp4: true, optional: true}"
sudo netplan set "ethernets.enp1s0f1={dhcp4: true, optional: true}"
Which will generate an /etc/netplan/70-netplan-set.yaml file which looks like:
After restart, it'll pick up the new interfaces. We can see the DHCP'd addresses like so:
; ip addr
...
3: enp1s0f0: <NO-CARRIER,BROADCAST,MULTICAST,UP> mtu 1500 qdisc mq state DOWN group default qlen 1000
    link/ether 10:60:4b:94:c2:90 brd ff:ff:ff:ff:ff:ff
4: enp1s0f1: <BROADCAST,MULTICAST,UP,LOWER_UP> mtu 1500 qdisc mq state UP group default qlen 1000
    link/ether 10:60:4b:94:c2:94 brd ff:ff:ff:ff:ff:ff
    inet 10.0.3.5/16 metric 100 brd 10.0.255.255 scope global dynamic enp1s0f1
       valid_lft 5063sec preferred_lft 5063sec
    ...
Only one of the ports is assigned because the other is not connected.
Testing with iperf3 shows only about 1.4 Gbps between this machine and a Fedora Linux VM on ESXi on an HP DL380 using the same card, through an IBM RackSwitch. To the pfSense VM which serves as my router, I can only get around 1 Gbps (1.4 Gbps using -P 8), which seems to be an issue with pfSense and the vmx devices. Between two Linux VMs iperf3 reports 11.1 Gbps, but only 1.03 Gbps between a Linux machine and pfSense (1.88 using -P 8).
WiFi
I had previously configured a TP-LINK Archer T2U Plus USB WiFi adapter. To configure it, first determine the device name via ip addr (in my case, wlx984827e92b5a), then configure netplan with the SSID and password:
https://connor.zip/posts/2024-12-15-vt220VT220Connor Taffe2024-12-15T00:00:00-05:00Using a VT220 with a MacBook Pro
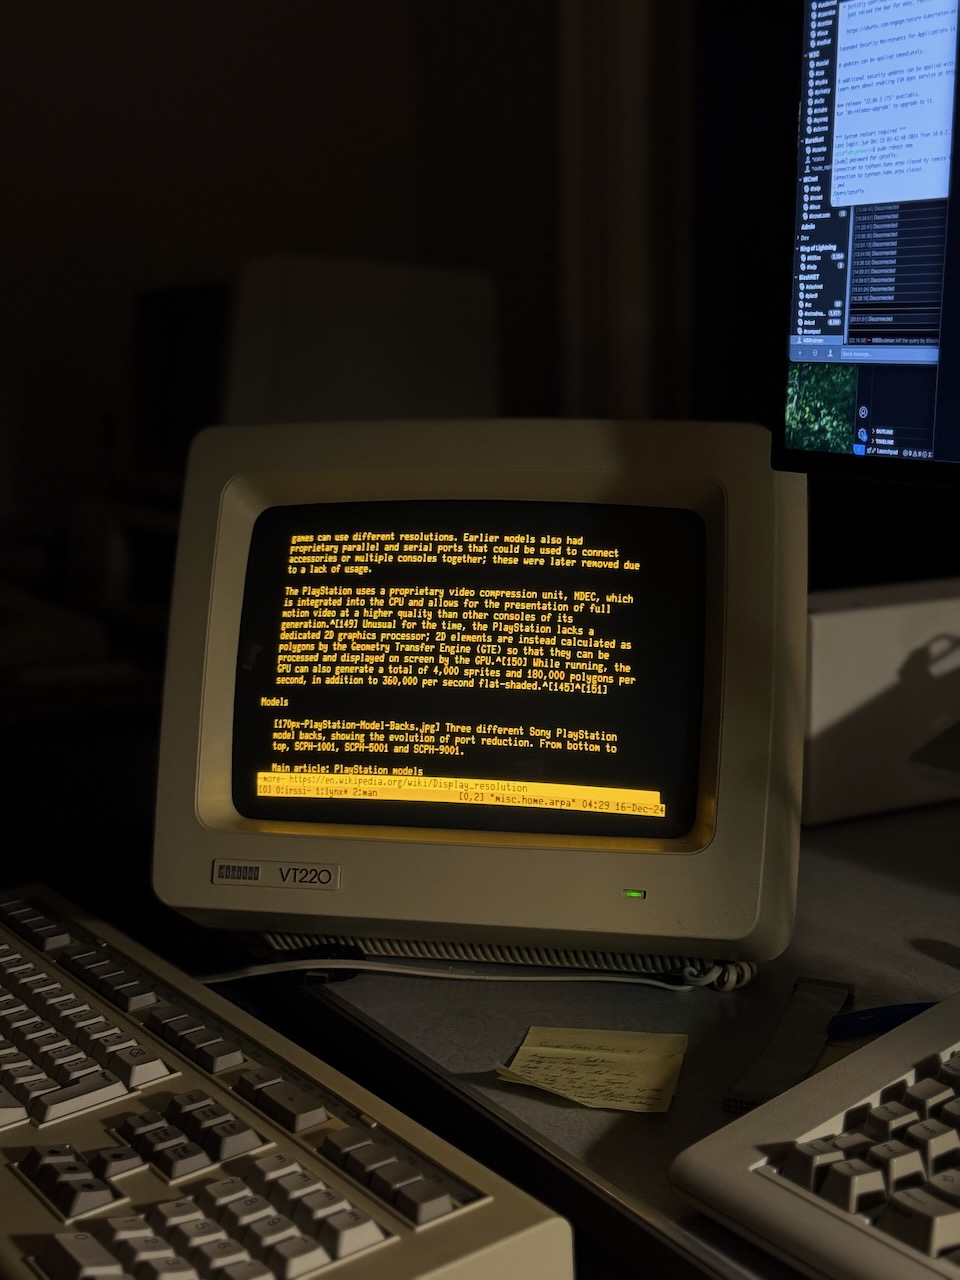
A few years ago, I stumbled upon a DEC VT220 on Facebook Marketplace labeled "old monitor." Of course I messaged the seller immediately and drove the half hour to meet at a Starbucks. I'd set it up before on a modern macOS system, but had issues with corrupt characters on scroll and placed it on a shelf. While testing an IBM 3151, I dusted it off and realized it's actually fully functional!
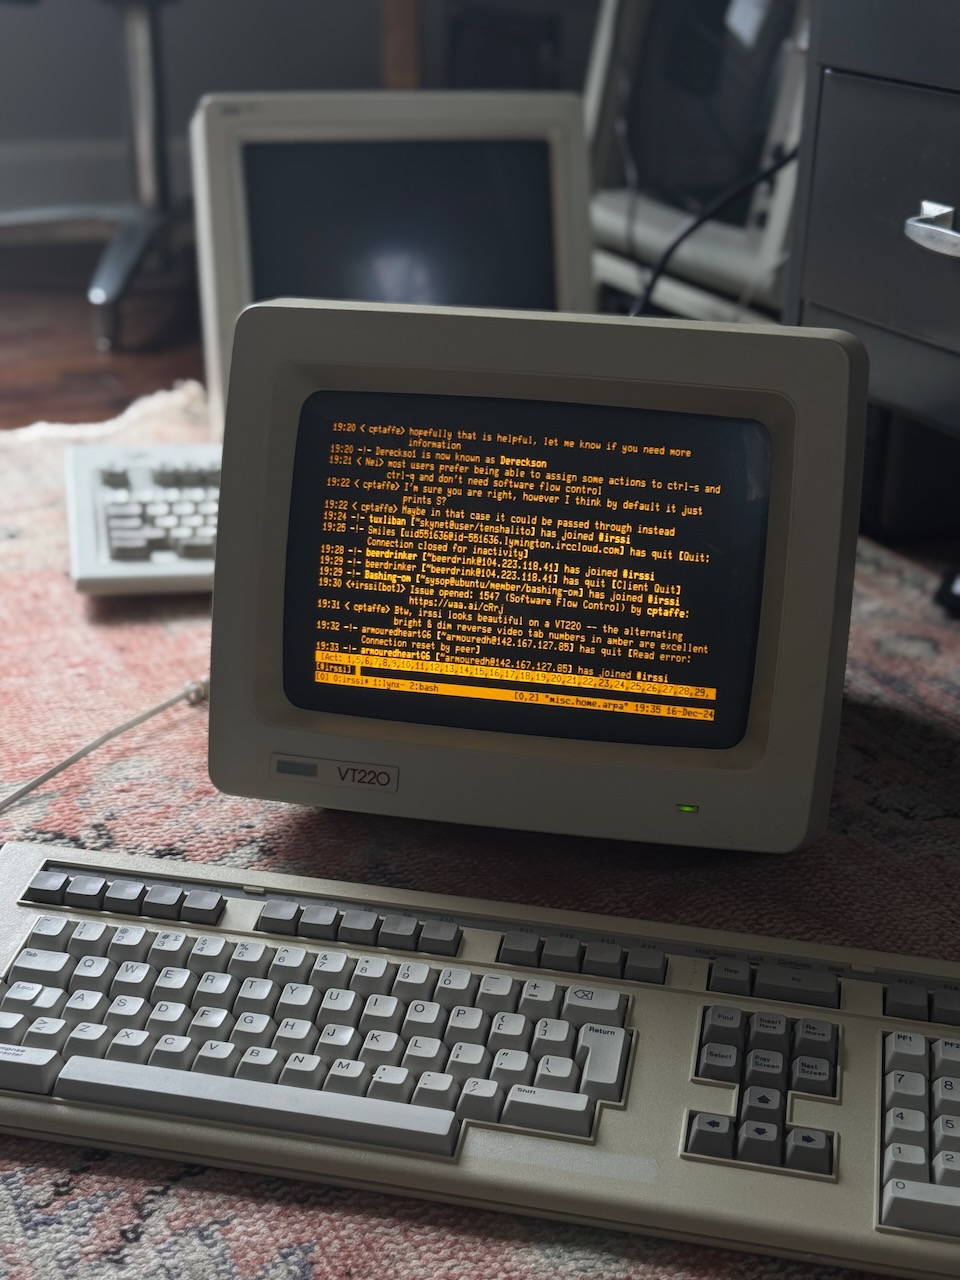
The irssi IRC client viewing #irssi on a VT220 terminal
To connect the VT220 to your system, you'll need a USB to serial adapter like the TRIPP-LITE Keyspan (USA-19HS), a null modem cable or null modem adapter, a DB9 to DB25 adapter, and possibly a DB9 or DB25 gender changer -- keep in mind both the Keyspan and the VT220 are male connectors.
As of writing, the TRIPP-LITE Keyspan (USA-19HS) drivers for macOS are not yet available for Sequoia, and previous driver versions fail to install with an error about the kernel extension signature. Fortunately, this USB serial adapter has been manufactured long enough that there's a driver for OS X 10.4, the version running on my iBook available from this Keyspan Driver Archive -- I chose Model USA-49WG Keyspan Driver 2.5 - Mac OSX 10.2.8 - 10.4.x and was able to connect my adapter and see it under /dev/tty.KeySerial1.
MacBook
On modern macOS, the adapter is available only via a longer adapter-specific name and as both a tty and cu variant, of which we'd use cu. See Setting up a Serial Console in Mac OS X for details setting up a launchd service for getty as /Library/LaunchDaemons/vt220.plist:
The first argument to getty tells it the type of the terminal, defined in /etc/gettytab, and the second is the Keyspan device name as found under /dev. The gettytab entry is as follows (see man gettytab), note al is optional and defines a user to automatically login:
vt220:\
        :np:im=\r\n:sp#19200:al=cptaffe:tt=vt220:
iBook
On OS X 10.4, we still have a functional /etc/ttys file (see man ttys), so we can add a new entry for our serial adapter:
# name         getty                      type  status    comments
tty.KeySerial1 "/usr/libexec/getty vt220" vt220 on secure # VT220 via USB serial adapter
This instructs getty to use the serial port adapter as a serial console, with a type of vt220 found in /etc/gettytab. We could also use the std.19200type here. This profile expects a console at 19200 baud, so we need to configure our VT220 as such. It also sets the vt220 terminal type ($TERM) so that the system understands how to interact with it. For more information see man getty. The /etc/gettytab entry is the same as above, see man gettytab for details:
vt220:\
        :np:sp#19200:al=cptaffe:tt=vt220:
The options have the following meanings, for undocumented FreeBSD options we use the OpenBSD man gettytab.
Option
Description
np
Terminal uses no parity (i.e., 8-bit characters)
im
Initial (banner) message
sp
Line speed (input and output)
al
User to auto-login instead of prompting
tt
Terminal type (for environment, e.g. $TERM)
Updating /etc/ttys requires a reboot, sudo kill -HUP 1 was unsuccessful for me.
VT220
The VT220 must have a keyboard to operate, and it's a very particular keyboard which communicates over serial protocol to the terminal1. To open the Set-Up Directory with the LK201, press F3. To select an item use arrow keys and the Enter key from the numpad (not Return).
Under the Display section, I have:
Interpret Controls
No Auto Wrap
Jump Scroll
Light Text, Dark Screen
Cursor
Block Style Cursor
Under the General section, I have:
VT200 Mode, 7 Bit Controls
User Defined Keys Locked
User Features Unlocked
Multinational
Numeric Keypad
Normal Cursor Keys
No New Line
With TERM=vt220, the 7-bit controls are expected. Some systems like OS X have a definition for vt220-8bit, seen in the output of the toe command. VT200 mode supports more keys than VT100 mode. OS X does not function correctly with the No New Line setting, but toggling to New Line leads to duplicate prompt lines -- Linux (e.g. via telnet) works well with No New Line.
Under the Communications section, I have:
Transmit=19200
Receive=19200
No XOFF
8 Bits, No Parity
1 Stop Bit
No Local Echo
EIA Port, Modem Control
Disconnect, 2s Delay
Limited Transit
Toggling EIA Port, Modem Control instead of EIA Port, Data Leads Only lead to a much smoother experience with paging data such as man pages because it enables hardware flow control. Without hardware flow control, the VT220 will sometimes struggle to handle the flow of incoming characters -- especially if Smooth Scroll is enabled. Additionally, when modem controls are enabled XOFF is no longer necessary, which solves issues with beeping within man and issues with irssi2. The getty config std.19200 expects both a speed of 19200 and 8N1: 8-bit, no parity, 1 stop bit.
Usage
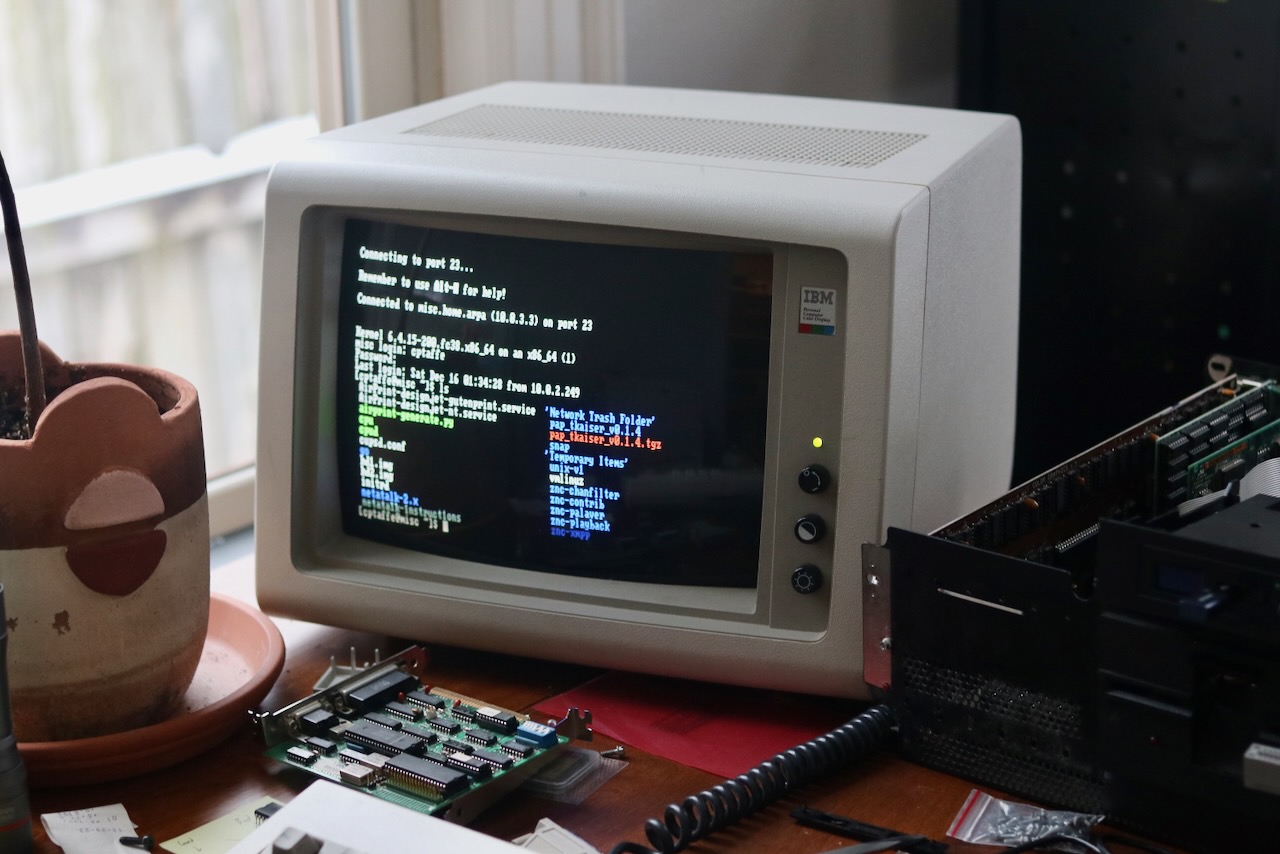
Once logged into the iBook from the VT220, I telnet (to bypass unsupported SSH algorithms) to a Linux VM which serves as a console server on my local network, and tmux attach to a shared tmux session where I run irssi for use by my IBM PC XT or other telnet clients.
From my macOS machine with iTerm, I ssh into the same machine and run tmux attach -CC which opens a native iTerm window for each tmux window. Now, when I select any tmux window, the VT220 (and any other clients) will refresh and display that window. The main advantage is that with the VT220 on my desk, I can use it an interface for IRC, vim, etc. while using a comfortable, clicky IBM Model M keyboard instead of the notably subpar membranes on the LK201.
Most command-line programs and visual applications work well on a VT220, including irssi for IRC chats, vim for editing, tmux for terminal multiplexing, and lynx for navigating text-based websites. Joel Buckley writes about using mutt for email on a VT510. A monochrome display means that any applications which depend on colored output won't work well, and some application themes may not map well to monochrome; however the amber glow is what gives the terminal its beauty.
Lynx browser viewing a Wikipedia article on a VT220 terminal
Terminal Mux
A USB serial adapter is great until you need to move your laptop, and a dedicated PC likely only has a single serial port. What if you want to run multiple terminals at once? Enter the terminal multiplexer: a networked appliance with a number of serial ports.
Terminal multiplexers like the DEC MUXserver could serve hundreds of terminals, or modems, over a single Ethernet connection3. In the age of the ubiquitous publicly switched telephone network, modems were the way to connect remotely -- to workers homes or to satellite offices. And with the advent of dial-up Internet, ISPs procured these same appliances, such as the Livingston (later Lucent) Portmaster series4, to provide dial-up service using a fleet of serial-attached modems.
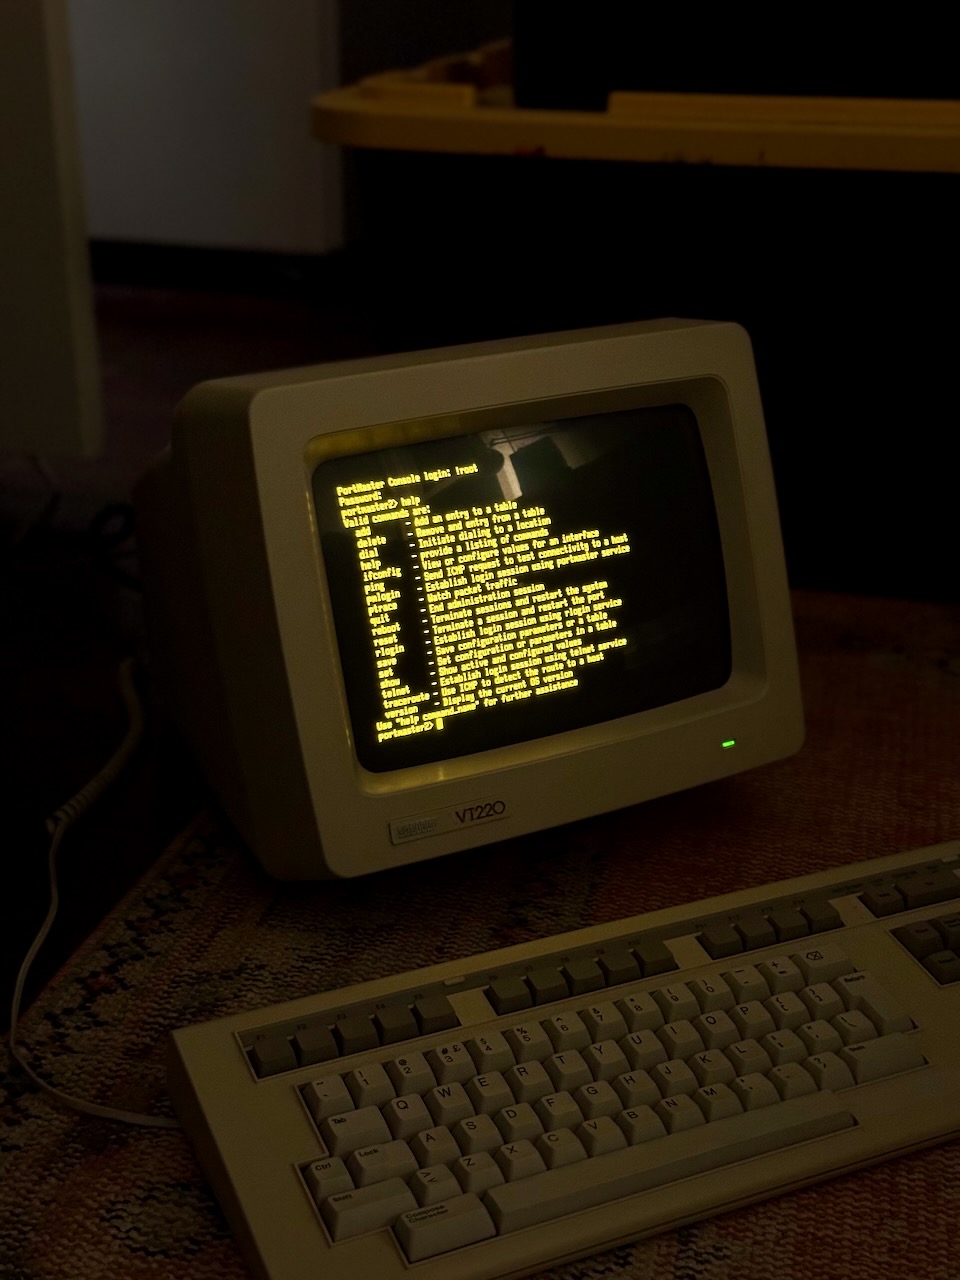
Interfacing with a Portmaster 2 from a VT220
I acquired a Livingston Portmaster 2 for a dial-up project on my home telephone network. To use it as a terminal server, we need a null modem adapter and DB25 cable. For longer connections, the DB25 to RJ45 adapters with configurable pin-out are popular. Once attached, the default connection is 9600 baud 8N1 on s0. The Portmaster 2 doesn't support DHCP, so it must be configured with a static IP address and netmask like so:
ComOS - Livingston PortMaster

login: !root
Password:
portmaster2> ifconfig
ether0: flags=16<IP_UP,IPX_DOWN,BROADCAST>
        inet 10.0.3.16 netmask ffff0000 broadcast 10.0.0.0 mtu 1500
portmaster2> set ether0 address 10.0.3.16
Local (ether0) address changed from 10.0.3.16 to 10.0.3.16
portmaster2> set ether0 netmask 255.255.0.0
ether0 netmask changed from 255.255.0.0 to 255.255.0.0
portmaster2> set gateway 10.0.0.1
Gateway changed from 16.3.0.10.in-addr.arpa to 10.0.0.1, metric = 1
portmaster2> set nameserver 10.0.0.1
Name Server changed from 192.168.1.1 to 10.0.0.1
portmaster2> set domain home.arpa
Domain changed from heavy.computer to home.arpa
portmaster2> save all
...
Note that by default the gateway was the reverse lookup for the address. Out of curiosity I tested this on my local network with dig -t PTR 16.3.0.10.in-addr.arpa and found that it would fail because there was no server with authority for 10.in-addr.arpa -- however nslookup would work. The solution, if using pfSense, is to add the following to Custom options under Services > DNS Resolver:
local-zone: "10.in-addr.arpa" transparent
See the Configuration Guide for more information. Once configured, I registered it on my local DNS as portmaster2.home.arpa where it is reachable over telnet for remote administration. My terminal is now connected to the second serial port, s1, because s0 is a special diagnostic port which cannot be configured (controlled by DIP switch):
portmaster2> show s1
----------------------- Current Status - Port S1 ---------------------------
        Status: USERNAME
         Input: 0                        Parity Errors: 0
        Output: 11                      Framing Errors: 0
       Pending: 0                       Overrun Errors: 0
  Modem Status: DCD-  CTS+

                Active Configuration    Default Configuration
                --------------------    ---------------------
     Port Type: Login                   Login
    Baud Rates: 9600                    9600,9600,9600
        Parity: none                    none
 Modem Control: off                     off

 Terminal Type: vt220
We can change settings, like enabling hardware flow control, modem control, and increasing the speed:
portmaster2> set s1 rts/cts on
RTS/CTS flow control for port S1 changed from off to on
portmaster2> set s1 speed 19200
Speed for port S1 (1) changed from 9600 to 19200
portmaster2> reset s1
Resetting port S1
We can set up the port to automatically connect to a remote host with TERM=vt220:
portmaster2> set s1 service_login telnet
Login service for port S1 changed from portmaster to telnet
portmaster2> set s1 host misc.home.arpa
Host changed from 192.168.1.1 to misc.home.arpa for S1
portmaster2> set s2 termtype vt220
Terminal Type for port S2 changed from  to vt220
Now, connecting a terminal automatically connects us to the VM at misc.home.arpa over telnet!
Note - The PortMaster ignores DSR. Some PCs may require DSR high, but do not tie DSR to DTR.
which the VT220 depends on:
in modem control modes, transmits data only when RTS, CTS, DSR, and DTR are on.
A workaround is to loop DTR to DSR, so that we can enable modem control on the VT220 and utilize hardware flow control with RTS/CTS. Even with only software flow control enabled, the VT220 performs flawlessly.
RJ-45 Adapters
To easily extend the distance between the Portmaster and the terminals, we can use DB-25 to RJ-45 adapters and existing Cat5+ cabling. The Portmaster is a DTE device, so a rolled cable or null modem adapter is used to connect to another DTE device, such as the terminal.
A null-modem cable is used to connect a terminal (DTE) to a console port. A null-modem cable crosses pins 2 and 3, and 4 and 5, pin 7 is straight-through, and pins 6 and 8 are connected to pin 20.
This is the standard null-modem translation found in adapters such as the L-com DMA074MF:
DB-25 pin 8, Data Carrier Detect (DCD), is only used on modems (DCE) and irrelevant for DTE devices.
Dial in
Now that we've experimented with direct serial connections, we can introduce a modem and dial in over telephone! The simplest option is to connect a modem to our Livingston Portmaster 2, connect another modem to our VT220, and connect both to a home telephone network. What could be simpler? Enter, the Lucent Portmaster 3.
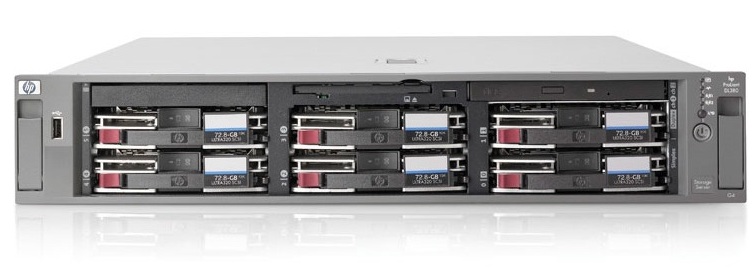
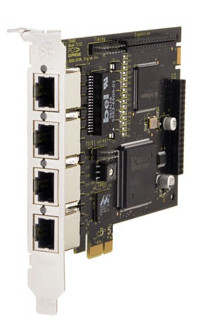
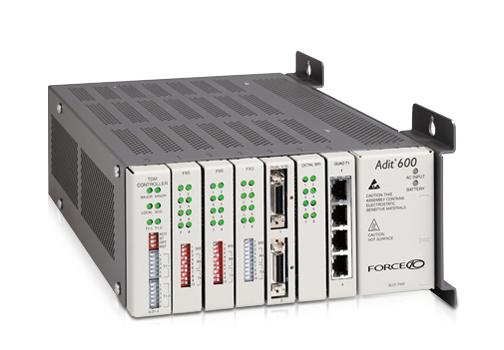
At the core of the publicly switched telephone system was a synchronous digital network transmitting sampled PCM audio, this T-carrier system began with T1 which could support 24 telephone lines over a single twisted pair (1.5 mbit/s). Enterprises could purchase T1 or T3 (672 channels at 44.736 mbit/s) from AT&T for phone lines and later data via ISDN. The last modems supported 56k speed downlinks, which utilized every available bit of the digital transmission (T-carrier used a bit-robbing system for status in the last bit of each 8-bit sample of the 8khz stream), and this is what the Lucent Portmaster 3 supports. It has two T1 line connections for up to 48 lines of 56k modem service -- no need for a separate modem rack.
My home phone system utilizes a Digium TE410 card to provide four T1 lines, two to an Adit 600 with FXS cards for individual POTS (subscriber) lines, and two to the Portmaster 3 for 56k modems. We can attach the VT220 to a physical Hayes modem over serial, connect it to a POTS line, and dial into the Lucent Portmaster 3.
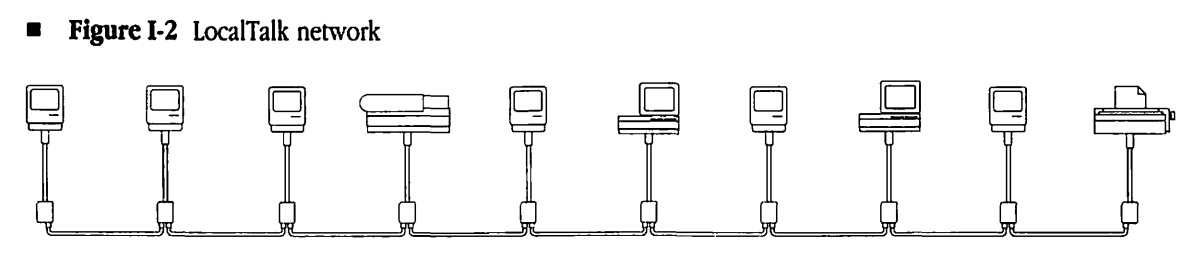
The LK201 keyboard communicates at 4800 baud using 8N1 over an EIA (Electronic Industries Association) RS-423 interface. The four conductors of the RJ11 connector (commonly used by telephones) are right-to-left data out, power, ground, and data in. Note that the serial protocol only denotes how the data is represented on the wire, not the pin-out which is specified by the D-subminiature specifications for e.g. DE-9 and DB-25. The RS-422 port used by the Macintosh and Apple IIGS differs in that each pin has a dedicated return line to avoid a common ground, because these ports can be connected over long distances with LocalTalk.
If XOFF is enabled, note that irssi blocks ^S, so when in settings or during initial tmux attach, the VT220 will spam S to the output in an attempt to send XOFF. The tmux attach may actually never succeed if irssi is the active window when attaching.
I've opened issue #1547 after discussing it with the maintainer on IRC. ↩︎
See the MUXserver 320 Hardware Installation Guide for details on how the MUXserver 320 could be synchronously linked to MUXserver 300s, each of which could connect to up to 32 terminals. ↩︎
https://connor.zip/posts/2024-11-03-email2podcastFrom Newsletter to PodcastConnor Taffe2024-10-03T00:00:00-05:00Generating an iTunes-compatible RSS feed from a newsletter with a linked audio recording
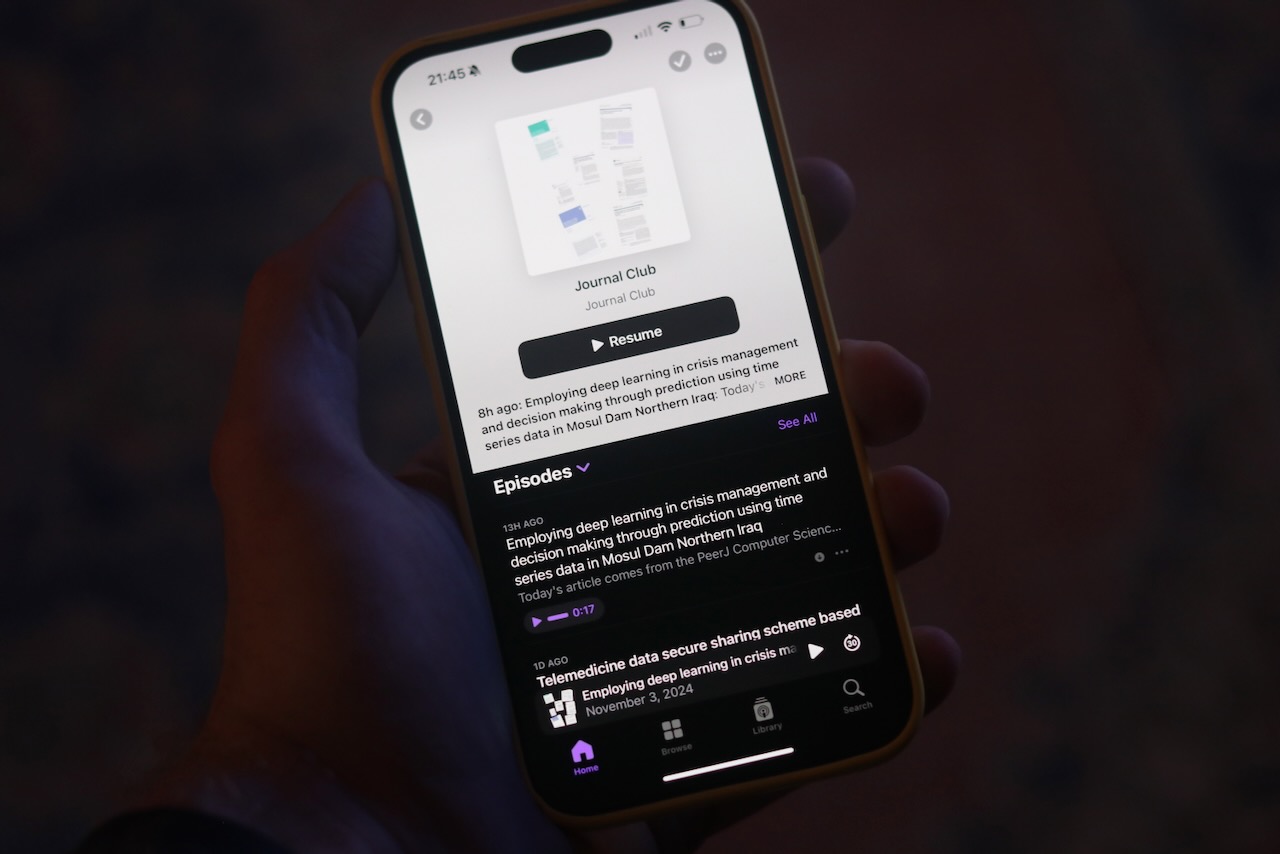
Recently, I subscribed to a new newsletter and podcast called Journal Club, a daily email in which Malcolm Diggs walking through a recently published paper related to the field of computer science -- often involving machine learning. It contains a transcript and links to an audio recording and the paper. Unfortunately, this isn't how I like to consume podcasts. Instead, I use the Apple Podcasts app on my iPhone.
Is there a way to go from a series of emails in my iCloud account to an iTunes podcast?
Journal Club Podcast in Apple Podcasts on iPhone
Email
I use a custom domain with iCloud mail to receive mail at connor.zip addresses. Since I don't control my mail server, I can't use existing filter languages like Sieve to move or otherwise process emails.
MailRules
Instead, I wrote a simple mail filtering utility which connects via IMAP and listens for new messages to process. mailrules takes simple text rules such as:
if to ~ "^marketing[\\+\\.]"
    then move "Marketing";
This rule allows me to give out the address marketing+llbean@connor.zip, and when those emails arrive from any From address, they'll be delivered to the Marketing folder. Usually bogus email addresses would be returned to sender by iCloud, but with the catch all setting enabled they'll be delivered to my main address.
When mailrules starts, it applies its rules to all emails the inbox.
Then, it waits for additional events such as incoming emails and applies any rules to that email.
I use a goyacc generated parser to implement the rule language, which uses as input tokens from the lexer. The lexer is a modified version of Eli Bendersky's A Faster Lexer in Go1. The parser builds a list of rules from the input rules file, and matches those rules in order to each email based on the metadata fetched from the email server.
For instance, the above rule would become the tokens:
IF IDENTIFIER TILDE QUOTE THEN MOVE QUOTE SEMICOLON
We start at the rules rule, defined as either a single rule or a series of semicolon-delimited rules. Here we strip SEMICOLON off the end and rule must be IF IDENTIFIER TILDE QUOTE THEN MOVE QUOTE.
rules: rule SEMICOLON
    { $$ = append($$, $1) }
    ...
One of the options for a rule is an if ... then predicate followed by a move action. Here we break our tokens apart into a IDENTIFIER TILDE QUOTE and MOVE QUOTE to fill in the blanks.
rule: IF condition THEN move
    {
        $4.Predicate = $2
        $$ = $4
    }
    ...
Focusing on the latter part of the if ... then, the move is a simple keyword followed by a string. Notice its first argument, the predicate, is empty; it's assigned within the if ... then rule once the condition is resolved. With MOVE covered, string must be QUOTE.
Within the if ... then, the condition can be a simple comparison, or it can contain and, or, not, etc. We're still handling IDENTIFIER TILDE QUOTE at this point.
condition: comparison
    { $$ = $1 }
    ...
The comparison we use here is the ~ regular expression match. With IDENTIFIER TILDE covered, string must be QUOTE.
We use UIDs instead of sequence numbers because the sequence number of a message will change if a message with a lower sequence number is moved out of the inbox, which can lead to strange behavior. The envelope contains just enough metadata to apply our rules, without pulling the entire body and attachments.
Then, we apply rules to each of the emails.
for msg := range messages {
    for _, rule := range rules {
        rule.Message(msg)
    }
}
The rules are then applied to all emails they matched in the order of the rules file:
for _, rule := range rules {
    err := rule.Action(c)
    if err != nil {
        log.Println("Apply rule:", err)
    }
}
After the first pass, we wait for additional emails regarding our mailbox and at that point re-process:
for {
    processMailbox(c, mbox, rules)

    log.Println("Listening...")

    // Create a channel to receive mailbox updates
    updates := make(chan client.Update)
    c.Updates = updates

    // Start idling
    stop := make(chan struct{})
    done := make(chan error, 1)
    go func() {
        done <- c.Idle(stop, nil)
    }()

    // Listen for updates
    for {
        select {
        case update := <-updates:
            switch update := update.(type) {
            case *client.MailboxUpdate:
                if update.Mailbox.Name != "INBOX" {
                    break
                }
                log.Println("Saw change to Inbox")

                // stop idling
                close(stop)
                close(updates)
                c.Updates = nil
            }
        case err := <-done:
            if err != nil {
                log.Fatal(err)
            }
            goto Process
        }
    }
Process:
}
The rule keeps track of which messages matched and resets its internal state within Action. For instance, the Message match function for the move rule looks like:
func (r MoveRule) Message(msg *imap.Message) {
	if r.Predicate.MatchMessage(msg) {
		log.Printf("Moving '%s' to '%s'", msg.Envelope.Subject, r.Mailbox)
		r.messages.AddNum(msg.Uid)
	}
}
Here r.messages is an imap.SeqSet, which is used to represent a set of message UIDs. Also note that the predicate is pluggable and is swapped in by the parser matching logic based on whether the predicate is a simple regex or equivalence match or a more complex boolean logic statement.
Stream
To keep mailrules a generic IMAP email processing tool, I added a new stream command, which can be plugged into any number of backends. The rule looks like this:
if from ~ "^members@journalclub.io$"
    then stream rfc822 "curl --silent --show-error --fail-with-body --header \"Content-Type: message/rfc822\" --header \"Accept: application/json\" --data-binary @- http://email2rss/journalclub/email";
When the from address matches our regular expression, this rule sends the entire RFC 822 formatted email message into the input of the command provided. The command can be anything, in this case we use curl to send the body of the email to a sibling service running on the same Kubernetes cluster, email2rss.
To fetch the full representation of the email, StreamRule's Action function:
Initiates a Fetch using the UID set constructed in its Message matching logic, in which it asks for UID, RFC822.HEADER, and RFC822.TEXT.
Finds the header and text portions of the response for a given message and concatenates them together.
Executes the command with the stdin set to the message.
Since this rule asks for the rfc822 representation of a message instead of html, we don't attempt to parse the body of the message.
Podcasts
Apple Podcasts supports ingesting RSS feeds as long as they meet its requirements, which mostly involves the use of the itunes namespace and the recently standardized podcast namespace. See also Apple's required tags page and their sample feed.
Here's an example of what we need to produce:
<?xml version="1.0" encoding="UTF-8"?>
<rss version="2.0"
xmlns:atom="http://www.w3.org/2005/Atom"
xmlns:content="http://purl.org/rss/1.0/modules/content/"
xmlns:itunes="http://www.itunes.com/dtds/podcast-1.0.dtd"
xmlns:podcast="https://podcastindex.org/namespace/1.0" >
<channel>
<title>Journal Club</title>
<link>https://journalclub.io/</link>
<atom:link href="{REDACTED}" rel="self" type="application/rss+xml" />
<language>en-us</language>
<copyright>© 2024 JournalClub.io</copyright>
<itunes:author>Journal Club</itunes:author>
<description> Journal Club is a premium daily newsletter and podcast authored and hosted by Malcolm Diggs. Each episode is lovingly crafted by hand, and delivered to your inbox every morning in text and audio form.</description>
<itunes:image href="https://www.journalclub.io/cdn-cgi/image/width=1000/images/journals/journal-splash.png"/>
<itunes:category text="Science" />
<itunes:explicit>false</itunes:explicit>
<item>
<title>Employing deep learning in crisis management and decision making through prediction using time series data in Mosul Dam Northern Iraq</title>
<description>
<![CDATA[
<p>Today's article comes from the PeerJ Computer Science journal. The authors are Khafaji et al., from the University of Sfax, in Tunisia. In this paper they attempt to develop machine learning models that can predict the water-level fluctuations within a dam in Iraq. If they succeed, it will help the dam operators prevent a catastrophic collapse. Let's see how well they did.</p>]]>
</description>
<guid isPermaLink="false">1b1dd75f-e37e-4c55-b759-dea3b1dbba3a</guid>
<pubDate>Sun, 03 Nov 2024 13:55:35 UTC</pubDate>
<enclosure url="{REDACTED}" length="12926609" type="audio/mpeg" />
<itunes:image href="https://embed.filekitcdn.com/e/3Uk7tL4uX5yjQZM3sj7FA5/sSM8ecFNXywfm7M3qy1tWu" />
<itunes:explicit>false</itunes:explicit>
</item>
</channel>
</rss>
Podcasts are RSS 2.0 feeds, in 2023 Apple deprecated the use of Atom feeds.
Object
Fields
Description
<channel>
<title>
The title of the feed, we use the name of the newsfeed.
<channel>
<link>
A link to the source of the information in the feed. Since this feed is based on an email newsletter and not a website, we use the homepage of the feed.
<channel>
<atom:link>
A self-link in the atom namespace, back-porting this feature from the Atom feed specification to RSS 2.0. We place the URL of the feed file itself here.
<channel>
<language>
The language of the content, in the same format of the Accept-Language HTTP header.
<channel>
<copyright>
Who owns the rights to the content in this file, we use the copyright statement from the homepage.
<channel>
<itunes:author>
This is the first of the itunes namespaced fields, the author of the content.
<channel>
<description>
A description of the content, we use the one available on the website.
<channel>
<itunes:image>
The image to use as cover art.
<channel>
<itunes:category>
The category of the podcast, this can also contain a subcategory.
<channel>
<itunes:explicit>
Whether or not this podcast contains explicit content.
<item>
<title>
The title of a podcast episode, extracted from the Subject line of the email.
<item>
<description>
A description of the podcast episode, taken from the first paragraph of the body of the email. This field can contain HTML tags such as paragraphs and links by using a CDATA block.
<item>
<guid>
A globally unique id, we use X-Apple-UUID so we must set isPermaLink to false since it's not a URL to the content.
<item>
<pubDate>
The date the podcast episode was published, we use the Date field from the email. This won't work in the case of back-dated episodes, for instance JournalClub has a mechanism to resend old episodes and those emails would have a renewed send date.
<item>
<enclosure>
The audio of the podcast episode, a URL along with its MIME type and file size.
<item>
<itunes:image>
The image to use for a specific podcast episode. We use the paper image, but it's so small Apple's podcast app ignores it.
At this point, mailrules has shelled out to curl which has sent the body of our Journal Club email to a sibling email2rss service, in the same Kubernetes cluster which mailrules is deployed within. This service has two relevant endpoints:
GET /{feed}/feed.xml which fetches the generated Podcast RSS.
POST /{feed}/email which accepts an RFC 822 formatted email and updates the Podcast RSS.
POST /{feed}/email
The POST endpoint needs to first parse the input email to find the HTML representation we'll be pulling relevant information from. To do that, we first need to parse the RFC 822 message body using Go's net/mail package using mail.ReadMessage(req.Body). Then, we extract the msg.Header.Date() which (RFC 3339 formatted) becomes the key for our state in cloud storage.
// MessageMIME finds and parses a portion of the message based on the MIME type
func MessageMIME(message *mail.Message, contentType string) (io.Reader, error) {
	mediaType, params, err := mime.ParseMediaType(message.Header.Get("Content-Type"))
	if err != nil {
		return nil, fmt.Errorf("parse message content type: %w", err)
	}
	if !strings.HasPrefix(mediaType, "multipart/") {
		return nil, fmt.Errorf("expected multipart message but found %s", mediaType)
	}
	reader := multipart.NewReader(message.Body, params["boundary"])
	if reader == nil {
		return nil, fmt.Errorf("could not construct multipart reader for message")
	}
	for {
		part, err := reader.NextPart()
		if err != nil {
			return nil, fmt.Errorf("could not find %s part of message: %w", contentType, err)
		}
		mediaType, _, err := mime.ParseMediaType(part.Header.Get("Content-Type"))
		if err != nil {
			return nil, fmt.Errorf("parse multipart message part content type: %w", err)
		}
		if mediaType == contentType {
			enc := strings.ToLower(part.Header.Get("Content-Transfer-Encoding"))
			switch enc {
			case "base64":
				return base64.NewDecoder(base64.StdEncoding, part), nil
			case "quoted-printable":
				return quotedprintable.NewReader(part), nil
			default:
				return part, nil
			}
		}
	}
}
The method parses the Content-Type header of the message to determine if it is multipart/, if so we need to determine the boundary string used to split each portion and iterate through each of the multiple parts using a multipart.Reader. As we iterate over each part, we again parse the Content-Type looking for our target text/html. Each of these message parts could be another multipart message (in which case we could recurse) or even an entire email (message/rfc822); but for our purposes we only expect a single level in the tree. Once we've found the appropriate portion, we check Content-Transfer-Encoding; in our case the email is quoted-printable3 encoded, which looks like:
<h3 style=3D"font-weight:bold;font-style:normal;font-size:1em;margin:0;font=
-size:1.17em;margin:1em 0;font-family:Charter, Georgia, Times New Roman, se=
rif;font-size:28px;color:#12363f;font-weight:400;letter-spacing:0;line-heig=
ht:1.5;text-transform:none;margin-top:0;margin-bottom:0" class=3D"">Employi=
ng deep learning in crisis management and decision making through predictio=
n using time series data in Mosul Dam Northern Iraq</h3>
Notice the trailing = for soft line-breaks and =3D to encode literal equal signs.
I may rewrite this in the future to leverage a more general library like go-message.
Parsing the HTML
Next, we extract information form the message using regular expressions4:
Expression
Description
"(https?://[^ ]+\.mp3)"
The audio recording link included in each email, which becomes the <enclosure>url field.
<img src="(https?://[^ ]*)"
An image of the first page of the paper we can use as the podcast episode <itunes:image>. Unfortunately this is too low-resolution to be used by the Podcast app.
Hi[ ]+Connor, (.*)</p>
The <description> of each episode, which begins with a salutation specific to each subscriber.
The link to the paper, using the DOI. This becomes part of the <description>.
Apple requires the <enclosure>length field contain the number of bytes within the file, so we send a HEAD request to the audio URL and record the Content-Length to populate this field.
We also extract some information from headers:
Header
Description
Subject
Populates <title>, but needs UTF-8 characters decoded according to RFC 2047 using mime.WordDecoder's DecodeHeader
Date
Used for the file name in cloud storage.
X-Apple-UUID
Used for the <guid> tag.
Once we've extracted this information, we format our state into a JSON blob and write it to storage:
{
  "uuid": "1b1dd75f-e37e-4c55-b759-dea3b1dbba3a",
  "subject": "Employing deep learning in crisis management and decision making through prediction using time series data in Mosul Dam Northern Iraq",
  "description": "Today's article comes from the PeerJ Computer Science journal. The authors are Khafaji et al., from the University of Sfax, in Tunisia. In this paper they attempt to develop machine learning models that can predict the water-level fluctuations within a dam in Iraq. If they succeed, it will help the dam operators prevent a catastrophic collapse. Let's see how well they did.",
  "date": "2024-11-03T13:55:35Z",
  "imageURL": "https://embed.filekitcdn.com/e/3Uk7tL4uX5yjQZM3sj7FA5/sSM8ecFNXywfm7M3qy1tWu",
  "audioURL": "{REDACTED}",
  "audioSize": 12926609,
  "paperURL": "http://dx.doi.org/10.7717/peerj-cs.2416"
}
Then, all state files are read in from cloud storage and passed through a template to generate the new Podcast RSS feed:
<?xml version="1.0" encoding="UTF-8"?>
<rss version="2.0"
xmlns:atom="http://www.w3.org/2005/Atom"
xmlns:content="http://purl.org/rss/1.0/modules/content/"
xmlns:itunes="http://www.itunes.com/dtds/podcast-1.0.dtd"
xmlns:podcast="https://podcastindex.org/namespace/1.0" >
<channel>
<title>Journal Club</title>
<link>https://journalclub.io/</link>
<atom:link href="{REDACTED}" rel="self" type="application/rss+xml" />
<language>en-us</language>
<copyright>© 2024 JournalClub.io</copyright>
<itunes:author>Journal Club</itunes:author>
<description> Journal Club is a premium daily newsletter and podcast authored and hosted by Malcolm Diggs. Each episode is lovingly crafted by hand, and delivered to your inbox every morning in text and audio form.</description>
<itunes:image href="https://www.journalclub.io/cdn-cgi/image/width=1000/images/journals/journal-splash.png"/>
<itunes:category text="Science" />
<itunes:explicit>false</itunes:explicit>
{{- range . }}
<item>
<title>{{.Subject}}</title>
<description>
<![CDATA[
<p>{{- .Description -}}</p>
{{- if .PaperURL -}}
<p>Want the paper? This <a href="{{.PaperURL}}">link</a> will take you to the original DOI for the paper (on the publisher's site). You'll be able to grab the PDF from them directly.</p>
{{- end -}}
]]>
</description>
<guid isPermaLink="false">{{.UUID}}</guid>
<pubDate>{{ rfc2822 .Date }}</pubDate>
<enclosure
url="{{.AudioURL}}"
length="{{.AudioSize}}"
type="audio/mpeg"
/>
<itunes:image href="{{.ImageURL}}" />
<itunes:explicit>false</itunes:explicit>
</item>
{{- end }}
</channel>
</rss>
And the final output is cached in cloud storage.
GET /{feed}/feed.xml
Using the portable blob package, we can avoid coupling ourselves to a specific cloud storage backend, and even write tests using a mem or file backend. Then, we use http.ServeContent to handle the finicky logic around Last-Mofied/If-Modified-Since and friends. Here's the implementation of GetFeed:
Once the email2rss's GET /{feed}/feed.xml endpoint has been published to the internet, and mailrules is sending emails to the service to populate the RSS feed; we can finally open the Podcasts app and see what we've accomplished.
On mobile, navigate in the Apple Podcasts app on iPhone to Library > ..., then Follow a Show by URI..., then paste the full URL of our feed.xml endpoint.
On desktop, navigate to File > Follow a Show by URI... (or command+shift+N).
Journal Club Podcast in Apple Podcasts on Mac
See also Lexical Scanning in Go by Rob Pike, which I've used as the basis for several previous projects involving lexers. ↩︎
Email predates the Internet, and is always ASCII encoded. ASCII was introduced as a 7-bit standard for telegraphs in the 60s, so to represent 8-bit UTF-8 characters, we need a way to encode the 8-bit characters into 7-bit ASCII. The quoted-printable scheme (RFC 2045 §6.7) does this by using an = sign followed by two hex digits. In the case of a literal equals sign in the original text, it must be encoded =3D, 3D being the hex for the ASCII code for =. Quoted printable also requires that lines be a maximum of 76 characters long, if the original text is a longer a soft line break can be inserted which results in a = before the \r\n sequence. The only mention of line length in RFC 822 is when referencing long headers:
"Long" is commonly interpreted to mean greater than 65 or 72 characters. The former length serves as a limit, when the message is to be viewed on most simple terminals which use simple display software; however, the limit is not imposed by this standard.
Long ago, email was delivered on UNIX machines using UUCP (UNIX-to-UNIX Copy), to user-specific mailboxes and viewed with a command such as mail. In fact email addresses looked much different before DNS, for instance a UUCP bang path representing the full route to the sender or recipient. As an example, Brian Ried's essay on Interpress was sent from the address decwrl!glacier!reid. ↩︎
These were ported from my first attempt at a solution, which involved integrating the HTML parser into mailrules and generating item.xml intermediate files which were globbed into a final feed.xml all via shell script. The html command input is still an option for the stream rule in place of rfc822. I then used gsutil rsync to copy files from the mailrules pod shell script workspace to cloud storage, and a simple static server container using BusyBox's httpd and the same gsutil rsync in an init container and in a loop as a sidecar using a shared empty volume. ↩︎
https://connor.zip/posts/2024-05-20-analytics-with-plausibleAnalytics with PlausibleConnor Taffe2024-05-20T20:30:00-05:00Self-hosting a Google Analytics alternative
While server-side logs are the most accurate information on who is accessing what on your site, client side analytics can compliment this by focusing only on browsers which have JavaScript enabled as opposed to any other client.
This blog is an exercise in creating a site from scratch, both code and infrastructure, so Google Analytics is off the table. I'd also like to avoid readers having to load scripts from a third party site, or give that tool access to my readers' behavior. Plausible is an open source solution that I can run myself, where I retain control over all analytics and how they are used.
I've been running Plausible for over a week now, here's what I see when I navigate to my instance:
Plausible Site View
I can quickly see where readers are connecting from geographically, including some countries I wouldn't expect like Russia, China, and Germany; where readers find my content, which is unsurprisingly Google but also some locally popular search engines; and which are my most popular pages, which by far is my article on AirPrint with CUPS. This is all information I didn't have prior to setting up Plausible -- it should be available in the logs, but processing logs is something I haven't taken a whack at yet.
Below I detail how I set up Plausible in my environment. Plausible includes helpful materials in the Community Edition repo including a Docker Compose file I based my Kubernetes configuration on.
Installation
Before we start, you'll need to install PostgreSQL and ClickHouse in your environment.
As I haven't yet solved the problem of persistent volumes on Kubernetes at home, I use a dedicated Fedora Linux 38 VM at db.home.arpa running on VMWare to host these databases.
Now connect and optionally create a user and database for yourself, so you can login with your own user on the VM.
The user name must match your Linux user name for peer authentication to succeed.
; whoami
cptaffe
; sudo -u postgres psql
psql (15.4)
Type "help" for help.

postgres=# CREATE ROLE cptaffe LOGIN;
postgres=# CREATE DATABASE cptaffe;
Login to that new user, and optionally set a password for connecting over the network:
; psql
psql (15.4)
Type "help" for help.

cptaffe=> \password cptaffe
Save this password in a password manager.
Edit your file var/lib/pgsql/data/pg_hba.conf to control access, mine looks like:
# TYPE  DATABASE        USER            ADDRESS                 METHOD

# "local" is for Unix domain socket connections only
local   all             all                                     peer
# IPv4 local connections:
host    all             all             127.0.0.1/32            ident
# IPv6 local connections:
host    all             all             ::1/128                 ident
# Allow replication connections from localhost, by a user with the
# replication privilege.
local   replication     all                                     peer
host    replication     all             127.0.0.1/32            ident
host    replication     all             ::1/128                 ident
host    all             all             samenet                 scram-sha-256
The important line here is the last one, which enables connections over the network to all users and databases, but only from hosts on the same network and they must authenticate using scram-sha-256.
; sudo systemctl restart postgresql.service
Add a firewall rule which allows connections to PostgreSQL:
Now test that you can login over the network. From another machine (assuming you have the same username):
; psql postgres://db.home.arpa
Password for user cptaffe:
psql (14.9 (Homebrew), server 15.4)
WARNING: psql major version 14, server major version 15.
        Some psql features might not work.
Type "help" for help.

cptaffe=>
Install ClickHouse
On the same instance, or another dedicated instance, install ClickHouse:
Next, we should create dedicated accounts on both systems for Plausible, to limit access.
From our VM, run the following commands for PostgreSQL, replacing xyz with a secure random password.
sudo -u postgres psql
psql (15.4)
Type "help" for help.
postgres=# CREATE DATABASE plausible;
postgres=# CREATE USER plausible WITH ENCRYPTED PASSWORD 'xyz';
postgres=# GRANT ALL PRIVILEGES ON DATABASE plausible TO plausible;
postgres=# GRANT ALL ON SCHEMA public TO plausible;
Next do the same for ClickHouse:
; clickhouse-client
Password for user (default):

db.home.arpa :) CREATE USER plausible IDENTIFIED WITH sha256_password BY 'xyz';
db.home.arpa :) CREATE DATABASE plausible;
db.home.arpa :) GRANT SELECT, INSERT, ALTER, CREATE DATABASE, CREATE TABLE, CREATE VIEW, CREATE DICTIONARY, DROP DATABASE, DROP TABLE, DROP VIEW, DROP DICTIONARY, TRUNCATE ON plausible.* TO plausible;
Kubernetes
What follows is the Kubernetes configuration I use for my Plausible setup.
Once Plausible is running, navigate to it and set up your account.
On my network, pfSense delegates k8s.home.arpa to Kubernetes, so we can navigate to https://plausible.plausible.svc.k8s.home.arpa/.
Finally, create a new Ingress which will make the service available from the Internet.
On my cluster, kubernetes-pfsense-controller syncs the Ingress configuration to HAProxy running on pfSense.
We need a new DNS entry for our Plausible server's domain. Navigate to your DNS provider and mirror the A or AAA records for your main domain for your new Plausible domain.
CloudFlare DNS Configuration
pfSense
Configuration of HAProxy is automatically handled by kubernetes-pfsense-controller, so we only need to ensure our ACME certificate can handle our new plausible.example.com domain.
Navigate to Services, ACME Certificates.
Click edit on your certificate.
In the Domain SAN List, add our new domain name; copy the e.g. webroot configuration from other domains.
Then back at the certificates list, click Issue/Renew on the certificate to ask Let's Encrypt to issue a new certificate with the updated domains list.
If successful, we have our updated certificate and HTTPS will work on our Plausible services.
Setup
Now that our Plausible server is accessible from the Internet, and we've created an account, we can add the analytics script to our site. For each page or template, add the following XML1 snippet to the bottom of the <header> tag:
This differs from the snippet Plausible provides in two ways:
It uses the attribute="attribute" form to side-step XML's lack of support for valueless attributes.
It uses async instead of defer. A script using defer will not block the parsing of the HTML, but will block rendering of the page; whereas async will not block rendering of the page. This means that defer will break your page if the Plausible server is unreachable, slow, etc.
I ran into this issue firsthand when I navigated to my blog and realized that my employer blocks .zip domains from resolving via DNS until they are allow-listed. My blog resolved without issue, but the subdomain failed to resolve and failed to render the page. I believe this condition can be replicated using a DNS-based ad-blocker like a Pi-hole.
https://connor.zip/posts/2024-05-05-pkiPKI at HomeConnor Taffe2024-05-05T21:30:00-05:00Setting up a private key infrastructure in a home lab environment
When running services at home, the proliferation of self-signed certificates and browser errors to click through can become a pain point. By creating our own internal Certificate Authority (CA) and loading that certificate onto relevant machines, we can access these services securely and simply.
To do this, I use Cloudflare's cfssl and follow a simple scheme I've encoded in my certs repo, orchestrated by the Makefile. This system is based on a pattern Rob Blackbourn wrote about.
Make
Our goal is to create a Certificate Authority (CA), Intermediate CA, and certificates signed by the Intermediate CA for each of our "servers" or services. If I want to construct a certificate just for my VMWare server, then my top-level goal could be:
All this says is that there is a goal named certs that is not a file (.PHONY), and it requires two files: the public and private certificates, which I name after the fully qualfied domain of the service on my network: vms.home.arpa. Given this goal, make looks for a way to create the two named files.
To do this, I have a pattern rules which will construct set of public and private keys:
This rule requires a configuration file, servers/vms/vms.home.arpa.json along with keys for the Intermediate CA adn the global config. The two configs we will have to provide, and are illustrated below:
For the CN I use the fully qualified internal domain. I also add it in hosts alongside the persistent IP address configured via DHCP and localhost for convenience and debugging purposes. The key section determines what size and algorithm the certificate will use, we use an RSA key of length 2048 which is the current NIST suggested minimum.1 The names section is not required to be accurate.
At the moment we are only using the server profile as indicated by -profile=server in our pattern, but we will later reference intermediate-ca. I use ten years for all the expirations, I am not concerned about man-in-the-middle attacks using leaked certificates; for your use-case set whatever is appropriate.
Intermediate CA
Now that we've covered the config files, our rule still needs an Intermediate CA, which is where the next rule comes in:
This rule creates an Intermediate CA adn signs it with the CA. The rule requires the CA certificates, Intermediate CA configuration, and global configuration. The global configuration is covered above, so I'll reproduce intermediate-ca.json below:
This rule copies all generated .pem files to a GCS bucket using gsutil rsync, then syncs any files from the bucket back to our local filesystem.
Usage
You can clone my certs repo and use it to generate your own certs. Simply:
Delete or reconfigure the \.synced rule in the Makefile.
If not on macOS, remove the sudo security add-trusted-cert ... line from the CA rule.
Remove folders under clients/ and servers/ and replace them with services of your own.
Edit the certs rule in the Makefile to reflect only your new folders, each must contain a config with the same prefix as your .pem files. For instance, servers/vms/vms.home.arpa.json matches servers/vms/vms.home.arpa-server.pem and servers/vms/vms.home.arpa-server-key.pem.
Run brew install cfssl to install the utility.
Then just run make from the root of the repository to generate all required certificates.
Follow similar instructions except in clients to create client certificates like those for IRC.
Configuring Services
This section outlines instructions for some services I use on my network.
VMWare
To install a new certificate on VMWare 6.x, follow the instructions here.
Navigate to the Web UI and from the Host page click Actions, Services, Enable Secure Shell (SSH)
NIST Special Publication 800-57 Part 3, Recommendation for Key Management summarizes recommendations in section 2.2.1 Recommended Key Sizes and Algorithms, Table 2-1. Reproduced below:
Key Type
Algorithms and Key Sizes
Digital Signature keys used for authentication (for Users or Devices)
RSA (2048 bits), ECDSA (Curve P-256)
Digital Signature keys used for non-repudiation (for Users or Devices)
RSA (2048 bits), ECDSA (Curves P-256 or P-384)
CA and OCSP Responder Signing Keys
RSA (2048 or 3072bits), ECDSA (Curves P-256 or P-384)
https://connor.zip/posts/2024-02-23-k8s-dnsIt was DNSConnor Taffe2024-02-23T00:00:00-05:00Debugging and customizing DNS with kubeadm
I use kubeadm for my home k8s cluster that I run my blog on. Yesterday, I refactored my blog server to push static resources to Google Cloud Storage and then pull those resources down in an init container, instead of packaging them in the container image. Originally, I planned to redirect to a signed GCS URL from my server application and have GCS handle serving static resources to the browser, but I ran into issues with page load time even with Cache-Control set to 48 hours. Eventually, I'd like to use a k8s storage class and push resources to NFS or similar served by a redundant local deployment.
The previous flow:
The updated flow:
I added the following init contianer to my deployment to pull resources into a new emptyDir volume:
I used the google-cloud-cli container for access to the gsutil command. The gsutil command doesn't look at the GOOGLE_APPLICATION_CREDENTIALS environment variable like the SDK client would, so we need to instead call
So, why can't gsutil complete the request? Let's check the pod's connectivity:
; kubectl exec -it blog-b85849cd-8j4mf -c init -- /bin/sh
/ # ping google.com
ping: bad address 'google.com'
/ # curl google.com
curl: (6) Could not resolve host: google.com
Now that we've identified the issue as DNS, we can follow the instructions at Debugging DNS Resolution. The resolution flow in my network is shown below:
DNS resolution within a pod is managed by k8s, which manages the /etc/resolv.conf file. Our pod has one like:
We should ensure our kube-dns service has the correct cluster IP:
; kubectl get svc/kube-dns -n kube-system
NAME       TYPE        CLUSTER-IP   EXTERNAL-IP   PORT(S)                  AGE
kube-dns   ClusterIP   10.3.0.10    <none>        53/UDP,53/TCP,9153/TCP   466d
There is a mismatch! For me, the reason is that the kube-dns IP is mismatched is that the worker's config wasn't reflecting the updated IP I chose for kube-dns. Previously, I had manually updated the /usr/lib/systemd/system/kubelet.service.d/10-kubeadm.conf file on the node. When I updated the node, the ConfigMap stored in k8s overwrote this file. The section of k8s docs on Updating the KubeletConfiguration instructs us to edit:
This is because my kube-dns service exists within the 10.3.x.x IP range, and because I want k8s DNS addresses to be placed under my home networks home.arpa DNS zone. The pfSense firewall is configured to delegate DNS for the 10.3.x.x and 10.2.x.x service and pod networks, as well as k8s.home.arpa to Kubernetes so that I can easily reach k8s resources from the rest of the network. For instance, this blog is accessible on my local network via http://blog.default.svc.k8s.home.arpa/.
Kubernetes Domain Overrides
Once updated, your nodes need to be updated:
; sudo kubeadm upgrade node phase kubelet-config
[upgrade] Reading configuration from the cluster...
[upgrade] FYI: You can look at this config file with 'kubectl -n kube-system get cm kubeadm-config -o yaml'
[kubelet-start] Writing kubelet configuration to file "/var/lib/kubelet/config.yaml"
[upgrade] The configuration for this node was successfully updated!
[upgrade] Now you should go ahead and upgrade the kubelet package using your package manager.
; sudo systemctl restart kubelet.service
This will update the /etc/resolv.conf on pods created by the kubelet to reflect our new dns and domain configuration. We may need to roll pods so they reflect this.
The log line was added to help with debugging. The k8s.home.arpa mentions on the kubernetes line is meant to coincide with our clusterDomain configuration in kubelet, and the /etc/resolv.conf follows system configuration when forwarding. We can get this configuration by running a dnsutils pod:
This pod will receive the same /etc/resolv.conf that CoreDNS will since it has dnsPolicy: Default. On my system, the kubelet is configured to pull /etc/resolv.conf from /run/systemd/resolve/resolv.conf, which contains:
...
nameserver 10.0.0.1
nameserver 2600:1700:f08:111f:20c:29ff:fe6f:1149
nameserver 10.0.0.1
# Too many DNS servers configured, the following entries may be ignored.
nameserver 2600:1700:f08:111f:20c:29ff:fe6f:1149
search home.arpa
In the logs for CoreDNS, I noticed errors around resolution of GCS DNS:
The search home.arpa line is informing CoreDNS to test DNS addresses within .home.arpa as well as globally, but lookups are failing within the .home.arpa zone. It turns out that pfSense’s unbound can get overloaded if set in recursive mode. Since the /etc/resolv.confsearch line contains home.arpa, every domain gets tested with that suffix e.g. google.com.home.arpa.
Under Services, DNS Resolver in pfSense, I could see “System Domain Local Zone Type” configured as Transparent, which attempts to ask upstream if x.home.arpa wasn’t present. Swapping this to Static avoids this lookup and return an NXDOMAIN if no overrides are present, since pfSense should be the owner of .home.arpa. I also toggled on forwarding mode so that it hits the upstream DNS server for zones it doesn’t manage instead of being a recursive resolver itself.
pfSense DNS Resolver
These changes solved my issue and the init container was able to pull resources from GCR. I later realized that setting the "System Domain Local Zone Type" to Static caused the Domain Overrides for k8s.home.arpa to fail, so I switched it back to Transparent. So far, DNS within Kubernetes is working properly:
https://connor.zip/posts/2024-02-16-hifiA HiFi SetupConnor Taffe2024-02-18T20:30:00-06:00Integrating the Magnepan LRS into a home audio setup.
Years ago, I decided to upgrade my Edifier S2000 Pro powered bookshelf speakers, and bought a pair of Magnepan Little Ribbon Speakers (LRS). I had heard amazing things about ribbon speakers, but owning a pair of Magnepans had been out of reach for me until the release of the LRS. At the time of writing, the LRS has been discontinued and replaced with the more expensive LRS+. I placed an order in early April of 2021, and they arrived in late October. The Edifiers are excellent all-in-one speakers which now reside in my friend's apartment in Philadelphia.
These speakers required a lot of power to drive, often paired with an amp like the NAD M33 which can provide 380 watts into 4Ω. On their website, Wendell Diller wrote:
The LRS is a full-range quasi-ribbon speaker that was designed from the ground up to give you a pretty good idea what to expect from the 20.7 or 30.7. The LRS was designed using high-end electronics and monoblocks. The LRS will perform nicely with a receiver, but it was intentionally designed to extract the most from high-end amplifiers and electronics. The LRS expects more from a properly designed high-current amplifier. That is a radical departure from most entry-level loudspeakers. If you put your expensive high-end amplifier on the LRS, you will hear the difference.
High power amps are expenive, much more expensive than the LRS they'd be driving. To save money, I took to Facebook Marketplace and found an old Audio/Video Receiver: a Yamaha RX-V750. The Yamaha included good quality versions of all the components I needed: a DAC to handle TOSLINK audio out from my television; a preamp, and an amplifier which could handle a 4Ω load at 150 watts; a separate subwoofer output with configurable crossover; multiple analog inputs for a record player, tape deck, etc.; and a remote control -- for less than $100.
I paired these speakers with a Rythmik L12 subwoofer and set the crossover to 80Hz.
The issue with the Yamaha is that it would trigger protection at peak wattage, cutting out at high volume during movies or listening. So, I replaced the amplifier role with a dedicated one: a Schiit Vidar. Rated for 200 watts into 4Ω, it increased the peak volume but I still ran into its protection at high volumes. For years I planned to get a second Vidar and to run them in monoblock configuration, but the lack of 4Ω rating for the Vidar as a monoblock amplifier troubled me. I emailed Schiit and Daniel Katz responded:
For the Vidar's it should be completely fine, but I do have to warn you that with some speakers that are 4 ohms in monoblock mode, it may go into protection as well, there is still that possibility.
The other hurdle was that in monoblock mode, the Vidar only supports balanced inputs, but my Yamaha only outputs unblanaced (RCA) preamp outputs. The next step up, the Schiit Tyr, does support unbalanced inputs but would be around three thousand dollars for two monoblock amplifiers which can produce 350 watts into 4Ω.
Enter, Bryston
Late last year, I visited Memphis and stopped into the Memphis Listening Lab, where they have a stereo setup estimated to cost a quarter million dollars. In that stack of equipment, I spied a Bryston amplifier. I wondered if a Bryston amp could solve my problem, and glancing at the specs for the Brsyton 4B Cubed I saw that it could output a mind-boggling 500 watts into 4Ω, but at a price tag of over seven thousand dollars -- out of my price range. But what about an older model? I read some reviews from the late 90s and searched on eBay, settling on a 4B-ST which is rated for 400 watts into 4Ω -- and totalling $1,400 shipped.
Bryston 4B-ST
The Bryston has been incredible. Using the NIOSH SLM app, I was able to measure peaks of 102dB from the couch -- around ten feet from the speakers. A Kill-A-Watt reported bursts of power consumption at 700W. But even the Bryston can clip, I've played some very loud music and caused clipping where the green lights on the front of the app blink red, and even blown a fuse on the Magnepans. A clipped sound wave is essentially DC current at very high wattage, which can cause overheating of the speaker circuitry, the fuse protects against this by sacrificing itself. I use a 250V 3A quick-blow fuse for my Magnepans.
Punch
To celebrate, I made a batch of Regent Punch (printable recipe) and invited a few friends for a listening party. We passed around the Apple TV remote and queued up songs throughout the night. I think the best sounding were songs like Landslide by Fleetwood Mac, with acoustics and clear vocals. Rock songs were a bit harder to appreciate, but dance music like Hung Up by Madonna or Loneliness (Klub Cut) by Tomcraft was carried by the subwoofer. The subwoofer is usually blended at closer to a quarter turn on the volume knob, but I moved it an additional quarter turn as we played more dance music. The Bryston is 29dB gain compared to the Vidar's 26dB, so it may need to be adjusted up to blend correctly anyway. Reception was very positive.
Punch bowl filled with Regent's Punch
The punch is a recipe published by Punch Magazine, an excellent source of cocktail recipes, taken from Will Duncan of Chicago's Punch House. In their article, How Well Do You Know the Flowing Bowl, describes it as a favorite of King George IV. I made the following substitutions due to availability:
Original
Used
Batavia arrack
Cachaça -- a Brazilian liquor distilled from sugarcane.
Hamilton Jamaican Pot Still Gold Rum
Hamilton Jamaican Pot Still Black Rum, the same rum with more artificial coloring. The color of the punch was largely unchanged after addition.
It is, essentially, a funky Indonesian ancestor to rum.
Cachaça, rum and rhum agricole are all distilled from sugarcane.
Additionally, I scaled the recipe by one and a half times, and used fresh juice for each of the lemon, orange, and pineapple juices via the following methods:
Fruit
Method
Lemons
I squeeze with Consumer Reports Best Citrus Squeezers Editor's Choice, the Chef'n FreshForce Citrus Juicer -- it's simplest to handle when squeezing the nearly a dozen lemons necessary for this recipe. Each yields about 1/8 cup of juice, or 2 tablespoons.
Oranges
I use an old Proctor-Silex JUICIT -- a countertop appliance with a spinning reamer and pulp catcher which makes juicing oranges as easy as halving them and pressing them onto the reamer. Each yields about 1/2 cup of juice.
Pineapple
I peel and chop before transferring to a Vitamix and them straining the slurry through a fine wire strainer -- the remaining pulp is likely good for your digestion. Each yields about 2 cups of juice.
We visited our local Asian Supermarket for green tea. For three cups, I placed three tablespoons of dry green tea in a French Press, heated a kettle of water and then waited for it to cool to 180F (using an instant read thermometer), and combined to steep. After three minutes, the tea is ready to add to strain into the oleo saccharum.
https://connor.zip/posts/2024-01-02-upgrade-kubeadmFixing expired kubeadm certsConnor Taffe2024-01-02T00:00:00-05:00Refreshing certs and updating kubeadm
I had my kubernetes certificate expire as I was publishing the last blog post, and was able to resolve it by following these steps on Fedora with kubeadm:
Confirm they are expired by running
; kubeadm certs check-expiration
Update the certificates manually by shelling into a control plane node and running:
; kubeadm certs renew all
Now, upgrade to the next version of kubeadm you can update to. Find your version with:
Then find the last patch version of the next major release:
; yum list available --disablerepo='*' --enablerepo=kubernetes --showduplicates --disableexcludes=kubernetes
If you see something like:
Errors during downloading metadata for repository 'kubernetes':
- Status code: 404 for https://packages.cloud.google.com/yum/repos/kubernetes-el7-x86_64/repodata/repomd.xml (IP: 2607:f8b0:4024:c02::8b)
Error: Failed to download metadata for repo 'kubernetes': Cannot download repomd.xml: Cannot download repodata/repomd.xml: All mirrors were tried
Ignoring repositories: kubernetes
then update /etc/yum.repos.d/kubernetes.repo (see k8s package management), replacing the version with the version of the next major release:
# This overwrites any existing configuration in /etc/yum.repos.d/kubernetes.repo
cat <<EOF | sudo tee /etc/yum.repos.d/kubernetes.repo
[kubernetes]
name=Kubernetes
baseurl=https://pkgs.k8s.io/core:/stable:/v1.27/rpm/
enabled=1
gpgcheck=1
gpgkey=https://pkgs.k8s.io/core:/stable:/v1.27/rpm/repodata/repomd.xml.key
EOF
After which, you must update this file on each machine for each major version upgrade.
After downgrading to 1.30.8, all pods stopped crashing.
https://connor.zip/posts/2024-01-01-ibm-pc-xtDiscovering the IBM PC XTConnor Taffe2024-01-01T00:00:00-05:00Exploring the IBM PC XT, the sequel to the original PC
Happy new year! As 2023 comes to a close, I'd like to start documenting the journey I've been on over the last month or two, exploring the IBM PC XT.
In mid-November, I came across a listing for an IBM PC XT alongside its monochrome monitor and Model M keyboard in my local area. I met the seller at his home, and he introduced himself as a researcher at the local medical school (UAMS) who was planning to move to Northwest Arkansas. The PC was actually the driver for a System/36 model 5364 which he also had for sale, and contained the driver card -- a brown ISA card with a many-pin connector on the back 1 -- which I asked him to keep for whoever purchased the System/36. He reached out a few weeks later to say someone had driven down from Oklahoma for it, and was very happy to have the controller card. There are examples of a working "Desktop 36", here's a video of one booting up, but it seems like documentation and software are scarce.
Below is the system as I received it, with only a half-sized 5.25" double-sided, double-density (360k) floppy disk drive and no hard drive. The keyboard is a Model F I had on-hand while I was cleaning the Model M. The floppy drive is not completely functional, generating a 601 on boot and sometimes failing to read media (always failing to boot from media).
An IBM PC XT booted into ROM BASIC
The system contains an Intel 8088 without an 8087 floating point coprocessor (they are seldom present), and 512k of RAM populated into a 256k-640k board. The first board revision supports 64k-256k of RAM, while the second supports 256k-640k. The 8088 uses a 20-bit address bus, which can only address 1MB of memory. 640k of this 1MB is available for RAM, while the rest is reserved for use by cards -- this is called "low memory." On boards with 64k-256k of RAM populated, the remaining 384k can be provided by memory expansion in the I/O channel. Upper memory is used for hardware mapped video memory, the system BIOS, and BIOS expansions such as hard drive controller card ROMs. On later systems this is called real mode.
The earliest PCs such as the XT had only 8-bit ISA slots, followed by 16-bit longer ISA slots in the PC AT -- 8-bit cards work in 16-bit slots and some 16-bit cards support 8-bit slots. Inside it were:
an IBM Monochrome Graphics Adapter card, which includes the TTL (transistor-transistor logic) monitor connector for the IBM Personal Computer Display and a DB25 parallel port for a printer;
a Floppy Disk Controller card which utilizes an "edge connector" instead of a 34-pin connector as found in later controller cards;
Each card may use an interrupt request (IRQ), an I/O address, and portions of high memory for ROM. They may use multiple, e.g. in the case of multi-purpose cards. These are often configurable either through software or dip switches on the card, and must not conflict. For ROMs, lower addresses are run first, so ROMs can be sequenced. On the XT, only IRQs 0-8 are available, with 0 and 1 taken by the system timer and keyboard. The canonical assignments are:
ROM addresses must align on 2k boundaries, but the cards I've seen use 8k ROMs and allow moving to several 8k aligned addresses. Here is an example setup:
ROM Address
Card
0xCC00
XT-IDE controller card
0xCE00
High density floppy disk controller card
0xC800
Hard drive controller card
0xD000
Network card expansion ROM slot
Some ROMs replace the Initial Program Load (INT 0x19), such as the high density floppy controller or XT-IDE; ordering these is important. For instance, to configure the high density floppy controller card, we need its IPL to be last, so it needs to be configured at a higher address than an XT-IDE. In other cases, the XT-IDE ROM needs to be placed higher so that we see its UI on boot instead of having to wait for the high density floppy controller's ROM to attempt to boot from a floppy before passing control.
A program like CheckIt is useful for determining what IRQs, addresses, etc. are used and by what hardware.
Installing Software
Without a hard drive or a working floppy drive and lack of floppy disks, the first challenge was loading software onto the machine. I utilized two pieces of modern equipment popular in the community:
An XT-IDE rev. 4, which is an ISA card which provides an IDE connector. It utilizes the XTIDE Universal BIOS in ROM to allow booting from IDE media. You can buy these as a kit or fully assembled. Alongside this you'll need an IDE media, I used a CF to IDE adapter (CF cards are uniquely suited to IDE), and a 128MB CF card I had lying around, along with a molex to floppy drive adapter cable.
A USB CF card reader then provides the easiest method to copy files to and from your PC, or to do backups.
A Gotek running FlashFloppy, which is a floppy emulator which allows booting from or reading and writing to floppy images on a USB drive. These are available pre-flashed, or you can acquire a Gotek (note the model) and flash it yourself. You will need a molex to floppy drive power adapter as above, and either an edge connector to pin adapter or a floppy drive controller and cable with pins. The Gotek connector has no plastic guide, so ensure the pins line up and that the markings for pins 1 and 34 match (on a ribbon cable, the red one is pin one).
Note that an XT cannot read 1.4MB high density 3.5" floppy images without an expansion ROM like the one in Sergey's floppy controller. This limits any images we use to 360k 5.25" disk images. Be sure to add a config file with something like:
Insert the flash drive into our Gotek and power on the XT, you should see our image name displayed on the Gotek (if not, use the dial to locate it); the machine should attempt to boot from the Gotek.
You can simply hit ENTER at the date and time prompts.
Run WIPEDISK.EXE to zero out our CF card. If booting to e.g. MS-DOS 5.0, you'll need to hit F3 to exit the setup utility; simply run SETUP after wiping.
The below apply to IBM DOS 3.30, but not later DOS installations with automated setups like MS-DOS 5.0:
Run fdisk and create a primary DOS partition. DOS 3.3 supports a maximum partition size of 32MB, so a later version of DOS is necessary for partitions up to 2GB using FAT16. You may create additional logical partitions to use up more space with additional drive letters.
To discover the partition, we must reboot. Then we can run format c: /s to format the drive as a system boot drive. You can also run format c: followed by sys c: for the same effect.
Next, we'll need to copy all files to a new DOS folder:
MKDIR C:\DOS
XCOPY A:\*.* C:\DOS
With an operating system installed, we can now start installing software. For instance, Lotus 1-2-3 2.3 or WordPerfect 5.1 as period-correct productivity software.
High Density Floppy Disks
High Density disks such as 1.2MB 5.25" floppies or 1.44MB 3.5" floppies require new firmware on an expansion ROM. Sergey's isa-fdc project provides this firmware on a ROM in an ISA floppy drive controller card capable of supporting "IBM PC, AT, and PS/2 floppy types from 160 KB 5.25" single side disks to 2.88 MB 3.5" ED (Extended Density) disks."
Sergey Kiselev's Floppy Disk Controller
These can be purchase pre-assembled, although shipping from Bulgaria does take a while. The key for the DIP switches is conveniently printed on the back, initially mine was set to a ROM address which collided with my Seagate ST11R hard drive controller card, so I set switch block one to 01000001 and two to 11101110. This combo uses IRQ 4 for COM1, and uses the corresponding I/O port 0x3F8, enables the ROM, makes the EEPROM writable so we can run the setup with F2, and sets the ROM address to 0xD0000 (what the XT-IDE uses). I also set the motherboard dip switches to reflect one floppy disk, since I only wanted to use a single drive at a time.
Booting the machine with the hard drive controller in place, we can leave the drive empty and boot from our DOS installation on the hard drive. With an empty physical 3.5" drive I get an "Boot failed, error 80" where I can press F to boot from the hard drive -- this could be an issue with the drive itself. If I then insert the disk, I can navigate to A: in DOS and see the files with dir. Funnily enough, the last edited timestamp of each file corresponds with the DOS version -- 6:22AM on May 31st, 1994.
DIR on a 3.5 inch 1.44MB floppy disk
I tested booting from high density disk both with an XT-IDE using an image of my DOS 6.22 setup disk I created with dd, and a real 3.5" drive with the real disk. Both displayed "Starting MS-DOS" before hanging, which I believe is a common problem with the 6.22 installer on the XT. On a different XT with the same amount of memory, I was able to load the 6.22 installer from a Gotek after adding interface=ibmpc to the FF.CFG file.
DOS 6.22 Intstaller
In case (like me) you accidentally wipe it attempting to configure another card; the ROM image can be reflashed using XTIDECFG.
Printing
Each application provides its own printer drivers, and printing under DOS is reliant on parallel ports. Lotus 1-2-3 configures printers during installation or later by running INSTALL. For a modern printer like an HP LaserJet, I use the Apple LaserWriter driver, which sends PostScript to the printer. Early HP Laser printer drivers may also work since they'll use an older version of HP's control language.
With the LocalTalk PC card and AppleShare PC software described below, you can print to virtual parallel ports which are networked printers. I've successfully printed to my Apple ImageWriter II over LocalTalk directly, and my HP LaserJet with a 635n EIO card over Ethernet via an AsanteTalk bridge.
These parallel ports are available to DOS as well, not just applications with printer drivers. A command like:
C:> DIR >LPT3
will pipe a directory listing to our third parallel port, in this case a virtual port managed by AppleShare PC and configured to send to the ImageWriter II.
Upgrading
To max out the memory and add a coprocessor, I found an XT motherboard on eBay:
IBM Motherboard
Using a chip lifter, an indispensable tool when dealing with old hardware, I was able to move the last two banks of memory onto my XT's motherboard. On the 256k-640k boards, the last two banks use the smaller memory chips which are used in the 64k-256k boards. Once those banks were populated, I just needed to toggle dip switches 3 and 4 off and the memory test passed without issue.
The 8087 coprocessor was similarly simple, although lifting longer chips and fitting them into the socket takes plenty of light and patience. Then flip dip switch 2 off. This allows for quicker floating point operations in programs like Lotus.
A NEC V20 processor is another great investment, for only $3.35 and some waiting, you can swap out your 8088 for a 80186-compatible and faster processor -- without changing the clock speed.
Graphics
IBM Color Displays are expensive, but after a week or two of searching, emailing Craigslist sellers, etc., I found a listing on eBay for an entire IBM PC XT with Hercules Color Card and a CGA Display and made an offer. At the same time, I made an offer on another CGA Display. My luck was such that both were accepted, and I ended up with two working CGA monitors and another entire XT. Around the same time I found another XT with an IBM CGA card, one that'd been stored in a garage and was a bit dirty. By some miracle, both of these XTs worked, were configured at the maximum of 640k of RAM (the first via expansion card, and the second via 640K mainboard), and contained a hard drive controller card and working hard drive.
Turbo Pascal taking advantage of color and monochrome monitors
To enable color, you'll need to install a CGA card (e.g. a Hercules Color Card or IBM Color Graphics Adapter), and toggle dip switch 5 (80 column) or 6 (40 column) on the motherboard on. With both an MDA and CGA (or Hercules Color Card), applications can utilize two monitors. With Turbo Pascal 7.0, simply use the /d option. Lotus 1-2-3 can also utilize the color monitor to display graphs, as demonstrated in this video.
CGA graphics are lower resolution than monochrome, so are more useful for graphs or games; while the monochrome monitor is better for text.
Try PAKU PAKU for a game which takes advantage of CGA graphics. You'll notice a little "snow," which happens when software writes to the video memory while the video memory is being read out to the display. The XT-IDE BIOS also takes advantage of CGA to highlight the boot options in color, but also produces some snow.
Monochrome
On the monochrome side, there are improvements to be made as well. Hercules Graphics, a de-facto standard supported by many applications and cards, adds a bitmapped graphics mode to the functionality provided by the IBM Monochrome Graphics Adapter. Lotus 1-2-3 uses this to depict graphs, while Hercules' HBASIC is a version of BASIC with facilities for drawing graphics to the screen as discussed in this 1983 BYTE Magazine review.
I found the card below from a recycler on eBay, but several clone boards which offer the same functionality are available too:
Hercules Graphics Card
You may notice the missing chip marked C17, this is where the font ROM should be! The seller was kind enough to refund me and allow me to keep the card, so I'm working on finding this chip. We can tell that the card is at least somewhat functional otherwise though, because the screen is pained with green boxes except where the text would be highlighted. The ROM is the same type used in the MDA card, the Hercules Color Card, and the IBM PC XT motherboard, but with different data. In fact, the data is so similar on the Hercules Color Card that the HGC will use it, but this results in two identical characters stacked on top of each other for each character, because CGA text is lower resolution (8 pixel instead of 14).
The ROM is 24 pin, but is compatible with the AT28C64 28 pin EEPROM when adapted. This means we can use a reflashable, cheaply available ROM in place of the old Font ROM. We can use any card with a writable ROM chip slot (such as the XT-IDE or Sergey's floppy controller) and XTIDECFG to flash the EEPROM from an image, such as this one. I ordered a handful of pre-assembled 2364 adapters along with AT28C64-12PC EEPROMs; after flashing them using XTIDECFG, the PC still emitted one long beep followed by two short and the display showed the top half of a character but a solid bottom half -- I also noticed some tick mark characters in random positions on screen.
Hercules Graphics Card with ROM
The Plus is similar but uses a new chip and on-card RAM to provide RAMFont capabilities.
Hercules Graphics Card Plus Ad
MFM/RLL Hard Drives
The second XT also contained a 20MB hard drive and Western Digital Modified Frequency Modulation (MFM) controller card, alongside a full-sized floppy disk drive. As expected, the computer refused to boot from the hard drive, but once reformatted it worked perfectly. Similarly, my third XT came with a 31.5MB ST-238R RLL drive and Seagate ST11R Run Length Limited (RLL) controller card alongside two half-height floppy drives. The hard drive booted once to the existing install before giving out and needing to be reformatted. MFM and RLL are simply different encodings, where RLL packs more data onto the same area and requires a more accurate hard drive mechanism. When formatting, an RLL drive will use more sectors pre track -- the ST238R can be formatted with 26 sectors per track instead of the MFM's 17.
Seagate ST-238R Ad
These hard drives are "dumb" in that the controller does a "low-level partitioning" of the drive and stores information such as bad sectors, which the manufacturer supplies as a list on the sticker. All hard drives have some defects, but the drive is manufactured such that there is enough room to handle this and still provide the advertised capacity. Controller cards contain a ROM which will contain a copy of a partitioning utility.
To low-level format a drive, we can use DEBUG (included with a DOS install) to branch into the ROM's formatting utility. The address depends on the manufacturer:
Manufacturer
Address
Western Digital
G=C800:800
Adaptec
G=C800:CCC
Omti
G=C800:6
Seagate, DTC (Data Technology), etc.
G=C800:5
A:> debug
- G=C800:800
See this hints file for more information on individual drives, such as cylinder counts, etc.
For my Seagate ST-238R, this is how I configured it (this guide may help):
From a bootable floppy disk with DEBUG (formatting fails with an XT-IDE installed), run:
A:> DEBUG
- G=C800:5
This launches the ST11 BIOS v2.0 Hard Disk Initialization Utility, assuming the card jumpers are using the default setting (no connections).
Choose the drive to format, I choose 0.
Confirm the existing configuration for the drive or input a new one, mine is as follows:
Option
Value
Total cylinders on the drive
615
Total heads on the drive
4
Number of sectors per track
26
Starting write precomp cylinder
616
Drive model
ST-238R
Drive serial number
82119697
Interleave
4
Note the track value is 26, not the standard 17 for MFM, which will allow us to use 32MB instead of 20MB. The optimal interleave should be noted by the utility, SpinRite can also test interleave values to find the optimal.
Tools
SpinRite is a good alternative to ordinary low-level formatting, because it doesn't destroy the contents of a disk. However, it does not work with many kinds of drives, especially those that use sector translation.
Controllers like the ST11R cannot be formatted with SpinRite because of sector translation (which SpinRite will detect), but once formatted and partitioned with fdisk SpinRite is able to test them.
SpinRite is an excellent tool for detecting bad sectors -- run the complete analysis after formatting your drive to detect any bad sectors. The analysis will test every sector of the disk and takes several hours. It can also choose the best interleave setting for your drive. Below is a readout of a completed scan:
SpinRite scan summary
Another option is SpeedStor, which can also be used to low-level format disks. It can also create 32MB partitions, if your DOS isn't new enough to support larger ones, but I prefer to use fdisk for that.
XT-IDE
My card came loaded with the "tiny" version of XUB, which doesn't allow selecting which drive to boot from (it always checks floppy drives first). To swap it, run XTIDECFG and choose the "XT" BIOS, re-flash it, ensure that "SDP Command" is set to "None." The "auto detect" functionality should detect your card revision information, I/O address, etc. Ensure the "W" dip switch is in the on position when re-flashing, and toggle it off otherwise to avoid accidental overwrite with e.g. driver misconfiguration.
XT-IDE card with CF card adapter and CF card
Some network cards use the same I/O address (0x300) as the XT-IDE uses by default, the first six dip switches on the SW1 block, labeled A9-A4, are the binary encoding of the I/O address. By default they will be (starting at A9) 110000 or 0x30, you can change it to the standard hard drive controller location of 0x320 by switching A5 to on, making 110010. Once this is done, the card must be reflashed. The XUB won't be able to find the CF card, so you must boot from a prepared disk image with XTIDECFG. Once booted, auto-detect should update the address correctly, if not just set it manually to e.g. 320 and 328.
As long as there is no I/O address overlap, XT-IDE cards can be used alongside a hard drive controller cards. During boot, the IDE drive will be drive D: and the hard drive will be C:. By pressing D, you can switch the IDE drive to boot as the primary hard drive, and once booted the hard drive will show up as D:. This is especially handy when initializing a hard drive: after low-level formatting, you can use the formatting tools of your existing DOS installation via fdisk followed by format d: /s. A DOS booted from one disk cannot mark a second disk's primary partition as active, but a PC-DOS 3.3 boot disk's fdisk was able to mark a primary partition active which was created with PC-DOS 2000 and greater than the 32MB limit that PC-DOS 3.3 could create itself. You must mark the partition active or the system won't boot using that disk (in my case it silently continues to BASIC).
Mounting
To mount the CF card under macOS, sometimes it will show up as blank. This is because macOS is stricter about FAT16 filesystems than DOS, but it's easy to resolve with repairVolume:
# Identify your CF card's device
; diskutil list external physical
# Replace /dev/disk4 with your disk
; diskutil unmountDisk /dev/disk4
; diskutil repairVolume /dev/disk4s1
; diskutil mountDisk /dev/disk4
Additionally, macOS will create hidden files such as a trash folder, spotlight index, fsevents folder, and attribute files for individual files. For a given volume name, you can disable some of these:
; sudo mdutil -i off -d /Volumes/MY_DISK
If you are having difficulty copying a file onto a disk, these files may be the culprit. Use ls -a to view them, and then rm to delete. Under Settings, Privacy & Security, Full Disk Access, you'll need to grant your terminal emulator access so it can delete spotlight indexes.
Backups
To back up your system, you can use dd:
# Identify your CF card's device
; diskutil list external physical
# Replace /dev/disk4 with your disk
; dd if=/dev/disk4 of="$HOME/Desktop/xt-backup-20240101.img"
This .img file can be opened and edited like any floppy disk image. Using an emulator like 86Box, you can even use it with a virtualized IBM PC XT -- unfortunately I've not been able to successfully boot from an image. Using this method, I was able to install IBM PC-DOS 2000, which is only distributed on 1.4MB 3.5" disks. After installation and backup, I was able to repartition my CF card into a single 128MB partition, and use rsync to copy all the files from that backup image to my current disk image:
an Analog Input Card, which provides a game port as well as a hole matrix for additional components;
Analog Input Card
a Parallel Card for printers;
Parallel Card
a Floppy Controller Card, each XT included one;
Floppy Controller Card
Professional Debug Facility
The Professional Debug Facility is a Terminate and Stay Resident (TSR) program for DOS which works alongside an ISA card which provides a unmaskable (un-ignorable) interrupt, so that whatever your application or the operating system is doing, the debugger can be invoked.
Professional Debug Facility
When invoked, either through a breakpoint in a program or via the card's button, the Resident Debug Tool presents the current execution environment:
Resident Debug Tool
It seems to fill a similar niche to MacsBug on the Macintosh, which can also be installed as a resident program and be invoked with a key press.
Networking
The IBM PC XT existed during the wild west of LAN networks: LocalTalk, Ethernet, Token Ring, StarLAN, Novell NetWare, etc. We'll focus on LocalTalk (AppleTalk) and Ethernet (IP).
Apple LocalTalk PC Card
The Apple LocalTalk PC Card, described in this OVCR post, enables printing to AppleTalk printers and mounting of AppleShare drives, but won't work with Netatalk 2.x printers or shares. Another write-up exists in this Reddit post, and another in this blog post. There is also information on Corey Anderson's blog, the apparent genius behind a talking toaster.
Software:
A 1.4MB disk image is available, made from 360K disks which I'm still searching for an image of.
Farallon's version of the software is available at the end of this write-up. This is the only version I've found on 360k floppies as required for the IBM PC XT, by running this install you should generate a config which can be used with another version.
Cameron at OVCR shared his files with me. The zip can be unpacked to C:\ASPC, and a NET.CFG file must be added to match your configuration. Appendix C of the User's Guide has details.
The manuals are available at BitSavers -- use rsync, it's quicker:
Farallon's fork of this software places several batch files into C:\PHONENET alongside the programs, ABOTH.BAT loads facilities for both printing and files, but doesn't load DA as a TSR by default (so the Alt+A hotkey doesn't work) -- to do this simply add the /r switch. The CONFIG.SYS file should contain FILES=20 or higher. In the Apple version, the loading script is placed directly into AUTOEXEC.BAT, below is an example:
lh C:\aspc\LSL
   if errorlevel 1 goto aspc_err
lh C:\aspc\LTALKP /NAME=LTALK$
   if errorlevel 1 goto aspc_err
lh C:\aspc\ATALK
   if errorlevel 1 goto aspc_err
lh C:\aspc\ASP_WS
   if errorlevel 1 goto aspc_err
lh C:\aspc\ASHARE
   if errorlevel 1 goto aspc_err
lh C:\aspc\MINSES
   if errorlevel 1 goto aspc_err
lh C:\aspc\REDIR
   if errorlevel 1 goto aspc_err
lh C:\aspc\PAP_WS
   if errorlevel 1 goto aspc_err
lh C:\aspc\APRINT
   if errorlevel 1 goto aspc_err
lh C:\aspc\DA /r
   if errorlevel 1 goto aspc_err
lh C:\aspc\ANET AUTO
   if errorlevel 1 goto aspc_err
REM ***  Memory usage for the above programs is approximately 200 K bytes.
goto skip_aspc
:aspc_err
echo *** A fatal error has occurred while loading AppleShare PC. ***
pause *ASPC*
:skip_aspc
You can use goto skip_aspc above this to only load AppleShare PC under certain circumstances, since it uses around 200KB out of 640KB total. Once loaded, using either Farallon's or Apple's version, the DA command or hotkey will load you into the "desktop accessory." Using tab and F keys, you can navigate through adding a printer and mounting it as a parallel port, or appleshare volume as a drive letter.
NCSA Telnet reportedly works with AppleTalk, but I have not had success with my Netatalk-based IP Gateway. I found this copy of version 2.3, here's the relevant excerpt from Telnet's FAQ:
Can I use Telnet with AppleTalk?


Using an Appletalk network involves some special considerations. First,
you must load the Appletalk driver into memory. Version 1.0 of the
"ATALK.EXE" driver was used in the development of NCSA Telnet.

The second consideration involves the "interrupt=" line. The "interrupt="
line in your CONFIG.TEL file refers to the software interrupt the
Appletalk driver is using, not the hardware interrupt the card is set to.
For example, if your Appletalk card is set to IRQ2, you should NOT set
the "interrupt=" line to "2". Instead, the value should be set to the
software interrupt, usually "interrupt=60" or "interrupt=5C".

Static addressing does not work at the current time in NCSA Telnet 2.3
using the AppleTalk driver. Therefore, NCSA Telnet ignores any IP address
you set in your CONFIG.TEL file, and assigns an IP address to your PC by
the Appletalk gateway.

Some AppleTalk users have been more successful with v2.3.03 of Telnet.
If you would like to try v2.3.03, it's available on our anonymous ftp
server in the /Telnet/DOS/contributions directory.

One of our users wrote:

To load telnet from the dosprompt [nothing telnet-specific in
config.sys or autoexec.bat we use the following sequence:

lsl.com
ltalk.com
atalk.com
ashare.com
compat.com
d:\network\telnet\telbin -n -h d:\network\telnet\config.tel

where all of the atalk stuff would be in the current directory and all
of the telnet stuff is in d:\network\telnet.

broadcast=255.255.255.255
netmask=255.255.255.0
hardware=atalk          # network adapter board (Appletalk)
interrupt=60            # I have an Apple or Farralon card and PhoneNET Talk
			#remember to run COMPAT.COM for NCSA to run on
			# LocalTalk
#interrupt=5C           # I have a TOPS Flashcard

mtu=512                 # maximum transmit unit in bytes
maxseg=512              # largest segment we can receive
rwin=512                # most bytes we can receive without ACK
The COMPAT.COM file is not loaded by default and is essential. Under Farallon's fork, this is commented out in the batch script, whereas it needs to be added manually with earlier versions.
I've also found copies of PCROUTE 2.24, which I am hosting: source, binaries. PCROUTE allows an IBM PC to act as a router, bridging between LocalTalk, Ethernet, SLIP, or StarLAN.
IP
IP Networking is possible on an XT given a card with a packet driver and mTCP. I was able to find a couple of Intel 8/16 LAN Adapter cards, which are compatible with both 8- and 16-bit ISA slots and configurable on both with SOFTSET.EXE. A copy is available at ftp://ftp.oldskool.org, navigate to pub/misc/Hardware/Intel/8_16 LAN ADAPTER/.
The files e16disk.exe and softset2.exe are self-expanding archives which should be run in a new folder on your XT. In the resulting files from e16disk.exe, the softset.exe program is a stand-along configuration utility for your card, which allows setting a new IRQ and I/O address based on your machine's available options. Also among the files is packet/eth16.com, the packet drive. You may need exp8.com within the FTP folder on an 8088. The softset2.exe files contain a softset2.exe which is nearly identical to softset.exe. Via softset, you can also configure the address of the boot ROM (or disable it) -- the socket supports AT28C64 chips which can be programmed with an XT-IDE board, so could support additional ROM software.
Once the card is configured, you'll need to load the packet driver by executing exp8.com (or exp16.com, add it to AUUTOEXEC.BAT), which will allow the mTCP programs a standard interface. Programs like PCROUTE can also support cards via a packet driver. With mTCP working, you can finally access BBSs, IRC, and even ChatGPT.
Intel 8/16 LAN Adapter
Unfortunately, my cards were defective and failed softset's diagnostics under several configurations. I reached out the eBay seller who is sending another two cards after running diagnostics themselves, and I'll fill this in as I get TCP/IP working. A third card, which also failed SOFTSET's diagnostics for the "82586 chip," did work:
Run SOFTSET.EXE and automatically configure the card. Take note of ROM address, as this may conflict with other cards you have. I use 0xCC00 for my XT-IDE ROM, 0xCE00 for my high density floppy controller, 0xC800 for the MFM hard drive controller, and 0xD000 for the Intel 8/16 LAN Adapter (empty). Also note the I/O address, I used 0x360-0x36F as it is listed as for use with a PC Network -- the XTIDE by default uses 0x300, and the hard drive controller card uses 0x320. The software chose available IRQ 2.
Confirm the software I/O address, usually 0x60 by running
EXP8.COM 0x60
Assuming mTCP is installed at C:\MTCP, add a TCP.CFGconfiguration file with the following contents:
PACKETINT 0x60
HOSTNAME xt
MTU 1500
The MTU line configures mTCP to use the maximum packet size according to RFC 894. Other fields are unnecessary if using DHCP (most networks do). mTCP's DHCP updates the configuration with IPs and other lease metadata each time it's run.
and EXP8.COM under C:\ETHEREXP, add the following to your AUTOEXEC.BAT:
SET MTCPCFG=C:\MTCP\TCP.CFG
C:\ETHEREXP\EXP8.COM 0x60
C:\MTCP\DHCP.EXE
This will load the packet driver and run DHCP on each boot. Alternatively, place the last two lines in a batch file and run it only when you wish to connect.
Adding a SLEEP between the packet driver and DHCP may be necessary to resolve an issue where the DHCP client fails to fetch a lease on the first two attempts because the packet driver has not fully initialized.
Once the packet driver is loaded and DHCP is run to establish an IP address, the other mTCP programs will read that info from the updated config file pointed to by MTCPCFG. For instance, we can use TELNET to access other computers across the Internet:
Star Wars playing via Telnet
Or simply across our local network, such as this Linux VM:
Linux shell via Telnet
The SOFTWARE.DOC file from a Crynwr distribution lists software that works with packet drivers, and where you could get it in 1993.
Telnet
If using a monochrome monitor via either MDA or Hercules, set TERM=pcansi-mono so that programs emit monochrome text (by default TERM=ansi). Otherwise, telnet will map colors to black or white which can result in invisible black-on-black text (for example, the tmux status bar). You may need to install the pcansi-mono terminfo entry on your Linux machine, on Fedora install ncurses-term.
sudo dnf install -y ncurses-term
You may also need to set LANG=en_US to disable UTF-8. You can have telnet set TERM automatically by adding:
In testing telnet with tmux, I uncovered a bug in its auto-margin implementation. Once I tracked the issue down, mbbrutman was able to patch telnet and make a test version available with the fix. Previously, tmux would trigger the cursor to move down to a new row by drawing the status line across the bottom of the screen. On each update of the status bar (which contains the time), the problem would compound and the text of the screen would move a line further up from the cursor. The following chronicles my experience isolating the issue:
First, I was able to get tmux working over telnet by using a termcap with automatic margins disabled. That way, tmux won't write the last character of the last line until it expects a line wrap, which side-steps our issue. This works either using an existing termcap like vt100-nam, or by crafting a new one:
; infocmp -C -T pcansi-mono > pcansi-mono-nam
; sed -i 's/pcansi-m|pcansi-mono|ibm-pc terminal programs claiming to be ANSI (mono mode):/pcansi-mono-no-am:/' pcansi-mono-nam
; sed -i 's/:am:/:/' pcansi-mono-nam
; tic pcansi-mono-nam
The tic command will compile the new pcansi-mono-nam terminal definition and place it under a personal terminfo database at: ~/.terminfo/p/pcansi-mono-nam. To place it under /usr/share/terminfo, run tic as root. Although tmux will find the terminal definitions under ~/.terminfo, screen will not.
Now, if we set TERM=pcansi-mono-nam, tmux would work correctly. We can set TELNET_TERMTYPE to our custom pcansi-mono-nam in TCP.CFG to set it automatically.
Wrapping means moving the cursor from the right margin to the left margin of the following line. Some terminals wrap automatically when a graphic character is output in the last column, while others do not.
The documentation notes that the am indicates the terminal will scroll if a character is placed in the last column of the last line. Using infocmp, we can show that our pcansi-mono terminal does have am, indicating a character should not be placed in the last column of the last line.
; infocmp -C -T pcansi-mono
#	Reconstructed via infocmp from file: /usr/share/terminfo/p/pcansi-mono
# (rmacs/smacs removed for consistency)
pcansi-m|pcansi-mono|ibm-pc terminal programs claiming to be ANSI (mono mode):\
	:am:bs:mi:ms:\
	:co#80:it#8:li#24:\
	:al=\E[L:bl=^G:bt=\E[Z:cd=\E[J:ce=\E[K:cl=\E[H\E[J:\
	:cm=\E[%i%d;%dH:cr=\r:ct=\E[3g:dc=\E[P:dl=\E[M:do=\E[B:\
	:ho=\E[H:kb=^H:kd=\E[B:kh=\E[H:kl=\E[D:kr=\E[C:ku=\E[A:\
	:le=\E[D:mb=\E[5m:md=\E[1m:me=\E[0m:mr=\E[7m:nd=\E[C:\
	:..sa=\E[0;10%?%p1%t;7%;%?%p2%t;4%;%?%p3%t;7%;%?%p4%t;5%;%?%p6%t;1%;%?%p7%t;8%;%?%p9%t;12%;m:\
	:se=\E[m:sf=\n:so=\E[7m:st=\EH:ta=^I:ue=\E[m:up=\E[A:\
	:us=\E[4m:
If your terminal is a “true” auto-margin terminal (it doesn’t allow the last position on the screen to be updated without scrolling the screen) consider using a version of your terminal’s termcap that has automatic margins turned off. This will ensure an accurate and optimal update of the screen in all circumstances. Most terminals nowadays have “magic” margins (automatic margins plus usable last column). This is the VT100 style type and perfectly suited for screen. If all you’ve got is a “true” auto-margin terminal screen will be content to use it, but updating a character put into the last position on the screen may not be possible until the screen scrolls or the character is moved into a safe position in some other way. This delay can be shortened by using a terminal with insert-character capability.
Confusingly, they suggest removingam if the terminal supports "true" auto-margin, and this is what side-stepped the behavior with tmux.
However, the real issue lied in mTCP's telnet implementation, which should implement "magic margins." It correctly does not automatically wrap when the final character is written, but it does when certain additional control characters are sent. In the source code, in TELNETSC.CPP:
// Overhang mode is kind of goofy and I created it based on experimentation I
// did with putty.  Basically, if the cursor is in the last column and you
// print a character there you do not automatically wrap.  You only wrap to
// the first column on the next line if another character gets printed.
// This allows you to put a character in the last column, and then interpret
// a control code such as Backspace, LF or CR while still on that same line.
From the telnet server host, we can run the following to get a hex dump of the packet contents, including the status line that caused the issue:
By testing this captured line with the printf command, I was able to show that the line without the trailing escape sequences did not wrap, but with them it did.
Set the cursor position to (25, 1), the first character of the last row of the screen
tput cup 24 0
...
80 characters of text, placing us at the last character, (25, 80)
\e[0;10m
Select Graphic Rendition
Resets all colors using the sgr0 value for our terminal
tput sgr0
Note \e[ aka \x1b[ aka \033[ is known as a Control Sequence Introducer (CSI), so these are sometimes redundantly referred to as CSI sequences. See Colours and Cursor Movement with tput for more information on producing sequences.
Resources
Here are a few helpful resources I found during this project:
https://connor.zip/posts/2023-11-04-mswfwMicrosoft Windows for WorkgroupsConnor Taffe2023-11-06T23:35:00-05:00Installing MS-DOS and Windows 3.1 from old floppies
Last Sunday I was able to partake in Little Rock's annual Cornbread Festival, which takes place in my neighborhood. We sampled blueberry cornbread, mexican cornbread, cornbread and chili, cornbread and barbeque, corndogs, and mealie bread, among others. On the way back, we stopped by a local thrift store operating out of the bottom of a Methodist church and stumbled upon a collection of floppy disks.
Microsoft Windows for Workgroups on eight disks
Among them were these:
Microsoft Windows for Workstations on eight disks
MS-DOS 6.22 on three disks
Sound Blaster 16 on four disks, including one for a text-to-speech program
ATi Mach 64 drivers on three disks
alongside seventeen other miscelaneous disks.
Imaging
I had obtained a Dell Floppy Drive Module, a USB 3.5" floppy disk drive, from Goodwill some time ago but hadn't any high density disks to test it with. Although rebadged Dell, it is a TEAC FD-05PUB:
TEAC FD-05PUB one-pager
It didn't work initially with an Apple USB C to USB adapter on my MacBook Pro, but plugging it into my Dell Monitor which was itself attached to the MacBook over USB C worked. The floppy disks showed up as any other external drive would, and using dd I was able to make some images.
; diskutil list external physical
/dev/disk6 (external, physical):
   #:                       TYPE NAME                    SIZE       IDENTIFIER
   0:                            MSWFW1                 *1.5 MB     disk6
I wrote a little script at ~/bin/fdimage:
#!/usr/bin/env bash
set -euo pipefail

name=""
while getopts "o:" opt; do
  case $opt in
    o)
      name="$OPTARG"
      ;;
    *)
      echo "Usage fdimage [-o out.dmg]" > /dev/stderr
      exit 1
      ;;
  esac
done

disks=$(diskutil list -plist external physical | plutil -extract 'AllDisksAndPartitions' json - -o -)
ndisks=$(jq -r length <<< "$disks")

if [[ "$ndisks" -ne 1 ]]
then
  echo "Expected one external disk, but found $ndisks" > /dev/stderr
  diskutil list external physical > /dev/stderr
  exit 1
fi

disk=$(jq -r first <<< "$disks")

volume=$(jq -r '.VolumeName // empty' <<< "$disk")
if [[ -z "$name" && ! -z "$volume" ]]
then
  name="${volume}.dmg"
fi
if [[ -z "$name" ]]
then
  echo "Disk has no name, provide one with -o" > /dev/stderr
  exit 1
fi

# Unmount disk
dev=$(jq -r .DeviceIdentifier <<< "$disk")
dev="/dev/$dev"
mount=$(jq -r '.MountPoint // empty' <<< "$disk")
if [[ ! -z "$mount" ]]
then
  diskutil umount "$dev"
fi

sudo dd if="$dev" of="$name" bs=512 conv=noerror,sync status=progress
It assumes you'll only have one external disk drive plugged in, and uses diskutil to image the file into a .dmg. The .dmg can be mounted just like any other .dmg, by double clicking it. Usage looks like this, using one of the mach64 disks as an example since they don't have a unique name, which forces the use of -o.
; fdimage -o "MACH64 3.dmg"
Volume NO NAME on disk6 unmounted
Password:
  1442304 bytes (1442 kB, 1409 KiB) transferred 64.089s, 23 kB/s
2880+0 records in
2880+0 records out
1474560 bytes transferred in 64.642070 secs (22811 bytes/sec)
To simplify the imaging of multiple disks in a series which do hae a unique name, I wrote another script ~/bin/fdimages:
#!/usr/bin/env bash
set -euo pipefail

# TODO: Disks with no name have no UUID
check_disks() {
  disks=$(diskutil list -plist external physical | plutil -extract 'AllDisksAndPartitions' json - -o -)
  ndisks=$(jq -r length <<< "$disks")

  if [[ "$ndisks" -eq 1 ]]
  then
    disk=$(jq -r first <<< "$disks")
    dev=$(jq -r .DeviceIdentifier <<< "$disk")
    dev="/dev/$dev"
    name=$(jq -r '.VolumeName // empty' <<< "$disk")
    uuid=$(diskutil info -plist "$dev" | plutil -extract VolumeUUID raw - || {
      echo "Disk has no UUID, fdimages can't detect disk removal. Use fdimage instead." > /dev/stderr
      exit 1
    })
  fi
}

prevuuid=""
while true
do
  check_disks
  if [[ "$ndisks" -gt 1 ]]
  then
    echo "Expected one external disk, but found $ndisks" > /dev/stderr
    diskutil list external physical > /dev/stderr
    exit 1
  fi

  # Wait for a different disk to be inserted
  if [[ "$ndisks" -lt 1 || "$uuid" = "$prevuuid" ]]
  then
    echo "Waiting for new disk to be inserted..." > /dev/stderr
  fi
  while [[ "$ndisks" -lt 1 || "$uuid" = "$prevuuid" ]]
  do
    sleep 1
    check_disks
  done

  echo "Imaging disk $name" > /dev/stderr

  # Unmount disk
  mount=$(jq -r '.MountPoint // empty' <<< "$disk")
  if [[ ! -z "$mount" ]]
  then
    diskutil umount "$dev"
  fi

  sudo dd if="$dev" of="${name}.dmg" bs=512 conv=noerror,sync status=progress
  prevuuid="$uuid"
done
The Windows for Workgroups and MS-DOS disks have names and unique UUIDs in diskutil, which makes it simple to detect if a new disk has been inserted and to create unique files for each disk. Here's an example from the Sound Blaster 16 disks:
; mkdir "Sound Blaster 16"
; cd "Sound Blaster 16"
; fdimages
Waiting for new disk to be inserted...
Imaging disk INSTALL
Volume INSTALL on disk6 unmounted
  1442304 bytes (1442 kB, 1409 KiB) transferred 63.385s, 23 kB/s
2880+0 records in
2880+0 records out
1474560 bytes transferred in 63.938421 secs (23062 bytes/sec)
Waiting for new disk to be inserted...
Imaging disk APPLICATION
Volume APPLICATION on disk6 unmounted
  1442304 bytes (1442 kB, 1409 KiB) transferred 64.143s, 22 kB/s
2880+0 records in
2880+0 records out
1474560 bytes transferred in 64.694649 secs (22793 bytes/sec)
Waiting for new disk to be inserted...
Imaging disk ACCESSORIES
Volume ACCESSORIES on disk6 unmounted
  1442304 bytes (1442 kB, 1409 KiB) transferred 63.345s, 23 kB/s
2880+0 records in
2880+0 records out
1474560 bytes transferred in 63.899592 secs (23076 bytes/sec)
Waiting for new disk to be inserted...
Imaging disk T2S DISK
Volume T2S DISK on disk6 unmounted
  1442304 bytes (1442 kB, 1409 KiB) transferred 63.367s, 23 kB/s
2880+0 records in
2880+0 records out
1474560 bytes transferred in 63.919394 secs (23069 bytes/sec)
Waiting for new disk to be inserted...
^C
In writing this I learned about diskutil's -plist option, which outputs info in a property list XML format. The tool plutil is handy for extracting info from these or converting the output, but contrary to its man page, when using the json format it will not output to stdout but instead write to a <stdout> file unless -o - is provided. After converting to JSON, we can use the incredibly useful jq utility to wrangle it. I was bitten by this issue where jq -r (raw output) outputs nothing for an empty string but the string null for missing properties, which we solve with // empty. I also learned about dd's status=progress option, which will display live information about the copy operation instead of waiting until the end.
VMWare
To test these disks out, I wanted to spin up a VM in VMWare ESXi 6.0. First we need to install DOS 6.22, then install Windows for Workgroups atop it. ESXi has some quirks with the floppy drive: it must be connected on VM power on because it cannot be connected afterwards, it must contain a disk, and the VM will not boot from the hard drive if a floppy disk is present. This necessitates booting from a floppy disk if we wish to use a floppy drive.
Create a new VM. I selected Windows as the Guest OS family and Windows 3.1 as the version.
Add a floppy disk drive. Rename the .dmg files we created to .flp, then upload them. Select the firt DOS 6.22 disk. Enable the "Connect" checkbox, the floppy disk cannot be connected after the VM is started.
Start the VM, follow the DOS Setup wizard. When it asks for the next disk: suspend the VM, edit settings and select the next disk, then resume the VM.
Once DOS is installed, stop the VM. Configure the floppy disk drive with the first DOS disk again. Start the VM.
Exit the Setup wizard with F3 from Actions, Guest OS, Send Keys. Then again to confirm.
Suspend the VM, edit settings and configure the floppy disk drive with the first Windows for Workgroups disk. Resume the VM.
From A: run setup
Continue through the Windows Setup wizard
When it asks for the next disk, once again suspend the VM, edit settings and update the floppy disk drive disk, and resume.
Once the wizard concludes, we need to edit the CONFIG.SYS file from MS-DOS:
Navigate to C:\DOS, run edit \CONFIG.SYS (or run edit and using Alt+F, navigate to Open. Navigate up one directory with .. and change the * to *.SYS. Highlight CONFIG.SYS and open it).
Edit the path to HIGHMEM.SYS from C:\DOS to C:\WINDOWS. Save the file and exit.
Editing CONFIG.SYS
Shut down the VM. Disconnect the floppy disk drive. If we boot from the DOS disk, we won't have the correct CONFIG.SYS settings loaded for Windows.
Start up the VM. Navigate to C:\WINDOWS and run win.
Windows 3.1 should start.
Microsoft Windows for Workgroups
Unfortunately, this setup has neither a working mouse or networking. For Windows NT, an old version of VMWare Tools did the trick, but Windows for Workgroups is too old to have ever been supported. VMWare also reports an error if a sound card is configured.
86Box
For a better emulated experience of these disks, with emulated hardware, we can use 86Box. I used the MacBox user interface for 86Box. The 86Box project even has a video tutorial on installing Windows for Workgroups with options ideal for sound, video, and networking. They also have an IRC channel, #86Box at irc.ringoflightning.net: connect with TLS on 6697 and register your nick with NickServ, then connect using SASL.
Download the zipped MacBox.app from the latest release, unzip it, and copy it into the Applications folder.
Open MacBox, you'll need to allow it via the Privacy & Security settings pane.
Click the red icon at the bottom left indicating that 86Box is not installed, this will bring you to the Jenkins build page for the latest release for your architecture1. Click the highlited release, unzip it, and copy it into the Applications folder.
Add a new VM in MacBox, when you attempt to edit settings it will try to open 86Box, you'll need to allow it via the Privacy & Security settings pane.
When editing settings:
choose the i386DX machine type and the AMI 386DX Clone machine with 16MB of memory,
choose the ATI Mach64 GX video card,
choose the Logitech/Microsoft Bus Mouse,
choose the Sound Blaster 16 sound card,
choose the 3COM EtherLink II network card and SLiRP,
created a new 100MB hard disk,
chose the Western Digital ISA16 hard drive controller,
configured a 3.5" 1.4MB floppy disk (not the PS/2 version)
On initial boot, you'll need to configure the BIOS with F1. The clone provides a much simpler BIOS interface than some of the earlier machines. Choose standard setup and navigate to C:, enter the cylinders, heads, and sector information from the settings. Choose a 3.5" 1.4MB floppy disk drive for A:.
BIOS Setup Program
Open the first MS-DOS floppy disk image (rename it to .flp), then
MS-DOS setup will start, swap disks as prompted. (middle click to free the mouse)
Boot into DOS, insert the first Windows for Workgroups disks. Navigate to A: and run setup.
Follow the setup instrunctions, swapping through Windows disks as needed.
Windows for Workgroups Setup
Choose to install the windows network (see the section below on TCP/IP)
Windows Setup: Networks
Choose the network card driver to install, in our case the 3COM EtherLink II
Windows Setup: Add Network Adapter
and set the address it operates at (available under Settings, Network, then Configure next to the adapter)
Windows Setup: 3Com EtherLink 16
at this point the installer will ask for disks seven and eight after copying some files.
Upon reboot, start windows from MS-DOS:
Start Windows from MS-DOS
and you should see the startup screen!
Windows Startup Screen
You will get an error about the network card, because SLiRP doesn't work with networks besides IP.
Mouse
If, like me, you configured the mouse after installing Windows, follow these instructions:
open Windows Setup, confirm that the Mouse entry is empty,
choose the Options menu with Alt+O, choose System Settings,
tab to Mouse, arrow key through the list and choose the Logitech option,
insert Windows for Workgroups disk two as prompted,
reboot.
Sound Blaster 16
Open the the Sound Blaster 16 INSTALL disk, navigate to A: in the File Manager, and open install.exe. The installer will open as a full-screen text installer, follow the direction onscreen and swap out disks accordingly.
Sound Blaster 16 Installer
The installer performs an install in a DOS-compatible way at the root of the C: drive, before copying some Windows 3.1 specific files into C:\WINDOWS\SYSTEM.
Sound Blaster 16 Installer Summary
Remove the disk and reboot. Upon reboot, you'll be greeted with the Creative DOS Multimedia Architecture copyright notice and the additional AUOTEXEC.BAT commands in the DOS prompt.
In fact, we can leverage this same AUTOEXEC.BAT file to automatically start Windows for Workgroups when we start our emulator, simply add the line:
C:\WINDOWS\WIN
to the end with edit autoexec.bat, save and exit, reboot.
Upon first running Windows after Sound Blaster installation, you'll be prompted to create a Sound Blaster 16 program group window, click OK. You should now see the following window populate:
Sound Blaster 16 Program Group
Open the T2S DISK disk and open it in the File Manager by navigating to A:, double click install.exe. This application is a Windows installer:
Sound Blaster Text to Speech Installer
Continue using the default options. Once finished, you'll have the Text to Speech program group:
Text to Speech Program Group
To hear sounds via the Sound Blaster 16 emulated card, we need to turn up the volume via the Creative Mixer app in the Sound Blaster 16 program group. Slide all sliders to max, and you should hear a sound from e.g. the Test button in Sound under Control Panel.
Creative Mixer
In the emulator settings, navigate to Sound, then Configure and check the Control PC Speaker.
ATi Mach 64
Open the first mach64 disk and exit Windows to return to DOS (installation cannot be run under the Windows DOS Box). Run A:\INSTALL, you should see
Invalid EEPROM status. Press any key to initialize...
At this point the system hung, so I reset the emulator and ran install again. This time, I get a wizard:
ATi Mach 64 Installer
First, run Quick Setup and choose VESA-std 75 Hz 20" 1280x1020 or another large resolution.
Then select Drivers Installation and choose Microsoft Windows and swap to disk two as instructed.
Choose Install the Windows 3.1 Driver
Choose Display drivers and confirm the paths (MVA fails)
Exit setup with ESC
Start Windows with WIN from the DOS prompt
Open ATi Dekstop, then the FlexDesk+ control panel, and configure a larger resolution and higher color depth. To take full effect you must reboot. Unfortunately, ATi changes to font to a larger size which is unweildy and a bit ugly.
TCP/IP
To use an IP network (e.g. SLiRP), we need an IP stack. Like the Macintosh System Software releases of this era, an IP stack isn't included as part of the OS. The one I used is Microsoft's TCP/IP-32 for Windows for Workgroups, which requires a 32-bit processor like the i386. As described in How to Install the TCP/IP Protocol, often a TCP/IP stack was included with your web browser such as the one included with the dailer in Internet Explorer 3.02. The article What It Was Like to Build a World Wide Web Site In 1995 mentions the shareware Trumpet Winsock as another popular alternative.
Place the Disk01.img in the virtual floppy drive
In File Manager, create a new folder e.g. C:\TCPIP
Copy the tcp32b.exe from the A drive into our new folder
Open the executable, it's a self-extracting archive which will expand in our new directory
From the Network program group, open Network Setup
Next to the 3Com ethernet adapter, click Drivers, then Add Protocol, choose Unlisted or Updated Protocol and click OK
In the dialogue box, type our directory path C:\TCPIP, it will list Microsoft TCP/IP-32 3.11b, click OK.
Our new TCP/IP protocol is now installed! Remove the Microsoft NetBEUI protocol since we won't be using it
Upon closing the window, a Microsoft TCP/IP Configuration window opens. According to the 86Box docs:
The virtual router provides automatic IP configuration to the emulated machine through DHCP
So we can check the Enable Automatic DHCP Configuration box and click OK.
At this point you'll be prompted to reboot.
After rebooting, we can delete our temporary C:\TCPIP directory.
If all went well, we should now be able to use tools like Telnet:
Telnet
Microsoft Word 6.0
Microsoft Word 6.0 was the version released for Windows 3.1 (with a version for NT), and was distributed on nine 3.5" 1.4MB floppy disks, larger than Windows for Workgroups itself. I've used the significantly smaller Word 4 and 5 on my System 6 and System 7 Macintosh SEs. After a painfully long and dull install process, we can finally lay our eyes upon the word processing behemoth.
Microsoft Word 6.0
For example, I downloaded the highlighted release:
https://connor.zip/posts/2023-10-10-vncVintage VNCConnor Taffe2023-10-10T00:00:00-05:00Configuring VNC on Windows NT and OS X Tiger
I run several VMs on ESXi 6.0, the last version to support the HP ProLiant DL380 G7 it runs on. The VMs are mostly *nix servers, there's also the odd server with a graphical user interface. One example is the Windows NT 4.0 Server1 VM I spun up to interface with the web UI on an HP DesignJet 650C network card. The card's web interface is constructed entirely of Java Applets, and only functions on IE 42 or Netscape Navigator 4.x (with the exception of 4.4), which must be running on Windows. Another is a Haiku instance.
I can access these UIs from the VMWare ESXi web interface, which on my local network is at https://vms.home.arpa, but it would be neat to access these instances outside of ESXi as well. Recently, I've been looking at software for the iBook G43 I picked up at an estate sale, which runs OS X 10.4.11 Tiger. While I could upgrade to OS X 10.5 Leopard, I likely won't before backing up so I can boot into multiple releases (such as 10.3 Panther, the last to support AppleTalk over Ethernet). Apple provides their own software for remote access, Apple Remote Desktop, version 2 replaced the underlying protocol with VNC. Virtual Network Computing (VNC) is the de-facto standard remote desktop protocol, and is supported by many open client and server implementations. Use ARD 3.0 and the 3.3 upgrade and these keys within the 3.0 installer. Software Update on OS X 10.4 will still locate the 3.4 update and install it.
iBook G4 running Apple Remote Desktop 3.3
WinVNC
On Windows NT, we can use WinVNC, which is the original VNC client and server developed by The Olivetti & Oracle Research Lab (ORL) at Cambridge. I installed the version distributed by Palm, and unzipped it with WinZip 8.0. To get the files onto the VM, since I didn't have a file share set up yet, I ran python -m SimpleHTTPServer 9000 within the extracted folder on my laptop and then pointed Internet Explorer 4.0 at that address. Once installed, we can navigate to Start, Programs, Vnc, then WinVNC Server (Install Service). It should prompt you to start it from the Control Panel, navigate to Start, Settings, Control Panel, Services, scroll down to VNC Server and click Start. Then reboot the VM, you should be prompted to set a password on the next login.
From the iBook, we can open Apple Remote Desktop, find the Windows NT machine in the Scanner pane, click Control and fill in the password (no username necessary). The window should display our remote desktop! If you see a black screen, try minimizing and then expanding the window.
Windows NT over VNC on Apple Remote Desktop
From a Macbook Pro running a modern version of macOS, we can simply press ⌘-K from the Finder and type in our server's address, e.g. vnc://nt.home.arpa. The system will prompt for a password and then display the Windows NT desktop. You can press fullscreen and change the Windows NT display properties to the largest supported size, 2560x1600, for an immersive experience.
Windows NT over VNC on macOS Sonoma's VNC client
ESXi's VNC Server
We can also do this natively from ESXi, using its VNC server
First, we need to enable the SSH service, this can be done from the web or console interface.
Each VM will require its own host on the ESXi server, which is why we use a port range.
Reload the firewall:
; esxcli network firewall refresh
and ensure it's running:
; esxcli network firewall ruleset list | grep vnc
Now shut down the VM you'd like to configure VNC for. Edit its settings, and under advanced add the following:
Field
Value
RemoteDisplay.vnc.enabled
TRUE
RemoteDisplay.vnc.port
5900
RemoteDisplay.vnc.password
hunter2
Start the VM and you should now be able to connect ARD to the ESXi server's IP on the port configured above. For each additional VM, just change the port. I was able to connect ARD and even watch the boot-up sequence of the server, but the image was yellowed (apparently a product of the bit depth of the image) and not very high resolution. It also disabled the console in ESXi's web interface.
ESXi's VNC over Apple Remote Desktop 3.3
Apple Remote Desktop
We can also access our iBook over VNC4, because OS X 10.4 comes with its own VNC software installed. To enable it, find Apple Remote Desktop under Sharing in the System Settings:
OS X Tiger Sharing Settings
then under Access Priviledges, select the users to enable remote access for and check at least Observe.
OS X Tiger ARD Access Priviledges
Finally, connect to the iBook from our client. In macOS we can do this via ⌘-K by entering the VNC address vnc://ibook.home.arpa or the Network pane in Finder since OS X advertises this feature via Bonjour. The above screenshots were taken from the macOS Sonoma VNC viewer.
Now I can do my OS X Tiger exploration from the comfort of a modern MacBook Pro. I do have to leave the iBook lid open; even when plugged in, the iBook will sleep if the lid is closed, reportedly unless it has a monitor and keyboard connected.
The images for Windows NT Server 4.0 I used are titled winnt40_x86en_entsrv.d1.iso and winnt40_x86en_entsrv.d2.iso, they are available from the Internet Archive. To run it under VMWare ESXi, you also need VMWare Tools 3.5, which is still available from VMWare, without which the mouse will not function and the screen resolution will be rather limited. ↩︎
A copy of the Internet Explorer 4.0 install disk is available on the Internet Archive. ↩︎
To create a new admin account on an iBook G4 for which you don't know the existing admin password, boot into single-user mode by holding down ⌘-S while booting. Then run:
mount -rw /
rm /var/db/.AppleSetupDone
reboot
Upon reboot, the system will detect the absense of the .AppleSetupDone file and run through the initial setup wizard again, allowing you to set up a new admin account. ↩︎
https://connor.zip/posts/2023-09-30-resize-vm-diskResizing a Fedora VM DiskConnor Taffe2023-09-20T00:00:00-05:00How to extend a Fedora VM disk to fill the available space when using LVM and XFS
Writing this down since I had such a hard time finding all the pieces. This procedure is for expanding the disk of a Fedora (in this case Fedora Server 35) virtual machine using LVM and XFS (the default). I use VMs on ESXi, but this should apply to any Fedora VM scenario.
Expand the disk in your virtualization system, in ESXi I chose the VM, then click Edit, then increase the size next to the Hard Disk.
Resizing a disk in ESXi
Use lsblk to determine which disk holds your root filesystem:
; lsblk
On my system, it outputs the following table:
Name
Major:Minor
Rm
Size
Read-Only
Type
Mount Points
sda
8:0
0
32GB
0
disk
↳sda1
8:1
0
1G
0
part
/boot
↳sda2
8:2
0
15G
0
part
↳ fedora_fedora-root
253:0
0
15G
0
lvm
/
plus the CD-ROM and swap partitions.
This table gives us some valuable information. The / filesystem we want to expand is an Logical Volume Manager (LVM) volume called root within a Volume Group called fedora_fedora. The logical volume group is atop the physical partition /dev/sda2, which is a partition of the disk /dev/sda. We can see the effects of our expansion at the disk level, but we need to propagate it through the partiton, the LVM Physical Volume within our Volume Group, the LVM Logical Volume, and the fileystem.
Use parted to increase the partition size of /dev/sda1.
; sudo parted /dev/sda
Within parted, use print to list your volumes:
(parted) print
Model: VMware Virtual disk (scsi)
Disk /dev/sda: 34.4GB
Sector size (logical/physical): 512B/512B
Partiton Table: msdos
Disk Flags:
It will then print the following table:
Number
Start
End
Size
Type
File system
Flags
1
1049kB
1075MB
1074MB
primary
xfs
boot
2
1075MB
17.2GB
16.1GB
primary
lvm
Resize partiton number two, which backs LVM, with the size reported next to Disk /dev/sda: above:
I've been an off-and-on IRC user for years, and running Wallops on System 6 reminded me how helpful these text-based communities can be. On my MacBook I've used IRSSI, but I'm not an avid enough IRC-er to remember the commands. I've also used the Matrix bridge, which has its own challenges and has recently been disabled. At least one large IRC network, Mozilla, has migrated from IRC to Matrix as of March 2020.
Lately I've used Textual which is paid but also open source. There are some issues with IRC that Matrix solved though, namely losing the history every time your client sleeps or restarts. The age-old solution to this is ZNC.
I set up ZNC on the Fedora VM I use for miscelaneous services, misc.home.arpa. First, we can install znc from Fedora's package repos:
sudo dnf install znc
Then, we need to run the init command:
sudo -u znc znc --makeconf
This will ask you a series of questions such as the admin username and password, nick, etc. I set up a dedicated admin user with a random password (thanks 1Password) and left most things blank. It's best practice to have a dedicated admin account, and then create a standard user account for yourself to use with your IRC client. When choosing a port, I choose 6697 as proposed by RFC 7194 and enabled SSL.
As the wizard warns, some browsers will not open :6697. I run Nginx on this server, so I added /etc/nginx/conf.d/znc.conf to reverse proxy to it from :443 when the host is znc.home.arpa:
Some unique DNS (e.g. znc.home.arpa) should point to your server's IP, I set this up via pfSense under Services, DNS Resolver, then at the bottom under Host Overrides I added a new record which points to the static IP I have DHCP configured to assign my VM:
pfSense Host Overrides
A cert that your computer trusts, or you can skip TLS altogether. I use cfssl to manage my TLS certificates. You'll need to create a CA1 and Intermediate CA, which I placed in a certs folder, and then a CSR file like this for your server:
A quirk of ZNC on my system is that systemctl stop znc.service doesn't work, you need to pkill znc and then systemctl start znc.service to restart it.
Now, we should have a UI available at https://znc.home.arpa! From there, I logged in as admin and did the following:
Under Global Settings, we can add a new Listen Port that only the UI uses (only HTTP and IPv4 are checked), say 6668, which won't be exposed to the network -- set Bind Host to 127.0.0.1 to signify this. Then we can edit our Nginx config to use http://127.0.0.1:6668/ as our upstream, so that we can only access it via Nginx.
We can update our 6697 port so that it doesn't have the HTTP checkbox.
We can add a 6667 port for unencrypted connections from clients like Wallops.
ZNC Listen Ports
We also want our clients to be able to talk to ZNC over TLS without self-signed cert errors, so we can use our same cfssl certs from Nginx for ZNC by copying them to /etc/pki/znc/server.crt and /etc/pki/znc/private/server.key and then chown -R znc:znc /etc/pki/znc so that ZNC can read them. Then, we can update the config at /var/lib/znc/.znc/configs/znc.conf with:
Next, you should add a new user for yourself in the UI. Then, under that user add a Network. I use Liberachat, with these options:
Hostname
Port
SSL
Password
irc.libera.chat
6697
Checked
Blank
I use CertFP to authenticate, and for that we'll need to check the cert module's box on both the User and Network page. Then, go to the User Modules > Certificate page and paste your certificate.
We'll also need to enable the sasl module on the Network page, which is required for CertFP to work for some networks, and from our client run /msg *sasl Mechanism EXTERNAL from each network.
Once connected, you can check that the certificate is being used by running /whois <your username> (after you've authenticated via another method), where you should see
cptaffe has client certificate fingerprint ...
If so, you can add that fingerprint to your account with /msg NickServer CERT ADD. Once your certificate is added to your account, and your SASL is set to EXTERNAL, you can reconnect with /msg *status jump to ensure you are correctly authenticated.
To connect to ZNC, configure your client's username and password fields:
Username
Password
the ZNC {username}/{network} e.g. cptaffe/libera
the ZNC password
You can configure multiple connections, one for each network.
Time Zone
There is a bug in ZNC where server time is not round-tripped appropriately if the server isn't running in UTC. It's good practice to run servers in UTC anyway, we can swap our system time to UTC:
; sudo timedatectl set-timezone UTC
and then reboot. As described in this comment, the playback module uses timestamps to determine what messages to deliver, so if the server time isn't synced properly then you may get duplicate messages or gaps.
I ran into this issue initially since my server was in my local time zone, which resulted in duplicate messages from the buffer on reconnect, and missing self-messages when reconnecting. This was most apparent in Palaver since it must reconnect so often.
Keeping a Nick
In most cases the initial connection will authenticate you and your nick will be assigned to you. In rare cases, for instance when your connection is interrupted, you may not be able to claim your nick because the server still has it assigned to your old connection. Enabling the keepnick module will configure ZNC to keep trying to get your original nick. In the case of a disconnection, your nick will be available soon when the old connection times out on the server end. I've only experienced this when connecting over Tor, but it's likely good practice generally.
Cloaks
To prevent users seeing your IP address, you can use a cloak.
On Libera, just /join #libera-cloak and send !cloakme, now your /whois {user} response should look like:
[14:22:25] cptaffe has userhost ~ZNC@user/cptaffe and real name "Connor Taffe"
By default, all hostnames on ergo.chat are cryptographically “cloaked” so that your IP address information is not visible to other users (although it is visible to server administrators).
They note, you can connect even more anonymously:
If you would like to anonymize your connection against the administrators as well, we are accessible via the Tor network, although you may be banned from some channels until you register a nickname:
To get Wallops to connect, I needed to create a new account with only one channel configured so that the joins wouldn't overwhelm the Macintosh SE. Wallops also doesn't have a username field where we could pass the network, so we can pass it in the password field as:
{username}/{network}:{password}
With that, Wallops can connect to ZNC and by proxy use CertFP for authentication!
Wallops on a Macintosh SE
We can also use the chanfilter module to hide channels so that Wallops only sees one channel, enabling us to use a single account. See the section below on multiple clients.
First, add a new client id to chanfilter, I called it wallops:
/msg *chanfilter AddClient wallops
Then, join from an IRC client which can handle all your channels using the client identifier. You can place the identifier in your username: for Textual I use shared@wallops/libera, but for Palaver (which has a dedicated network field for ZNC) I use shared@wallops. Once connected, leave all channels you wish to hide from wallops (all but one) -- the /part will be intercepted by chanfilter (on a second /part, ZNC will leave the channel).
To check that the channels you want to hide are hidden:
/msg *chanfilter ListChans wallops
Now in Wallops, our password field will look like:
To access our ZNC bouncer outside of the network, we need to creat a NAT rule. I followed these instructions to port-forward 6697 from my DNS address to my VM via pfSense, then followed these instructions to enable NAT Reflection so I could reach it from inside my network as well as outside.
I quickly realized that my internal certs won't work with my external DNS name, so I decided to scratch port-forward in favor of using the HAProxy plug-in. I've already configured it to work with the ACME plug-in to automatically issue and renew certificates for my domain names with Let's Encrypt. To do this, we add a new backend in HAProxy, znc, with:
Forward to
Address
Port
Encrypt (SSL)
SSL Checks
Address+Port
10.0.3.3
6667
No
No
We also need to tune the timeout settings because IRC connectios are long-lived and often quiet, unlike HTTP connections. The timeout must be longer than the interval between PINGs. I set mine to one day:
The timeout connect setting configures the time that HAProxy will wait for a TCP connection to a backend server to be established. The timeout client setting measures inactivity during periods that we would expect the client to be speaking, or in other words sending TCP segments. The timeout server setting measures inactivity when we’d expect the backend server to be speaking. When a timeout expires, the connection is closed.
We forward to the unencrypted port to avoid the extra SSL overhead on our local network, but SSL can be used as well. Then create a new front-end irc-6697 with:
Listen Address
Custom Address
Port
SSL Offloading
WAN address (IPv4)
6697
Yes
We also need to tune the timeout settings again:
Timeout
Value
Client timeout
86400000
Then under Actions, choose Use Backend and the znc backend.
Next, under Firewall > Rules, create a new rule:
Field
Value
Action
Pass
Interface
WAN
Address Family
IPv4
Protocol
TCP
Source
Any
Destination
This firewall (self)
Destination Port Range
Choose (other), then 6697 for both to and from, since we're using a single port.
Description
IRC traffic to HAProxy
Now we can easily configure our clients to use our external DNS address.
With our public ZNC service, we can use IRC on the move. I installed Palaver on my iPhone and configured it against my IRC bouncer to do just that.
Multiple Clients
Using multiple clients on a single ZNC account can introduce issues with the playback buffer not forwarding to all clients, so that the history is choppy in any one clinet. I asked on #palaver on irc.ergo.chat (which can be set up just like Libera, and supports CertFP), and kylef gave me this advice:
I would recommend the znc-playback module to solve the history sync per device, depending on which other clients you use and if they support it though.
Make sure that the "auto clear" buffer features are not enabled in ZNC otherwise it will clear buffers on each connection.
Having separate users would work but its complicated and this would solve it.
As for push notifications, I would recommend installing the clientaway module, then configure all your clients to auto away you when you are not there.
That provides the best experience as then when you are using one client actively, your other devices are not receiving messages you've read.
Under "Your Settings" for the user your clints login as, uncheck "Auto Clear Chan Buffer" and "Auto Clear Query Buffer." You may need to do this for each channel under each network as well, if there are any already configured.
You'll also want to enable route_replies for all networks, so that client request responses (such as /who, etc.) are routed to the client which sent the request. See the Multiple Clients wiki page.
or edit /var/lib/znc/.znc/configs/znc.conf, and add:
LoadModule = palaver
Upon restarting znc, you should see a "Connected!" push notification come through Palaver, you can also run /msg *palaver info for connected device info.
Client Away
For the clientaway module, instructions are very similar:
The znc-xmpp module adds an XMPP (Jabber) interface to ZNC, for XMPP clients like iChat on mid-2000s versions of OS X. The module requires the libxml2 library and headers, install it via:
; sudo dnf install libxml2-devel
then proceed as usual:
; git clone https://github.com/kylef-archive/znc-xmpp.git
; cd znc-xmpp
The C++ compiler (my version of g++ and clang++) complains about the use of vector<...> without a using namespace std; statement. I ran grep vector -r src/ to find all usages of vector and changed them to std::vector.
Adding mappings allows us to connect using TLS without certificate pinning, since the host name will match the certificate. TLS is required for CertFP authentication, which is required over Tor by Libera. Edit /etc/tor/torrc to include:
Since ZNC doesn't support SOCKS proxies natively, you'll need proxychains:
; sudo dnf install proxychains-ng
which by default is configured to proxy to Tor over localhost:9050 using SOCKS4.
Then change the ExecStart line in /usr/lib/systemd/system/znc.service to:
ExecStart=/usr/bin/proxychains /usr/bin/znc -f
and add
Requires=tor.service
Then, you should update your networks in ZNC to point to the MapAddress'd addresses above:
Network
Address
Libera
palladium.libera.chat
OFTC
irc.oftc.net
Ergo
irc.ergo.chat
At first I had OFTC mapped to graviton.oftc.net, but they load balance between several servers. When it moved to dacia.oftc.net, TLS stopped working and my connection dropped. Since irc.oftc.net is an alternative name in all server certificates, it's valid without certificate pinning on all servers.
This means that all connections will happen over Tor, so networks that don't have an onion service will use Tor exit nodes, which are blocked on many networks. The suggestion from #znc is to use two ZNC servers, one specifically for Tor connections. You may also be able to connect one to the other so that only one ZNC service need be exposed. I've been told implementing proxy support requires a big refactor of the ZNC networking code.
Fixing restarts
The unit contains the line After=network.target, which does not ensure the network is actually usable, and may result in the following error:
Binding to port [6668] on host [127.0.0.1] using ipv4... [ Unable to bind: Invalid argument ]
Undernet doesn't support TLS, CertFP, or even SASL. It doesn't allow registering nicks. Once you've signed up for an account, you need to provide
+x! <username> <password>
in the networks's server password field, this is called Login on Connect. The +x! will cloak your IP upon connection:
+x!: Only connect me when X is online and hide my IP address
X is the Undernet Channel Services bot, which should always be online.
Undernet also doesn't support registering nicks, only usernames registered through the Undernet Channel Service, known as CService. The CService website supports 2FA via OTP codes, but it is required for IRC login as well if enabled which is not supported in ZNC, so I don't recommend enabling it.
Undernet blocks Tor exit node IPs, so it won't connect if using proxychains.
IRCnet
IRCnet supports TLS but also doesn't support registering nicks, and doesn't support SASL or CertFP. If you sign up for a cloak, you can then provide a server password to ssl.cloak.ircnet.io, but you must have a static IP address or CIDR to sign up for one.
IRCnet does provide an onion service at IRCnet3mh2zfmpn3zcgwtrjnh37zcnyvjmsvoig577isjmy6m24auqqd.onion on port 6667.
irssi
Below is a snippet of my ~/.irssi/config as an example of how to configure each network:
https://connor.zip/posts/2023-09-01-system-6-onlineSystem 6, OnlineConnor Taffe2023-09-01T00:00:00-05:00Hooking a System 6 Macintosh SE up to the Internet
After writing most of Browsing like it's 1994, I found another Macintosh SE running System 6.0.3.
System 6 ships with minimal AppleTalk support, and no built-in support for AppleShare, so it's more challenging to get online. There's useful info in this post on Networking your System 6 Mac.
My System 6 machine is in slightly better shape cosmetically than the other Macintosh SE, and it has a drive cover since it originally came with a hard drive. Both machines have faulty internal floppy drives, so using an external 800k drive from my Apple IIGS, I was able to copy some files from the share on the System 7 machine to disk. But, I couldn't experiment much because this drive also failed while using Disk Copy1 to copy an image file (Apple 3.5 Drive A9M0106, with a Sony MFD-51W-03 drive inside).
I've learned there is a ROM revision that allows later Macintosh SEs to support 1.4M floppy drives, but I believe mine only support 800k drives, and that it matters what cable you use to connect what model of floppy drive when it’s used as an internal drive. I can only find Apple Network Software 1.4.5, which includes the updates to System 6 to support AppleShare, on a 1.4M floppy. Since compatible floppy drives are expensive, the best solution may be to find an external SC20 SCSI drive or a FloppyEmu or SCSI2SD.
Luckily, I was able to find a reasonably priced working Sony MP-F51W 800k floppy drive on eBay. I placed it in an external floppy drive enclosure and read a disk successfully. I also acquired some unformatted Sony MFD-2DD 800k floppy disks, since my only spare floppy had bad sectors, and used Disk Copy on the System 7 Macintosh to burn a copy of AppleShare 2.0.1 Workstation for the Plus, SE or Macintosh II. To install AppleShare, I booted the System 6 Macintosh with the disk in the external drive. This boots to the copy of System 6.0.3 on the disk. I then chose the Workstation option on the install list, which installed successfully onto the local hard drive. I also discovered the option to boot into Multifinder instead of Finder when selecting the start-up drive.
Upon reboot, the System 6 Macintosh still doesn't recognize Netatalk's AppleShare server, but it does recognize the System 7 Macintosh's file server. Since the file server on the System 7 machine was installed by the previous owner, I'm not sure what revision it is.
Below is the flow to copy files through the system:
AFP 2.0 is the version that was initially documented in Inside AppleTalk. The contents of Inside AppleTalk are now split between this document and Apple Filing Protocol Reference.
AFP 2.1 was a significant upgrade to accommodate System 7.0.
Although Netatalk's asip-status.pl reports it is advertising AFP versions 1.1 through 3.3:
As referenced in this forum post, Apple provided a downloads archive which included a copy of Networks Software Installer 1.4.4, reportedly the latest version compatible with System 6 avialable on an 800k floppy. A copy is available in the Networking_and_Communications_Software.zip archive on that page. The installer is a Disk Copy 4.2 formatted image, but the README notes it needs System 6.0.5 or later.
Apple 3.5 Drive
I took this opportunity to install System 6.0.8 from the second link, an archive of several System 6 versions, by carting my external floppy drive back and forth between System 7 and System 6 machine to burn each of the four 800k disks. During 6.0.8 installation, I noticed it installed AppleTalk components, and I had read that System 6.0.8 contained the System 7 printing subsystem. Unfortunately, the Chooser behaved just as it did before, only recognizing the System 7 share.
Next I popped in the Network Software Installer 1.4.4 floppy I had burned earlier before realizing it wouldn't install on System 6.0.3. The installation went smoothly, and after a reboot, the Chooser now shows my Netatalk server and I am able to log in and mount the shares.
With the shares mounted, it was simple to copy MacTCP 2.0.6 over the network and into the System Folder and reboot once more. I then opened the Control Panel, chose MacTCP, and filled in the IP information from the tinyMacIPgw VM I set up in Browsing like it's 1994, but replaced the DNS address with my router.
MacTCP Control Panel
That was enough to let me start Wallop and join an IRC channel!
Wallops on a Macintosh SE running System 6.0.8
Other Apps
I was able to connect to a local Linux VM via Telnet, first to set up my local Telnet server:
BBEdit is made by Bare Bones Software, now on revision 14.6. I'd heard of it during my earliest years programming, but I didn't realize how long it had been around.
Disk Copy is a utility that can copy files. The 4.2 version is the earliest that runs on System 6, and 5.5 is the latest. Both can run on System 7, but fail on Basilisk II.
Disk Copy 6.3 runs on System 7 and Basilisk II running System 7.5 without issue, but won't run on System 6. It can create compressed images, and has a more streamlined UI than 4.2 or 5.5. The images it creates can be double-clicked to mount them, which opens Disk Copy in the background. I haven't been able to create 4.2-compatible images using 6.3, and the images can't be opened by earlier versions.
My recommendation after using these is to stick to 4.2 on all systems where it will run, see the DC42 format description.
A neat snippet from the Wikipedia article on Disk Copy:
Disk Copy was also the name of an Apple utility distributed with some of the earliest versions of the classic Mac OS. In order to copy 400K floppy disks using as few disk swaps as possible on a machine with only 128K of RAM, the original Disk Copy used the screen buffer to store binary data from the disk being copied; as a result, the screen (other than a small area at the bottom displaying the GUI) filled with noise while copying was in progress. It was shipped with System 1.1 and System 2.0.
https://connor.zip/posts/2023-08-21-macintosh-midiMacintosh MIDIConnor Taffe2023-08-21T00:00:00-05:00Connecting a Macintosh SE to an Ensoniq ESQ-1
A while back, I found an Ensoniq ESQ-11 at Goodwill. Like most synths, it has MIDI input/output on the back. Unlike many modern synths, it has no integrated speakers or headphone jack. Instead it sports full size tape input/output jacks and a stereo audio out jacks. Once I got it home, I bought some RCA adapters and plugged it into my Yamaha AVR which serves as a preamp for a Schiit Vidar driving a pair of Magnepan LRS and a Rythmik L12 subwoofer. It sounded incredible, and the presets on the cartridge it came with were a lot of fun. Unfortunately, I don't know how to play so that was as far as I got.
Last week I was surfing eBay and came across the Apple MIDI Interface, which connects either the 8-pin DIN printer or modem port on an Apple IIGS or Macintosh to MIDI input/output. I found one for a reasonable price and ordered it.
Apple MIDI Interface
Connecting the Apple MIDI Interface is simple enough, just connect one end of the 8-pin DIN cable into the printer port and the other to the MIDI Interface. Then connect one MIDI cable to the input port on the MIDI Interface, and the other end to the output port on your instrument, and vice versa for the other cable.
Or as illstrated on the back of the box:
Apple MIDI Interface Box
Next we need some music software for interfacing with MIDI. Older versions of Cubase2 run on System 7, but certain versions (e.g. 2.5) can't be copied off the disk without triggering the copy protection, and the README for Cubase LITE 1.0.2 warns that later versions will be distributed on high-density floppies which can't be used from 800k systems like my Macintosh SE.
If you have Basilisk II and AppleShare set up as outlined in this article, follow these directions:
Modern macOS will handle unpacking .hqx simply by opening the file. Under that is a .sit file which must be unpacked with StuffIt.
Copy the .dsk.sit file to the share folder of Basilisk II, start the emulator, then drag the file onto the StuffIt app to expand it. The expanded file is a .dsk (equivalent to .image).
Shut down the emulator. Open the Basilisk GUI and add a new disk, select the .dsk file from the share folder. Start the emulator.
Drag the disk onto the share folder, this will copy the disk files into a folder.
Copy the folder in the share from macOS to the mounted AppleShare share if your emulator share folder is not the same.
On the Macintosh SE, open the same AppleShare share.
Open the Cubase folder. Then open your boot disk, System Files, Fonts.
Copy the Cubase font file into the Fonts folder.
Copy the Cubase app onto the hard disk.
Open the Cubase app!
Macintosh SE running Cubase 1.0.2
Cubase starts with MIDI settings which will work with the modem port. You can change it to use the printer port if you like, but I'm using that for LocalTalk. To create a new recording, click the record button at the bottom. Cubase will start clicking, and you can play some notes on your instrument. Once you're finished, click stop. The track will display, click on it to see the notes it recorded like in the image above.
From this screen, we can print our masterpiece. Copying the font file into the system Fonts folder is required for this to work, as outlined in the documentation. My system printer is already configured to my HP LaserJet 4100 which advertises itself over AppleTalk, and I can print with the default settings. It takes a couple of minutes, but eventually the printer will start humming and out will come a beautifully typeset sheet of music.
Printed Sheet Music from Cubase
At this point, you're likely unimpressed with my key smashing. Luckily, there are actual musicians that have documented their use of Cubase 1.0 on the Macintosh:
Ensoniq ESQ-1 is a 61-key, velocity sensitive, eight-note polyphonic and multitimbral synthesizer released by Ensoniq in 1985. It was marketed as a "digital wave synthesizer" but was an early Music Workstation.
A 1990 article in Sound On Sound, Mac Attack!, discusses Cubase's arrival on the Macintosh platform and illustrates some of its features. ↩︎
https://connor.zip/posts/2023-08-04-localtalk-ethernetBrowsing like it's 1994Connor Taffe2023-08-13T00:00:00-05:00Integrating a Macintosh SE, and an ImageWriter II dot matrix printer into a modern network: browsing the web, printing with AirPrint, and sharing files
Before the ubiquity of the Internet, before WiFi, even before Ethernet was affordable, there was the LocalTalk physical layer and cabling system and its companion suite of protocols called AppleTalk1. A network ahead of its time in terms of plug-and-play2, but not quite as fast as 10mbit/s Ethernet at 230.4 kbit/s.
A few weeks ago, I found a Macintosh SE on Facebook Marketplace. It turned out to be running System 7.1, and had Microsoft Word 5 installed. Years prior, I had recapped an Apple IIGS and brought it back to life, and attempted to network it using LocalTalk and an ImageWriter II with a LocalTalk Option card, but was unsuccessful. With the Macintosh, I was finally able to use my ImageWriter II over AppleTalk!
Off to a good start, I wanted to expand my LocalTalk network. I swapped the ImageWriter II for an AsanteTalk and discovered that my HP LaserJet 4100N from 2004 with a 635n EIO networking card spoke EtherTalk and advertised itself as a LaserWriter. I was able to print the same document on the LaserJet, using the built-in PostScript driver for the LaserWriter -- the result was beautiful crisp text. In fact, there's another EIO card in the LaserJet; it provides USB connectivity alongside a LocalTalk port, so it could become part of my LocalTalk network as well.
HP JetDirect Cards
Next, I ordered some LocalTalk adapters from eBay to convert my 8 pin DIN to 3 pin locking LocalTalk ports which work with LocalTalk cabling. Each adapter has two ports, which supports chaining devices together. Unfortunately, LocalTalk cabling is expensive (and PhoneNet was used more often at the time), so my LocalTalk network is limited to the Macintosh and AsanteTalk for the moment. With the AsanteTalk3, we open up the possibility of interfacing with a wider Ethernet and IP network.
As we enter the early 90s and the Internet becomes more widely available, these older Macintosh computers were used to access it. MacTCP and the AsanteTalk helped to enable this, and that's what this post is about.
AsanteTalk
This post is broken down into several sections:
The next section, Printing over LocalTalk covers the steps I used to configure my ImageWriter II and Macintosh SE to allow printing over LocalTalk.
Netatalk 2.x covers integrating a Linux server with an Ethernet connection into an AppleTalk network.
Printing covers how to print to the ImageWriter II from a modern network, even from an iPhone via AirPrint.
Adding Files covers how to get files from the internet onto your Macintosh SE via AppleShare.
Getting Online covers using a period-correct browser, MacWeb 0.98, to browse the web.
System 6 is an adendum on work in-progress to connect a Macintosh SE running System 6 to the network.
Printing over LocalTalk
Printing from a Macintosh SE to an ImageWriter is easy with the LocalTalk option card.
Install the LocalTalk option card in the ImageWriter II:
Lift off the lid, both clear plastic and tan pieces
Gently move the carriage to the extreme left
Remove the ribbon cartridge by lightly bending the two black tabs on either side and lifting, ensure the ribbon isn't stuck in the print head.
ImageWriter II with lid and cartridge removed
Unscrew the two golden screws on round plastic wells on either side of the printer
Lift up and back at the top of the printer, being careful not to pull the cable that connects the top buttons
ImageWriter II with top removed
Place the option card atop the logic board.
ImageWriter II Logic Board
Press the plastic spacers into the holes in the logic board. Slide the ground cable onto the unused stub.
LocalTalk Option Card
Ensure that DIP switch 4 on the second switch block is in the down position to enable the card
ImageWriter II DIP Switches
Connect the Macintosh SE's printer port to the ImageWriter II using either a 8-pin DIN printer cable, or by using LocalTalk adapters on each side and a 3-pin DIN LocalTalk cable, or by using a Farallon PhoneNet adapter and a phone line.
Macintosh SE Printer Port
In Chooser, select "AppleTalk ImageWriter" to set it as the default printer
Macintosh Chooser
Open a document in a word processing app like Word 5.1, and print a document.
Word 5.1
Netatalk 2.x
Netatalk is the Linux implementation of several Apple protocols including AppleShare. Before 3.x, it supported AppleTalk, the protocol that Apple used before the switch to IP, importantly for us this is the protocol used over the LocalTalk and EtherTalk physical layers. There are several forks of Netatalk 2.x maintained by the retrocomputing community:
In the 5 years since the release of Netatalk 2.2.6, an impressive number of forks and projects with their own downstream patchset to keep Netatalk running have emerged. Here are a few of the major ones that I encountered:
Last year, Daniel Markstedt (handles rdmark or slipperygrey) released a new Netatalk 2.x fork which can be compiled on modern Linux and includes systemd services. I'll be installing it on a Fedora Server VM running on ESXi.
Compile
To get netatalk-2.x installed and serving AFP and AppleTalk, we need to compile it. First, we'll install some dependencies:
Zeroconf (Bonjour) service discovery in Mac OS X 10.2 or later
cups-devel
papd printer server support
libgcrypt-devel
DHX2 authentication support, required for Mac OS X 10.2 or later
Then we'll need the appletalk kernel module for AppleTalk network support. On Fedora this is provided by kernel-modules-extra, but not on Fedora 35:
; sudo dnf install kernel-modules-extra
On Fedora, the appletalk module is blacklisted. To allow it, edit the file /etc/modprobe.d/appletalk-blacklist.conf and comment out the last line:
# This kernel module can be automatically loaded by non-root users. To
# enhance system security, the module is blacklisted by default to ensure
# system administrators make the module available for use as needed.
# See https://access.redhat.com/articles/3760101 for more details.
#
# Remove the blacklist by adding a comment # at the start of the line.
#blacklist appletalk
Then have the module load automatically4, we need to add the file /etc/modules-load.d/appletalk.conf:
# Load appletalk.ko at boot
appletalk
which configures the systemd-modules-load.service service. You can test it with:
Now you should have the systemd services in place for atalkd.service and afpd.service among others. First let's set up some minimal config files under /etc/netatalk/:
To configure atalkd.conf, you'll need the name of the interface that an AppleTalk network will be present on (a LAN):
; ip addr
1: lo: ...
....
2: ens160: ...
....
...
In my case my VM's interface is named ens160, so my /etc/netatalk/atalkd.conf file ends with the line:
I use "Office" instead of - because I want a friendly name instead of the VM hostname. transall enables both DSI (Data Stream Interface6) over TCP and DDP (Datagram Delivery Protocol7) aka EtherTalk, the AppleTalk data link layer on the Ethernet physical layer. The modules listed enable both DDP and DSI, the guest UAM for anonymous read-only access, the clrtxt UAM for Classic Mac OS authentication, and DHX2 UAM for Mac OS X / macOS authentication. The guest login only allows read-only access to shares, and System 7's AppleTalk interface in Chooser limits passwords to 8 characters. Netatalk authenticates against system users, so I created a new macintosh user with an 8-character password to allow logins.
; sudo useradd macintosh
; sudo passwd macintosh
Next is the AppleVolumes.default file, which defines the volumes available to connecting systems. By default a user's home directory is exposed as a share with this line
~
but we can also add other shares:
/srv/appletalk "Share" options:prodos
This creates a share at /srv/appletalk, named Share, with the prodos option which allows the Apple IIGS to use the share or boot from it.
To ensure we can access these shares over TCP using afpovertcp from a modern mac, we need to open the firewall. I created a new service for the port and enabled it:
If used as the first entry in papd.conf this will share all CUPS printers via papd. type/zone settings as well as other parameters assigned to this special printer share will apply to all CUPS printers. Unless the pd option is set, the CUPS PPDs will be used. To overwrite these global settings for individual printers simply add them subsequently to papd.conf and assign different settings.
We should now enable the service
; sudo systemctl enable --now papd.service
CUPS to ImageWriter II
To have CUPS print to an AppleTalk printer, we need a pap backend, see section 4 for directions on configuring a pap backend8. By default, the backend only looks for LaserWriter devices, edit /usr/lib/cups/backend/pap so that devicetypes reflects this or set it to devicetypes="=" to find all devices.
devicetypes="LaserWriter:ImageWriter"
With the pap backend in place, we should see our printer here:
We also need to update our /etc/cups/cupsd.conf file with:
BrowseOrder allow,deny
BrowseAllow all
BrowseRemoteProtocols CUPS dnssd pap
BrowseAddress @LOCAL
BrowseLocalProtocols CUPS dnssd pap
and restart the services:
; sudo systemctl restart cups.service
Now in the CUPS UI, under Administration > Add a Printer, you should see the AppleTalk Devices via pap option. Select it and continue, then copy the URL from lpinfo -v or constructed from nbplkup info into the form, name the printer, and upload the ImageWriter II PPD file.
We need to patch9 our Netatalk 2.x distribution so that the status check doesn't error on ImageWriter IIs. Apply this patch to your netatalk-2.x directory:
; curl -s https://connor.zip/resources/patches/netatalk-2.x/0001-Fix-PAP-status-for-ImageWriter-II.patch | git apply -
; make
; sudo make install
; sudo sytemctl restart papd.service
Now from the CUPS UI, you can print a test page and it should print from the ImageWriter II:
ImageWriter II printing the CUPS test page
By adding a Avahi service file, we can even print via AirPrint:
In each share, Netatalk creats metadata stores. Files in the share only represent only part of a file, the metadata is maintained in these databaes. If you add a Macintosh file in Linux, or even if you copy an existing file to a new name, it'll show up to the Macintosh as an unknown file -- the metadata about how to open it has been lost. This presents quite a problem: without a Macintosh with the file, how can I add files to my share? I've come up with a couple of options:
StuffIt is a program for creating archive files. These file contain this special metadata and it's recreated when StuffIt Expander is run on a Macintosh on one of these files, so the files can be handled by other operating systems and file systems without losing it. It was a common way to provide Macintosh files over the internet at the time. If your Mac doesn't already have StuffIt installed, but has a working floppy disk drive, you may be able to dd an .img image file onto a floppy using a USB floppy drive. Macs use variable speed writes and so PCs can't read their floppys, but I believe the reverse is possible.
Basilisk II a Macintosh emulator which could emulate a client Mac and allow you to add files to the share. The latest version (as of writing) of Basilisk II with support for ARM-based Macs, and the Basilisk II GUI, follow this guide and then this one for AppleTalk. We can add an image file of a floppy containing StuffIt to install it, then we can copy that program onto the share.
When using slirp with Basilisk II, the IP configuration (using OpenTransport) are not the settings from your network, but the network within Basilisk II:
Setting
Value
IP Address
10.0.2.15
Subnet mask
255.255.255.0
Router address
10.0.2.2
Name server address
10.0.2.3
I couldn't get slirp to work, but I discovered that the shared directory between macOS and System 7 on Basilisk II can hold the StuffIt files going into Basilisk II and the resulting decompressed files. And macOS can handle Macintosh files without disrupting the metadata. We can mount the Netatalk AFP server to our modern Mac via afpovertcp, then copy the un-stuffed program files from Basilisk II from the share folder to our AFP folder. Or, we can make the AFP share folder our Basilisk II share folder and skip the extra copy. I was able to copy the StuffIt program file this way from Basilisk II to my Macintosh SE.
There are several file formats used for old files:
.sit or .sea are archives created by StuffIt, StuffIt 4.x runs on a Macintosh but can't open archives from newer versions.
.bin and .hqx which are extractable with Archive Utility on a modern macOS.
Sometimes an .img file may be StuffIt compressed, to deal with that:
Copy the file into the share folder for the emulator
On the emulator, StuffIt expand the file by dragging it onto the StuffIt Expander app
Shut down the emulator
In the Basilisk II GUI, add as a disk the expanded .img file in the share folder
Start the emulator, the files are available on the mounted disk iamge
To get our Macintosh online, we need either OpenTransport10 (for newer versions of System 7) or MacTCP. They both work by proxying IP packets over AppleTalk where a gateway, (originally a newer Mac running Apple IP Gateway11) translates them to IP on Ethernet.
Using macipgw, which was originally written for FreeBSD but has now been ported to Linux, we can provide this gateway. The AppleTalk packets themselves are copied from LocalTalk to Ethernet by an AsanteTalk, and since EtherTalk is routed over Ethernet and not IP, any system or VM running this software or Netatalk 2.x must have a physical Ethernet connection. Unfortunately, macipgw requires a kernel with CONFIG_IPDDP disabled:
Your kernel must be configured with the CONFIG_IPDDP option disabled completely. It is not sufficient to compile it as a module -- in order to support the module, the kernel is modified to intercept all MacIP traffic, so userspace applications such as macipgw cannot handle it.
And my Federa 37 kernel on the VM where I run Netatalk has it configured as a module:
There is a ready made ISO image from macip.net based on Tiny Core Linux, which I can run on ESXi with 512MB of memory and no hard disk (it's a live CD).
MacWeb
Using MacWeb 0.98 and MacTCP configured with the IPs provided by tinymacipgw, I was able to access the local network and load this blog's index page from the Kubernetes cluster in my office closet. I attempted to use Netscape Navigator and iCab based on this list of System 7 browsers to no avail, Netscape Navigator crashed and iCab reported that it didn't have enough memory (the Macintosh has 4MB of RAM which is the maximum configurable).
MacWeb 0.98 on a Macintosh SE running System 7.1
Below is a diagram of the path from the Mac to the internet:
Here's what an HTTP request from MacWeb looks like:
The Accept header syntax has some quirks when compared to the standard. Instead of separating the options with , on a single line, each option gets its own line; and instead of separating each option and its q= with a ;, there is a space. The browser also places the most preferred format at the end, instead of at the beginning as would be expected within a single line to distinguish between multiple values with no q. And, it has no support for application/xhtml+xml, a MIME type registered in 2002 well after its release. After some adjustments, this website is now viewable on MacWeb 0.98, although all pages except the index seem to hang (I assume because they're too large).
There are also some interesting MIME types in the request, like BinHex for applications or audio/basic for audio (the digital audio encoding introduced by the telephone system)
The content of the "audio/basic" subtype is single channel audio encoded using 8bit ISDN mu-law [PCM] at a sample rate of 8000 Hz.
It also advertises image/pict for the PICT graphics format:
PICT is a file format that was developed by Apple Computer in 1984 as the native format for Macintosh graphics. PICT files are encoded in QuickDraw commands. The PICT file format is a meta-format that can be used for both bitmap images and vector images.
There's also www/source and www/unknown, an artifact of its use of libwww, now available on GitHub. I found some information in the MIT WWW Library HTFormat docs. It seems to predate MIME:
The www/xxx ones are of course not MIME standard.
star/star is an output format which leaves the input untouched. It is useful for diagnostics, and for users who want to see the original, whatever it is.
#define WWW_SOURCE HTAtom_for("*/*") /* Whatever it was originally */
www/present represents the user's perception of the document. If you convert to www/present, you present the material to the user.
#define WWW_PRESENT HTAtom_for("www/present") /* The user's perception */
The message/rfc822 format means a MIME message or a plain text message with no MIME header. This is what is returned by an HTTP server.
#define WWW_MIME HTAtom_for("www/mime") /* A MIME message */
www/print is like www/present except it represents a printed copy.
#define WWW_PRINT HTAtom_for("www/print") /* A printed copy */
www/unknown is a really unknown type. Some default action is appropriate.
#define WWW_UNKNOWN HTAtom_for("www/unknown")
NCSA Mosaic
Based on a comment on Hacker News, I also gave NCSA Mosaic 1.0.3 a try using this copy. It works! Mosiac 1.x is the last to work on the Macintosh SE, since Mosaic 2.0.1 asks for 5MB of memory.
NCSA Mosiac 1.0.3 on a Macintosh SE running System 7.1
The historical relevance of Mosaic can't be understated. Marc Andreessen led the NCSA Mosaic project, and went on the found Netscape, eventually co-founding the VC firm Andreessen Horowitz. Netscape went on to become Mozilla Firefox, one of today's major browsers. In 1995, Internet Explorer had its start when Microsoft licensed Spyglass Mosaic (which shared no code with NCSA Mosaic but licensed the name).
Mosaic's creation was enabled by Al Gore's bill High Performance Computing and Communication Act of 1991, Andreessen had this to say:
If it had been left to private industry, it wouldn't have happened. At least, not until years later.
It accounts for the origins (at least in name) of two major browsers, of which only Firefox is still relevant today since the switch from IE to Edge. As for the other two major browsers: Safari was originally derived from the KDE project's Konqueror browser engine, KHTML (and JavaScript runtime KJS); the WebCore component of Safari's browser engine, WebKit, was forked into Blink, Chrome's browser engine. Chrome's open source project, Chromium, is the basis for several other browsers including Brave, Vivaldi, and Opera.
So, we can trace the lineage of every major browser today back to an early browser written in the 1990s.
And here's what a request looks like from NCSA Mosaic:
There is an option to use HTTP 0.9, which simply sends:
; nc -vv -l 0.0.0.0 -p 8000
Connection from 10.0.2.250:1153
GET /
There are some interesting non-standard MIME types here as well, such as application/x-html and text/x-html. There's also application/macbinary for the MacBinary (.bin) format (similar to BinHex referenced above with application/mac-binhex40) used to transfer both data and resource forks of Macintosh application file across the network. We also see formats specific to Microsoft Word and MacWrite II.
As Apple shifted to IP, it helped to create Bonjour aka Multicast DNS (mDNS) or DNS Service Discovery (DNS-SD) which allows computers on a network to advertise services they provide on the network. The ZeroConf standardized IPv4LL (IPv4 Link Local addressing), a requirement for fully plug-and-play networking without a DHCP server:
The IETF Zeroconf Working Group was chartered September 1999 and held its first official meeting at the 46th IETF in Washington, D.C., in November 1999. By the time the Working Group completed its work on Dynamic Configuration of IPv4 Link-Local Addresses and wrapped up in July 2003, IPv4LL was implemented and shipping in Mac OS (9 & X), Microsoft Windows (98, ME, 2000, XP, 2003), in every network printer from every major printer vendor, and in many assorted network devices from a variety of vendors. IPv4LL is available for Linux and for embedded operating systems. If you’re making a networked device today, there’s no excuse not to include IPv4 Link-Local Addressing.
The specification for IPv4 Link-Local Addressing is complete, but the work to improve network ease-of-use (Zero Configuration Networking) continues. That means making it possible to take two laptop computers, and connect them with a crossover Ethernet cable, and have them communicate usefully using IP, without needing a man in a white lab coat to set it all up for you. Zeroconf is not limited to networks with just two hosts, but as we scale up our technologies to larger networks, we always have to be sure we haven’t forgotten the two-devices (and no DHCP server) case.
Historically, AppleTalk handled this very well. Back in the 1980s if you took a group of Macs and connected them together with LocalTalk cabling, you had a working AppleTalk network, without any expert intervention, without needing to set up special servers like a DHCP server or a DNS server. In the 1990s the same was true using Ethernet — if you took a group of Macs and plugged them into an Ethernet hub, you had a working AppleTalk network, using AppleTalk-over-Ethernet. Now that it’s common for computers to have IEEE 802.11 ("AirPort") networking built-in, you don’t even need cables or a hub.
The AsanteTalk is a small metal box with a wall-wart power supply, Ethernet port, and 8-pin DIN port which can either be connected directly to the printer port of a Macintosh, Apple IIGS, or to a printer, or to a LocalTalk 3-pin DIN adapter and used with locking LocalTalk cabling as part of a wider LocalTalk network. The Farallon PhoneNet adapters were popular in this era, and you can use these adapters as well along with standard 4-wire RJ11 terminated phone lines. The Macintosh Troubleshooting Pocket Guide from 2002 answers this question:
How do I connect my LocalTalk printer to my USB Mac? Printers like the LaserWriter IINT, NTX, F, Personal LaserWriter NT, NTR, 320, LaserWriter Pro 600, 4/600 PS, Select 360, Color StyleWriter 6500, or an HP LaserJet with "M" or "MP" in its name?
To connect these printers to a new Mac, you must use an Ethernet to LocalTalk Bridge:
The AsanteTalk Ethernet to LocalTalk Bridge includes everything you need to connect a LocalTalk printer to a new Mac. It works with existing drivers.
If the printer is already connected to a LocalTalk network, you can use Farallon's iPrint LT. The iPrint LT is similar to the AsanteTalk, except that it has a PhoneNet jack instead of a LoclTalk DIN-8 jack. If your existing LocalTalk network has more than eight LocalTalk devices on it, you need a much more expensive bridge, and are better off upgrading to Ethernet all around.
One gotcha: Mac OS 10.2 and later no longer support PostScript Level 1 printers -- only PostScript 2 & 3. So your old LaserWriter II NTX and other PostScript Level 1 printers will not work from 10.2 at all.
More information on the AsanteTalk is available in the User Manual. I found this manual on Marushin, a website for a Japanese shop which focuses on old Macintosh computers.
I can't help but fix it. This is the spirit of the 65-year-old shopkeeper.
DSI was introduced with MacTCP to enable AppleTalk over TCP and enable IP networking. I've found this PDF of chapter 5 on ADSP of Inside Macintosh: Networking. ↩︎
The excellent book Inside AppleTalk covers DDP in chapter 4. I've also found this PDF of chapter 7 on DDP of Inside Macintosh: Networking. ↩︎
I adapted the approach taken by Carpentier Pierre-Francois in thier fork. In futher testing, it seems the patch to papstatus.c is unnecessary and reports incorrect status information, the Netatalk 2.x version already returns a human-readable string. There is a bug where CUPS displays discovered network printers, PAP printers will display the status strangely:
Patchwork solutions to specific problems were destroying the modularity of this part of the system. The time was ripe to redo the whole thing. This paper describes the new organization.
I think this was in response to approachs such as BSD Sockets. STREAMS was further iterated on in Plan 9. ↩︎
https://connor.zip/posts/2023-07-27-interpressPostScript and Interpress: A ComparisonBrian Reid2023-07-27T00:00:00-05:00A 1985 essay comparing two similar printer languages of the era: PostScript and Interpress
Below I've reproduced the essay by Brian Reid, written in 1985 in an email via ARPA-net.
The original from line:
From: Brian Reid <reid@Glacier>
and signature
Brian Reid Re...@SU-Glacier.ARPA
Computer Systems Laboratory decwrl!glacier!reid
Stanford University 415/323-6100
give some insights into how ARPA-net was used at the time. The original is preserved on google groups:
This essay offers a comparison of two modern schemes for controlling what laser printers print. One scheme, called PostScript, is offered by Adobe Systems, Inc.; the other scheme, called Interpress, is offered by the Xerox Corporation. A discussion of these two schemes has provoked a considerable amount of interest in this forum recently. I have for some time been promising (threatening?) to provide my interpretation of the difference between the two systems. It is long enough and detailed enough that you will certainly never want to read another word on the topic after you read it, but given the nature of computer mail systems you almost certainly will be given the opportunity.
To a first order, PostScript and Interpress are indistinguishable. What I mean by that is that by comparison with all other current techniques for page image representation, the two can be considered to be nearly identical. I believe that it is worth looking at how they got to be that way; their similarities and differences can best be understood with a proper historical perspective.
Part I: History
The Evans and Sutherland Computer Corporation has for quite a number of years sold very expensive, very powerful graphics devices for CAD/CAM and for real-time simulation. The CAD/CAM machine is called The Picture System; the simulation machines are custom-built for each application. Custom simulation graphics machines are used for such purposes as providing the windshield graphics for military flight simulation systems--emulating what a pilot would see if he were looking out the window of a real airplane. These graphics systems use a very clever graphics model, developed by Ivan Sutherland and others, which is based on coordinate system transformations and line drawing.
Although the Evans and Sutherland company is primarily in Salt Lake City, they had a small research office in Mountain View (California) in the early 1970's. John Warnock was in charge of it, and John Gaffney worked for Warnock. One of the activities of the Mountain View office was to develop software for producing 3-dimensional graphical databases both for the Picture System and for the simulation machines. Working with Warnock, Gaffney had by 1975 programmed and documented and released the first version of a programming language that was called "The Evans and Sutherland Design System".
Gaffney came to E&S from graduate school at the University of Illinois, where he had used the Burroughs B5500 and B6500 computers. Their stack-oriented architectures made a big impression on him. He combined the execution semantics of the Burroughs machines with the evolving Evans and Sutherland imaging models, to produce the Design System. Like all successful software systems, the Design System slowly evolved as it was used, and many people contributed to that evolution.
John Warnock joined Xerox PARC in 1978 to work for Chuck Geschke. There he teamed up with Martin Newell in producing an interpreted graphics system called JAM. "JAM" stands for "John And Martin". JAM had the same postfix execution semantics as Gaffney's Design System, and was based on the Evans and Sutherland imaging model, but augmented the E&S imaging model by providing a much more extensive set of graphics primitives. Like the later versions of the Design System, JAM was "token based" rather than "command line based", which means that the JAM interpreter reads a stream of input tokens and processes each token completely before moving to the next. Newell and Warnock implemented JAM on various Xerox workstations; by 1981 JAM was available at Stanford on the Xerox Alto computers, where I first saw it.
In the meantime, various people at Xerox were building a series of experimental raster printers. The first of these was called XGP, the Xerox Graphics Printer, and had a resolution of 192 dots to the inch. Xerox made XGP's available to certain universities, and by 1972 they were in use at Carnegie-Mellon, Stanford, MIT, Caltech, and the University of Toronto. Each of those organizations produced its own hardware and software interfaces. The XGP is historically interesting only because it is the first raster printer to gain substantial use by computer scientists, and was the arena in which a lot of mistakes were made and a lot of lessons learned.
To replace the XGP, Xerox PARC developed a new printer called EARS, and then another newer printer called Dover. After the agony of converting software from XGP to EARS, various Xerox people realized that applications programs generating files for the XGP or for EARS should not be tied to the device properties of the printer itself. Bob Sproull and William Newman, of Xerox PARC, developed a relatively device-independent page image description scheme, called "Press format", which was used to instruct raster printers what to print.
As part of an extensive grant program to selected universities, Xerox donated Dover printers and made documentation of the Press format available under a nondisclosure agreement. As far as I know, that nondisclosure agreement has never been lifted, though information about Press format has been widely enough distributed that by 1982 researchers at the Swiss Federal Institute of Technology (EPFL) at Lausanne had given conference papers about their own independent implementation of Press format.
Press format was a smashing success; it revolutionized laser printing technology in the academic and research communities, and stimulated a large number of people to think about issues of device-independent print graphics. Nevertheless, Press format had its limitations, and various people felt the need to revise the basic design.
Sproull left Xerox in 1978 to become a professor of computer science at CMU. Newman returned home to England to become an independent consultant. Martin Newell left Xerox to join Cadlinc Corp. Warnock and Geschke remained at Xerox.
While at CMU, Sproull began making plans for a new version of Press that would combine the graphics model of JAM with the page image description properties of Press. Sproull returned to Xerox for a sabbatical leave in 1982, and enlisted the help of Butler Lampson in the creation of the new page image description language that Warnock dubbed "Interpress". The name caught on.
While it is difficult to separate the contributions made by Sproull and Lampson, it is not incorrect to say that Lampson and Warnock produced the execution model of Interpress while Sproull and Warnock produced the imaging model. It is also approximately correct to characterize this first version of Interpress as being derived from the graphics model and execution model of JAM with additional protection and security mechanisms derived from experience with programming languages like Euclid and Cedar, and a careful silence on the issue of fonts. The trio worked under Geschke's direction, and Geschke was responsible for refereeing disagreements and for making certain that the resulting design was acceptable to the rest of Xerox.
My own involvement with the Interpress effort is difficult to explain. Sproull was my thesis adviser at CMU; we had discussed many of the issues in page description languages at length. As a consultant to PARC during the Interpress design work, my primary activity was one of writing or rewriting the Interpress materials. I also represented a "consumer" point of view rather than a "designer" point of view, and often complained about aspects of the evolving language.
I feel uncomfortable discussing the issues involved in the transition of Interpress from an artifact of the research lab to a marketable product. I shall therefore not discuss them. During this transition phase Geschke and Warnock left PARC (December 1982) to start Adobe Systems, Sproull returned to CMU (June 1983), and Lampson left PARC to join DEC Research (November 1983).
Warnock had various philosophical differences with the final Interpress design, and he voiced those differences to the rest of the Interpress group at every opportunity. At Adobe, Geschke and Warnock saw the opportunity to try again, with a design group composed of people who shared his ideology. They enlisted Doug Brotz, a Xerox PARC researcher who had had no involvement with any of the Press/JAM/Interpress world, to join them in developing a new page description language named PostScript, based on combining the execution model and imaging model of JAM with a protection structure more reminiscent of C or the Unix shell than of Euclid or Cedar. While not at all a copy of JAM, PostScript resembles JAM more than it resembles Interpress. PostScript also embraced various Unix notions, such as the use of text streams to convey information.
On March 15, 1984, Adobe shipped its first PostScript manual to a potential customer. That PostScript manual was printed on a PostScript printer using a Times Roman font licensed from Allied corporation and digitized by Adobe.
At that time all aspects of the Interpress project were still very proprietary, and it appeared to me that Xerox had no interest in releasing them. However, on April 25, 1984, I received a Xerox press release announcing the availability of Interpress documentation. I finally managed to get my hands on a copy of the Interpress documentation in February of 1985, and was quite surprised to discover that the Interpress documentation had not been printed on an Interpress printer, but was instead printed on a Press format printer, using the same Times-like and Helvetica-like fonts that I had become familiar with at CMU and Stanford on the Dover printers.
Part II: Comparison
Part I outlined the history of PostScript and of Interpress, as I have been able to determine it. With that historical background, I now offer a comparison of the two languages.
While there are quite a number of extant schemes for the description of printed images, most of them are better described as "data structures" than as "languages". In particular, only PostScript and Interpress are directly executable.
Languages can be compared at several different levels. Languages have a lexical representation, a syntax, a semantic model, an intended style of usage, and implementation considerations.
Lexical Considerations
The lexical properties of a language define the way the tokens of the language are represented in terms of bits, bytes, or characters. The FORTRAN language was defined in terms of a particular character set, which the implementor was expected to use. The ALGOL language was defined in terms of keywords and symbols, and the language definition left the implementor free to choose how he would represent those keywords in terms of characters available on his computer. For example, the FORTRAN definition of a "DIMENSION" statement is that it is the letter "D" followed by the letter "I" followed by the letter "M", etc. The ALGOL definition of the "BEGIN" keyword was merely that it was a keyword; the ALGOL standard document used boldface to identify keywords. When ALGOL is implemented on computers whose character sets include boldface, the implementors normally use the boldface characters as a way of identifying keywords. When ALGOL is implemented on other computers, the implementors choose other schemes for identifying keywords, such as putting them in quotes or putting them in all capital letters.
Both PostScript and Interpress have an operator called MOVETO, and in both languages it does exactly the same thing, which is identical to what the MOVETO operator did on the Evans and Sutherland hardware that spawned this graphics model. Let's look at how that operator would be represented in the two languages.
The PostScript language is defined in terms of characters, like FORTRAN. The definition of the PostScript operator "MOVETO" is the letter "M" followed by the letter "O" followed by the letter "V", etc. The Interpress language is defined in terms of keywords; the definition of the Interpress operator "MOVETO" is that it is a keyword in the ALGOL sense. The Interpress 2.1 standard suggests that MOVETO can be represented with the serial number 25 in a standard encoding that the standard provides, but the definition of the MOVETO keyword is independent of the choice of encoding.
Since PostScript is defined in terms of sequences of characters, it is always possible to assume that a PostScript file can be transmitted over any link capable of sending characters, and can be stored in any device capable of holding characters. Since Interpress is defined more abstractly, it is not necessarily possible to make any assumptions at all about a particular Interpress file. However, any Interpress encoding can be translated into any other Interpress encoding, so it is always possible to take an Interpress file and translate it into a stream of characters which will then have properties identical to PostScript's. Conversely, it is always possible to translate a PostScript program into a tokenized keyword form, though the PostScript standard does not suggest any particular tokenization scheme.
It is worth mentioning that the word "token" is slightly overloaded here. A "tokenization scheme" is a means of doing data compression, wherein a sequence of characters is called a "token" and is replaced by a token number, which will occupy less space. However, a language can have tokens without having a tokenization scheme. Both PostScript and Interpress have an execution semantics that is defined in terms of things called "tokens". The Interpress tokens are normally represented by tokenization schemes--i.e. replaced with integers--while the PostScript tokens are normally left as sequences of characters. In later sections of this message the word "token" will be used to mean either the PostScript kind of token or the Interpress kind of token; by the time they get to the interpreter they are roughly the same thing.
The Interpress 2.1 standard defines a particular encoding of Interpress, and gives bit and byte formats, decimal integer operator numbers, and so forth. This encoding is a full binary encoding, using all 8 bits of each byte, which means that it cannot always be sent over a serial character link. The Interpress standard encoding of a page description normally occupies a smaller number of bytes than the equivalent PostScript character representation. This is possible because binary encodings make more efficient use of the bits.
Interpress files are clearly intended to be transmitted via XNS protocols over Ethernet. In its current form, without further processing or re-encoding, Interpress is not suitable for transmission over character-protocol lines. PostScript files are clearly intended to be transmitted over character-protocol lines. Like all character stream protocols, PostScript can also be transmitted over Ethernet, but a PostScript file will use more bytes than the corresponding Interpress file.
Text files such as PostScript sources are highly redundant (i.e. they make inefficient use of their bits) and can be run through data compression programs (such as the Unix "compact" program) to reduce the amount of space they occupy in storage and during transfer. Data compression techniques will probably not yield much further compression of Interpress files, because the information is already quite tightly packed. After compression of both, the PostScript and Interpress representations of an image will likely occupy approximately the same number of bits.
Syntactic Considerations
The syntactic issues (or issues of syntax, if you will) of a language are the means by which an interpreter for the language distinguishes variables from operators from constants from function calls from quoted strings, and by which it determines whether or not a certain sequence of characters or tokens is in fact a "legal" construct in the language.
As languages in general go, both PostScript and Interpress are remarkably free of syntax. As token-oriented postfix languages, each token of the language is "executed" as soon as it is identified, and that execution will either succeed or fail depending on the state of the execution environment at that point.
Nevertheless, both languages have a small amount of syntax, though they differ radically in the nature and application of this syntax. In fact, the primary area in which the PostScript language and the Interpress language are incontrovertibly and irrevocably different is in their syntax.
As explained above (Lexical Issues) PostScript is defined in terms of character sequences. A PostScript program is a series of character tokens, separated by white space characters. That program is fed to an interpreter to be executed; the interpreter reads in the characters and assembles them into words (i.e. tokens), then looks up the tokens in dictionaries to determine their meaning. In this regard PostScript is similar to many other programming or command languages: if the PostScript interpreter sees the command "MOVETO", it finds the current definition of that string, and then performs whatever action is requested in that definition.
By contrast, Interpress is defined in terms of byte codes, which behave more like the instruction codes of a hardware interpreter than like a traditional programming language. Instead of the letters "MOVETO", an Interpress file will have a byte whose binary value is 25; the number 25 is then used to index an operation code table which directs the interpreter to the program implementing the MOVETO operation.
The byte codes of Interpress can be viewed as a compiled form of the character codes of PostScript. One could imagine a translator that passed over a PostScript file, looked up each name, and produced an output file whose contents was the binary identification of the thing found during the lookup. In fact, the Interpress standard document explains that the two forms are equivalent, and the Introduction to Interpress document explains how to write a program to convert one to another.
There is, however, a crucial difference between the PostScript and Interpress naming schemes that makes them very different, and makes impossible the above-mentioned imagined compiler to translate PostScript into Interpress. That difference is best understood as a semantic difference, and will be explained in the next section.
Returning to syntactic issues, an Interpress file has what is called "static structure" or "lexical structure". This means that you can look at an Interpress file and make structural assumptions about what you find there. For example, an Interpress file is defined to be a sequence of "bodies"; each body is a sequence of operators and operands. The first body is the "preamble", or setup code; all following bodies correspond to printed pages. If an Interpress file has 11 bodies, then it will print as 10 pages.
By contrast, a PostScript file has no fixed lexical structure; it is just a stream of tokens to be processed by the interpreter. PostScript prints a page whenever the SHOWPAGE operator is executed. If a PostScript file contains a loop from 1 to 10, with a SHOWPAGE operator inside the loop, then it will print 10 pages even though there is only one actual call to SHOWPAGE in the file. However, since PostScript is a textual language, and since it has a "comment" facility like the C /..../ or Pascal {...}, it is possible for the creator of a PostScript file to represent whatever additional information is desired. It is a slight misnomer to call this a comment facility, because the normal use of the word "comment" in programming languages implies that the contents of the comment are irrelevant. PostScript comments are irrelevant in the sense that they do not affect the image produced by a PostScript file, but they do convey machine-readable information about the structure of the document.
A PostScript client is free to choose any structuring scheme that he wants, and the tool that he has available to implement this structuring scheme is the PostScript comment. There is a particular "standard" structuring convention documented along with PostScript by which page boundaries and other lexical information can be marked. A PostScript file that follows that convention is called a "conforming" file, but it is a convention and not a rule; the printed image produced by a nonconforming PostScript file will be identical to that produced by the equivalent conforming PostScript file. Conversely, the structure of a PostScript file, as represented by the structuring convention, is completely independent of the appearance of the page images--the actual PostScript text appears to be a series of comments as far as the structuring systems are concerned.
The technique of mixing two different languages in one file, so that a processor for one language sees the text of the other language as comments, is not new. Perhaps the most widely-known instance of this scheme is Don Knuth's "WEB" system, in which Pascal and TEX are woven together in such a way that the Pascal program looks like a comment to the TEX interpreter and the TEX source looks like a comment to the Pascal compiler.
This absence of fixed lexical structure in PostScript is a two-edged sword. On the one hand, it offers more flexibility in creating page images, especially repetitive ones; on the other hand, it provides more opportunities to make mistakes.
One final syntactic issue is perhaps worth mentioning, though it could also be considered a semantic issue. Interpress does not support "variables" so much as it supports "registers", in the hardware sense. All storage in Interpress is accessed by address and not by name. What would be called a "local variable" in a programming language is represented in Interpress by an integer subscript into the procedure's frame. All programming languages must ultimately reduce their variable names into memory locations; Interpress asks that this translation be performed by the creator of the Interpress file and not by the interpreter. An obvious benefit of this approach is efficiency--no name lookups need be performed as the file is being printed. An obvious drawback of this approach is the restricted name space available to the programmer and the extra care that must be taken to manage addresses instead of names. By contrast, PostScript supports ordinary named variables.
Semantics
Since both Interpress and Postscript derive their semantics from the same source, it stands to reason that the semantics would be similar. Both use similar graphical semantics, the same imaging model, and both use very similar execution semantics. The differences are minor, though one could imagine that the consequences of those differences might be major.
There are two substantive differences between the graphical semantics of PostScript and Interpress 2.1, namely that Interpress has no facility for describing curves, and the Interpress standard is completely silent on the issue of fonts.
A curve can of course be approximated with a series of line segments, and if the line segments are short enough the resulting appearance will be identical, but many classes of curved lines, such as those appearing in fonts, can be described very succinctly in terms of the PostScript CURVETO operator while requiring a tedious collection of short line segments to describe in Interpress. Because of the importance of fonts to printed images, this seemingly minor omission could possibly have major consequences.
On the issue of fonts, the Interpress standard states only that a font is an operator that will be executed for you when appropriate, and that the operators for that font are defined "in the Environment". A PostScript font is just an ordinary PostScript defined operator, and the PostScript manual gives explicit instructions for creating user-defined fonts and making those font definitions be part of a PostScript file. One could imagine that it is possible to write an Interpress composed operator (in Interpress, of course) to behave like a user-defined font, but the Interpress implementations do not currently have any mechanism for recognizing that an operator is in fact a user-defined font and should therefore receive any kind of special treatment. This is not a deficiency in Interpress, just a silence, accompanied by a deficiency in current implementations (this and other implementation issues are discussed in the last section).
There are three consequential differences between PostScript execution semantics and Interpress execution semantics: user-defined operators, the nature of the "firewalls" between pieces of the program, and error recovery.
In Interpress, a user-defined operator is syntactically different from an intrinsic operator, and requires an explicit "DO" operator to call it. In PostScript a user-defined operator is syntactically identical to an intrinsic operator, and in fact any intrinsic operation can be redefined by simply making a new entry for that operator's name in the appropriate dictionary. This is stylistically similar to the difference in lexical structure: Interpress guarantees that if a byte code 25--the MOVETO operator--is found in a file, that it will when executed perform a standard MOVETO. PostScript guarantees nothing because it enforces nothing. If you want to redefine the meaning of MOVETO, then you can do so, and when the characters "M O V E T O" are found in a PostScript file, the redefined operator will be executed instead. To execute a PostScript user-defined operator you just include its name, the same way you execute any other operator. To execute an Interpress user-defined operator, you execute the DO operator (or a variation of it), after pushing onto the stack the thing that you want to execute.
Analogously with the static structural issues, The PostScript user-defined-operator scheme offers more flexibility than Interpress but carries with it more dangers. Like the old saw about giving one enough rope to hang himself, the additional flexibility of the PostScript scheme requires discipline on the part of the user. Furthermore, just as PostScript has a convention for the voluntary inclusion of static structure in a file, it has a mechanism by which a PostScript program can reference the true built-in version of an operator and not the current, possibly user-redefined, version of an operator. From the point of view of language design, this scheme is not terribly elegant, but it is quite practical, as it provides a mechanism for the solution of all of the problems associated with operator redefinition and the prevention thereof.
It is this ability to redefine builtin operators that makes the compilation of a textual Postscript file into an encoded Interpress file (mentioned above under Syntax) impossible. A static analysis cannot determine the operator that will be executed when the textual token is interpreted. By contrast, it is easy to translate Interpress into PostScript, because all of Interpress' semantic capabilities have direct equivalents in PostScript, and the lexical translation is straightforward.
Interpress has a distinction between "bodies" and "operators". A "body" is a sequence of Interpress tokens. The Interpress operator "MAKESIMPLECO" (make simple composed operator) translates a body into an operator. Like all other Interpress operators that reference bodies--referred to in the Interpress standard as "body operators"--the MAKESIMPLECO operator is prefix and not postfix. This was done to make it easier for small computers to implement Interpress interpreters; it has the interesting side-effect of making it impossible for an Interpress program to generate and then execute a piece of Interpress source code. I would guess that the entire reason for the distinction between Interpress bodies and operators is to enable a clean prefix implementation of body operators while at the same time permitting the more conventional postfix use of expressions of type "operator".
By contrast, PostScript represents operator bodies as arrays of PostScript tokens. The PostScript lexical scanner processes a body by building an array out of the tokens that it finds in the input stream; that body is then handled as an ordinary data value in the language, and it can be stored into variables, executed, modified, searched or searched for, etc. The translation of a body into something like an Interpress operator consists merely of returning the address where the body is stored; that can be handled by the PostScript type system and does not require a special conversion operator. Consequently, a PostScript program is able to generate an array of PostScript operators, however it so chooses, and then declare that array to be a new PostScript operator and have it be executed just like any other PostScript operator.
The second important semantic difference between PostScript and Interpress is the set of mechanisms that they offer for protecting one piece of the file from side effects in another. As you might be able to guess if you have read this far, the Interpress protection mechanism is static and mandatory while the PostScript protection mechanism is dynamic and optional. This kind of mechanism is often referred to as a "firewall".
An Interpress file consists of a series of bodies. Each body is executed completely independently of each other body. In particular, at the beginning of each page body, the execution environment is restored to the state that it had at the end of execution of the preamble, so that each page body is executed as if it were the only page in the document. There is absolutely nothing that the code in one Interpress page can do that will have any effect on the execution of the code in any other Interpress page, and the Interpress language guarantees that independence. This permits, for example, the pages to be executed or printed in any order, front to back or back to front, or in folios of 16 pages at a time, with complete confidence that the appearance of the pages will not change.
By contrast, a PostScript file has no static structure, so there is no convenient place to build automatic firewalls. PostScript provides, instead, two pairs of operators by which a PostScript user can build his own firewalls wherever he wants them. There is an operator called SAVE, and another operator called RESTORE. The RESTORE operator restores the execution state of the machine back to what it was when the last SAVE operator was executed. Thus, if a PostScript user wants to have pages that are firewalled against each other, then he puts a SAVE operator at the beginning of the page and a RESTORE operator at the end of the page. If the PostScript user wants to play tricks, and build PostScript files that do bizarre things with the execution state between pages, he is free to do so by leaving out the SAVE and RESTORE.
By now you can probably see the fundamental philosophical difference between PostScript and Interpress. Interpress takes the stance that the language system must guarantee certain useful properties, while PostScript takes the stance that the language system must provide the user with the means to achieve those properties if he wants them. With very few exceptions, both languages provide the same facilities, but in Interpress the protection mechanisms are mandatory and in PostScript they are optional. Debates over the relative merits of mandatory and optional protection systems have raged for years not only in the programming language community but also among owners of motorcycle helmets. While the Interpress language mandates a particular organization, the PostScript language provides the tools (structuring conventions and SAVE/RESTORE) to duplicate that organization exactly, with all of the attendant benefits. However, the PostScript user need not employ those tools.
Before taking a stand on this issue, you must remember that neither Interpress nor PostScript is engineered to be a general-purpose programming language, but rather to be a scheme for the description of page images, so it is not necessarily valid to apply programming language lore to these two systems.
The third area in which there are significant semantic differences between PostScript and Interpress is in error handling and error recovery. The Interpress 2.1 standard is slightly vague as to what happens when various error conditions occur; one assumes that the implementors of Interpress printers will do something reasonable. The PostScript language provides a user-extensible error-recovery mechanism that is keyed on PostScript's ability to redefine intrinsic operators. Whenever an error of any kind occurs in PostScript, be it the printer out of paper, the file asking for a font that doesn't exist, or a division by zero, the PostScript interpreter responds by executing an "error operator". If the error operator has not been redefined, then some standard action is taken; sometimes the standard action is to do nothing, while sometimes the standard action is to abort or to retry. The standard action is merely the execution of the error operator.
The Interpress documentation does not offer much explanation, one way or another, of error handling. The Interpress standard describes certain kinds of error conditions that can occur, such as "appearance error" or "master error", but does not specify exactly what will happen if those errors occur. I assume that the reason the standard is vague is to provide leeway to the implementors in error handling. The Interpress language standard does not describe any technique by which an Interpress master can control or modify the error recovery actions.
When a PostScript error occurs, an error operator is executed. There is a set of built-in error operators provided as part of PostScript, and documented like all other operators. If a PostScript user wants to change the error handling of a PostScript printer, he simply changes the dictionary entry for the relevant error operator. Depending on the relative position of that redefinition with respect to SAVE and RESTORE operators in the PostScript file, the redefinition will have a certain lifetime. A SAVE and RESTORE pair is wrapped around each separate file printed by a PostScript printer, so that the redefinition does not carry over to other jobs. The manager of an installation can change the overall default of the printer by sending it a redefinition, during printer startup, before entering the SAVE/RESTORE loop around each print job.
Like so much of PostScript's flexibility, the ability to redefine operators is a two-edged sword. Redefining an operator can be used to advantage by clever and knowledgeable users, and it can be used as a technique for fixing bugs in a PostScript implementation. For example, if an accounting package were not provided as part of a PostScript implementation, the owners of a PostScript printer could add page accounting to their printer by downloading a redefinition of the SHOWPAGE operator that kept accounting information. However, a user might be able to disable that accounting by doing yet another redefinition that disabled the installation's accounting. To circumvent this class of problem, PostScript provides a mechanism for declaring certain objects to be read-only, or execute-only. The management of a shared PostScript printer can specify that part of its power-up or restart sequence is to load a configuration file; that configuration file can redefine certain operators--for the purpose of bug fixing or accounting or any other reason--and then, if desired, mark the redefined operators read-only so that they cannot be further redefined. As a language mechanism this is very clumsy, but as an operational technique it is effective.
Implementation Issues
The implementation considerations are the most difficult to review and compare, because it is next to impossible to determine the reason for some annoying property of an implementation; it is also not entirely proper to criticize a language for the state of its implementation. Nevertheless, the history of programming languages has repeatedly shown that good implementations of languages have longer-lasting impact than good designs. For example, I quite commonly encounter people who choose to run VMS on their Vax systems instead of Unix and who offer the explanation that they do this because the VMS implementation of Fortran is so good that their programs will run a lot faster. Naturally, other people have other reasons; this is just an example.
The Interpress documentation is peppered with "fine print" explaining the possible limitations of various possible Interpress printers, and a chapter of the Interpress standard is devoted to a discussion of the various ways to subset Interpress so that stripped-down versions of the language can be implemented. Indeed, as of today (March 1, 1985) I am not aware of the existence of any printer that implements the full Interpress 2.1 language defined in the standard. Certainly none is offered now as a product, and if one has been announced the announcement has not yet reached me. The Xerox 8044 "Star" printer and the 5700 and 2700 printers all implement various subsets of Interpress. Perhaps there are others. The only one of these that I have used to any extent is the 8044. It implements a textual subset of Interpress, with the capability of a certain amount of line graphics, and has some unknown capacity for more sophisticated graphics. It does not implement very many of the features that distinguish Interpress from the older Press format, and in fact has some surprising limitations. For example, Interpress provides the ability to get rounded ends on line segments. The 8044 implementation of Interpress that I experimented with faked the circular arcs with sections of a 9-sided polygon. The Interpress standard promises the ability to rotate the coordinate system through arbitrary angles; all of the existing implementations of Interpress limit coordinate system rotations to multiples of 90 degrees.
Xerox quite likely has been developing true Interpress printers, which implement the full documented language, but none has been demonstrated or announced.
By contrast, the PostScript documentation makes no mention of any subset, or of any implementation restrictions. The entire PostScript language was fully implemented before any PostScript documentation was distributed or any printers shipped. There are four PostScript printers announced and demonstrated by three OEM vendors: the Apple LaserWriter (300 dots/inch) the QMS 1200A (300 dots/inch), the Mergenthaler P300 phototypesetter (2540, 1270, or 635 dots/inch), and the Mergenthaler P101 phototypesetter (1270 or 635 dots/inch). The Apple printer has been shipped to customers, the QMS printers are in Beta test, and the Mergenthaler machines will be shipped to customers by Fall of 1985.
All implementations of PostScript printers can print any PostScript file, with no restrictions save the availability of fonts as licensed to that manufacturer. Circles come out as circles. A PostScript file that has been proof-printed on an Apple LaserWriter can be typeset on a Mergenthaler P101 without making any changes to the file. Naturally all device-independent page representation schemes have this ability as their goal, and many claim to be able to do it, or claim that they could do it if they had all of the necessary fonts available in all of the requisite sizes. The current set of PostScript printers actually do it.
Given that Xerox has been working on Interpress for about twice as long as Adobe has been working on PostScript, and many of the graphics techniques necessary for the implementation are copiously described in the open literature, I find it surprising that there are no true Interpress printers on the market. I am puzzled by this, and as a student of programming languages I am very interested in learning whether or not there are any properties of the Interpress language itself that are somehow contributing to this difficulty, or whether this is just the usual sluggishness that one expects from all large companies.
https://connor.zip/posts/2023-07-27-hp-designjet-650cPrinting like it's 1995Connor Taffe2023-07-27T00:00:00-05:00Fixing up and printing to an HP DesignJet 650C
I found both of my printers second-hand at Goodwill. At twenty and nearly thirty years old, it's amazing they still operate and through open source software that we can print to them from modern hardware. They are:
An HP LaserJet 4100N laser printer. Released in 2004, it prints black and white documents at a stunningly crisp 1200x1200 DPI.
An HP DesignJet 650C large format inkjet plotter. Released in 1995, it prints from a 36" roll at 300x300 DPI color and 600x600 DPI black-and-white.
With some searching on eBay I was able to equip each with JetDirect network cards, and added a duplexer to the LaserJet. Network cards are not required, you can instead install CUPS on a machine with a serial, parallel, or USB connection to your printer. I choose to network them because it simplifies hosting a print server on a VM and allows me flexibility in where they're located.
The DesignJet supports MIO cards, the most recent being the JetDirect 400N cards released in 2000. The preferred card is the J4100A which supports 10/100 BASE-TX Ethernet (RJ45), aka Fast Ethernet, and 10 BASE-2 (BNC).
The HP LaserJet supports EIO cards. I have the 635n installed which provides gigabit ethernet and IPv6 support alongside a j4135a HP Connectivity Card which provides USB, serial, and LocalTalk ports.
HP EIO JetDirect Cards
The HP DesignJet 650C was almost in working order when I found it at Goodwill. After soaking the ink cartridges in hot water and wiping their ports with alcohol, removing the part of the roller that introduces friction so that it could roll freely, and oiling the print head rail, it was able to produce beautiful 36" wide inkjet prints. Below is a close-up of a print of the Highway Map of Arkansas which I was able to print scaled up while maintaining its resolution. You can see the 300x300 color DPI and the 600x600 DPI blacks:
Close up of Highway Map of Arkansas print
Maps are ideal for this printer, which was expected to be used mostly for drafting prints. The paper roll that it had when I found it is very thin paper that won't hold lots of ink well. I was also able to find some appropriate new old stock ink cartridges at the Goodwill Computer Store which I have in case I run out of ink.
Below is an ad for the HP DesignJet 650C which appeared in the July 1995 issue of InfoWorld magazie, with a price tag of $8,595 for the 24" plotter and the add-on PostScript support ROM.
An ad for the HP DesignJet 650C
Although some still utilize this printer via modern Windows, it was designed to work with Windows NT. The MIO network card even has a web interface that utilizes Java Applets, which only works on Netscape 4.0.3 (not 4.0.4), or IE 4. I was able to spin up a Windows NT VM on VMWare and install Netscape to see it in action:
The HP DesignJet 650C Web UI
Note the antiquated supported protocols including EtherTalk, a version of AppleTalk using Ethernet as the physical layer instead of LocalTalk. AppleTalk's auto-configuration features were the basis for Bonjour aka mDNS/DNS-SD.
In AirPrint with CUPS, I discuss setting up CUPS and Avahi to support driverless printing from devices like an iPhone, there I use the GhostScript driver. The OpenPrinting page mentions that the GhostScript driver has issues with color, especiall the B models like mine (C2859B):
Works "almost" - RGB data are sent to the plotter. The CMYK mode of the "B"-Models and the 75x Series is not supported. Images are somewhat "greenish"; gray is composed of CMY. Nice for really LARGE printouts ... (ISO A0).
These are the options I've thought of to print to the printer:
Using the suggested GhostScript printer driver dnj650c. This driver prints blacks using black ink but grays are a mix of colored inks since it uses RGB instead of CMYK colors.
After installing Gutenprint drivers with dnf install gutenprint-cups, I configured a new printer using the HP DesignJet 750C driver it provides. Test pages produce blacks and grays that are made from a combination of color inks instead of black ink.
Using the HP Windows driver, which utilizes a similar approach to GhostScript -- converting the job to raster format before sending it in chunks to the printer. From the Windows NT VM, I can expose the printer via lpd and configure that backend in CUPS.
Using an inbuilt PostScript interpreter, which is only available on the more expensive /PS models, or via an expansion ROM. I was able to find a C3545-60101 PostScript ROM SIMM, and installing it allowed me to nc designjet.home.arpa 9100 < test.ps and see the printed result. The chip goes in the second slot from the top, under the panel which contains the RAM.
In these expriments, I used the CUPS setup wizard to create a new printer (and upload a PPD), then copied the Avahi service file and pointed it at the new IPP endpoint with a new UUID and name.
For the last two approaches, I need a PPD file (and possibly an ICC color profile) which I can configure in CUPS. HP originally provided these, they mention a v2.0 file which enabled long axis printing for banners, but it's no longer available from their website. I reached out to David Mauldlin based on an old Graphisoft post of his, hoping he might have had the PostScript module and a PPD — sadly this wasn't the case, but he helpfully provided me with a copy of the Service Manual.
Without an embedded page size in a PostScript file, PostScript-capable HP DesignJet printers default to a paper size that is the width of the roll multiplied by 1.5. For example, if the printer had a 36-inch roll, the printer would feed and cut the paper at 54 inches (36 x 1.5), regardless of the size of the image on the paper.
I've witnessed this behavior when printing a test PostScript file, so add <</PageSize [612 792]>>setpagedevice (for Letter) to avoid wasting paper. This can be done automatically via PPD file.
I've successfully printed a PDF through CUPS through Windows NT:
using a custom PPD file, which is essentially a generic PostScript PPD combined with some additional page size options,
and by configuring CUPS against Windows NT using the lpd backend (lpd://nt.home.arpa/DESIGNJET),
where DESIGNJET is the share name (under Control Panel, then Printers, then the HP Designjet, then the Printer menu, then Properties, then the Sharing tab)
and the Microsoft TCP/IP Printing service is installed (under Control Panel, then Network, then the Services tab).
I believe Windows NT is simply piping the PostScript file it receives from the network directly to the printer, instead of running the PostScript file it receives through its own driver which would use RTL to speak to the printer. This documentation sheds some light on the situation:
Before Windows 2000, Windows rendered print jobs on the client computer and the rendered data was sent to the print server for printing. Since Windows 2000 and before Windows Vista, print-job rendering took place on the print server. Print-job rendering was moved to print server beginning with Windows 2000 because print servers offered more processing power than the client computers. The more powerful print servers could then complete the processor-intensive task of print-job rendering.
So to take advantage of the official HP driver, I'll need to spin up a Windows 2000 VM.
The CUPS debug log complains:
[Job 178] No resolution information found in the PPD file.
[Job 178] Using image rendering resolution 300 dpi
I'm not yet sure how to add this info, which is 300x300 for color but 600x600 for black and white.
Using this same PPD file, I can print directly to the printer and utilize the PostScript ROM. Both printing through Windows NT and directly via PostScript yield a test page which uses black ink for black, but I ran out of paper before more testing could be done so I'm uncertain whether all colors are constructed in the proper CMYK color space.
A Short History
PostScript was created as a way for an application on a workstation to describe how to print a document in a standard way such than any PostScript printer could render it. It was created by John Warnock and others at the Xerox Palo Alto Research Center (PARC) as InterPress, where laser printing originated. See PostScript and Interpres: A Comparison for an in-depth history of PostScript and Interpress. PostScript also defined a high-end proprietary font format, Type 12. In 2022, The Computer History Museum has published the PostScript v.10 source code, from 1983.
PostScript is not a raster format, it's a stack-based interpreted program (sometimes described as Forth-like), originally the interpreter ran on the printer itself, which produced a raster image at the correct resolution and size for printing on the printer on the chosen media. For Steve Job's unveiling of the Apple LaserWriter in 1984, an expensive workgroup laser printer which used PostScript (and had the most powerful CPU of the Apple line-up at the time, a Motorola 68000 at 12MHz3), he printed a IRS tax form in twenty seconds. To get the form's PostScript program to run that fast, Adobe founder John Warnock applied optimizations like loop unrolling in a program that become Acrobat Distiller4, as described in Warnock on PDF: Its Past, Present and Future. The LaserWriter was so important to Adobe, that my first edition copy of the PostScript Language Reference5 from 1985 advertises "Includes Detailed Programming Information on the Laser Writer" on the cover. These optimizations form part of Project Camelot, which became PDF:
This project's goal is to solve a fundamental problem that confronts today's companies. The problem is concerned with our ability to communicate visual material between different computer applications and systems. The specific problem is that most programs print to a wide range of printers, but there is no universal way to communicate and view this printed information electronically. The popularity of FAX machines has given us a way to send images around to produce remote paper, but the lack of quality, the high communication bandwidth and the device specific nature of FAX has made the solution less than desirable. What industries badly need is a universal way to communicate documents across a wide variety of machine configurations, operating systems and communication networks. These documents should be viewable on any display and should be printable on any modern printers. If this problem can be solved, then the fundamental way people work will change.
In a modern setup, the printer no longer interprets PostScript itself, instead its successor format PDF is received by our print sever CUPS which utilizes filters to transform it into a format the printer can understand. Although CUPS can print to a PostScript printer, using the printer's built-in PostScript interpreter means being limited by its likely small amount of onboard memory and version of PostScript. For instance, the DesignJet can be expanded to 68MB of RAM, but when printing using carefully crafted HP Raster Transfer Language, it only needs to hold a few lines of image at a time as it prints. In my case I use:
hplip, which is provided by HP and includes a staggering number of drivers, for the HP LaserJet.
Foomatic, which provides PostScript Printer Description (PPD) files for many printers, for the HP DesignJet since it is too old to be included in hplip.
The History of Foomatic discusses CUPS' 1999 release, and the pstoraster filter which utilizes GhostScript (an open PostScript interpreter and set of printer drivers) to convert PostScript to a raster format that printers can understand. In the case of the HP DesignJet 650C, the driver is present in the initial 1998 commit. Foomatic provides a database of PPDs, which describe details of the printer including: what GhostScript driver to use, printer dialogue options, paper sizes, etc.
This syntax is fine since the PostScript ROM supports Level 2, which introduced the << ... >> syntax for dictionaries, but the tech note mentions on page 30:
To further the aim of printing whenever possible, even when Level 2 code is sent to a Level 1 device, the following recommendations should be followed when building a PPD file.
Do not use the Level 2 dictionary syntax symbols << and >> directly in invocation code when constructing dictionaries. Doing so will cause a syntaxerror if this code is re-directed to a Level 1 device. Such a syntaxerror cannot be trapped in a stopped context by a print manager. The two alterna- tives are to use the more verbose Level 1 method:
N dict
dup /name1 value1 put
dup /name2 value2 put
...
dup /nameN valueN put
or to put the more efficient Level 2 method into an executable string:
This second method will avoid the syntaxerror described above. It will consume a tiny amount of VM, which will be restored by automatic garbage collection on a Level 2 device.
The generic PPD bundled with macOS uses this style:
*PageSize Letter/US Letter: "2 dict dup /PageSize [612 792] put dup /ImagingBBox null put setpagedevice"
Described Adobe Type 1 Font Format. Adobe later competed with Apple and Microsoft's TrueType fonts in the Font Wars, which ended with Microsoft and Adobe creating OpenType fonts, and Adobe ending support for Type 1 fonts as of 2023. ↩︎
The Xerox Diablo 630 daisywheel printer was for many years the industry standard letter-quality printer for business correspondence, and was widely emulated by other printer manufacturers. As a daisywheel printer the Diablo 630 could not print graphics, and had few font selection capabilities, but it is a useful emulation on laser printers which may be used with very old word-processing software.
In 1985, he created a new PostScript graphics program (which would later become Acrobat Distiller) and used it to re-code an old federal tax return form. When Steve Jobs unveiled the Apple LaserWriter that year, one of the documents he printed out on stage was John’s 1040 tax form. With Apple on board, Adobe helped launch the desktop publishing revolution.
The validity of this claim is clouded by the fact that according to Warnock it wasn't "an old federal tax return form," but a form he had hand-coded in PostScript. ↩︎
Colloquially known as the "red book", there is also the PostScript Language Tutorial and Cookbook known as the "blue book", and the PostScript Language Program Design or "green book". The PostScript Language Reference has three editions, there are PDFs of the second and third, the third edition being available directly from Adobe. The first edition is avialable to borrow on archive.org. Fermilab maintained a copy of all of these documents, and they are now available only on the Wayback Machine, unfortunately PLRM1.PDF is actually a copy of the second edition. That folder contains some neat PostScript example programs, such as one to generate a fractal fern. ↩︎
https://connor.zip/posts/2023-06-08-airprint-with-cupsAirPrint with CUPSConnor Taffe2023-06-08T00:00:00-05:00How to print from your iPhone to HP printers from .
Using Linux and other free software, it's possible to revive an older but perfectly functioning printer as an AirPrint printer, allowing simple driverless printing from your iPhone and other devices. This article outlines a solution using the following:
Common UNIX Printing System or CUPS for network printing
Avahi for multicast DNS (mDNS) or DNS Service Discovery (DNS-SD) aka Bonjour
In this article we connect the print server to the printer over the network, which requires a printer with a network interface possibly via a network card. A print server is any physical or virtual machine running Linux with CUPS and Avahi installed, in my case it's a VM running on VMWare on an HP ProLiant DL380G7 rack server. The printer can also be physically connected to the print server through USB, serial, parallel, or any other mechanism supported by CUPS. It could even be an authenticating IPP print service being accessed over the Internet.
Printing from your iPhone utilizes AirPrint, an Apple technology built on several standards: Internet Printing Protocol (IPP) and mDNS. IPP, controlled by the Printer Working Group provides a standard way to send jobs to a printer, track jobs, receive errors, etc; Multicast DNS (mDNS) or DNS Service Discover (DNS-SD), also called zero configuration networking or ZeroConf1, is a way to advertise services on the local network alongside capabilities information. IPP Everywhere is an open standard which works similarly to AirPrint, and is compatible with it.
Installing Linux on your chosen target system is out of scope for this article, in my case I uploaded an ISO to VMWare and booted a new VM with it as the CD-ROM, once installed I did some housekeeping:
# Connecting over SSH as my user
; mkdir -p .ssh
; chmod 700 .ssh/
; cd .ssh/
# Add my SSH public key so I can login without a password
; echo 'my-public-key' >> authorized_keys
; chmod 600 authorized_keys
# Allow VMWare better interop with the guest
; sudo dnf install open-vm-tools
Goal
Our goal print job flow is the following:
In more detail:
Avahi will send multicast UDP packets which are received by every device on the local network. These packets contain the SRV records which define our IPP Everywhere (AirPrint) service and include information like the IP and port of the Internet Printing Protocol (IPP) service CUPS provides, the capabilities of our printer, etc.
Our iPhone receives this SRV record and updates its database of local services. When we open a print dialogue, we can choose from these advertised IPP services presented as printers.
When we print a document, our iPhone sends the PDF or other common raster format over IPP to our CUPS server, along with metadata such as single-sided or two-sided printing, etc. CUPS returns a job id for the submission and our iPhone can check the status of the job and report any errors to us via IPP.
CUPS transforms the job from PDF or common raster format, through filters, into a format that the printer driver can understand such as PostScript. The driver then converts this format to a language the printer can understand such as HP Printer Command Language (PCL) or HP Raster Transfer Language.
This final (usually raster) format is sent to the printer over the network via AppSocket (TCP on port 9100) to the printer for processing. The printer may report errors or a successful print, which CUPS will report via IPP when our iPhone checks on the job.
AppSocket is a protocol developed by Tektronix in which a driver can talk to a printer over a TCP connection to port 9100 on the printer's network interface -- the protocol is also called JetDirect (because of its usage with JetDirect cards) or RAW. The HP printer listens for commands from network connections as if it were directly connected to a PC over serial or parallel, supporting the same formats such as Adobe PostScript, HP Printer Command Language (PCL), or its subset HP Raster Transfer Language (RTL).
It is imperitive that the printer's network interface not be accessible from the Internet. Access to the printer network interface should be limited to the local network, and preferably only accessible by the print server via VLAN or physical network partition. Since it has no authentication mechanism, AppSocket will accept anything sent to it and print it. You can navigate to your printer's IP on port 9100, e.g. http://printer.home.arpa:9100, and the printer will print out the incoming HTTP request as if it were a print job.
Installing and Configuring
To install CUPS and Avahi, you should be able to use your distro's package manager:
; sudo dnf install cups

# These may be unnecessary
; sudo systemctl enable cups --now
; sudo systemctl enable avahi --now
The cups package installs Avahi through its dependency on cups-browsed on Fedora, but may not on all systems.
If you use a firewall, you need to poke some holes to allow your devices to communicate with CUPS over your local network:
If you're using an HP printer, you'll want to install hplip so that CUPS can use those drivers:
; sudo dnf install hplip
Configuring CUPS
To configure CUPS to accept traffic from other network devices, we need to edit /etc/cups/cupsd.conf, by replacing the Listen directive for localhost with a general Port directive:
#Listen localhost:631
Port 631
To allow all (even unauthenticated admin) access from your local network to the Web UI, add this to /etc/cups/cupsd.conf (more information at Red Hat and man cupsd.conf):
A LogLevel of info will give you more information on when the Web UI or IPP service is being used. The Location block is required to allow printing from the local network. Omitting any Policy blocks seems to allow any user to access the admin Web UI without authentication. Disabling Browsing means CUPS won't produce mDNS entries of its own, instead we'll do that manually so they work with AirPrint. You'll need to restart CUPS to see config changes reflected:
; sudo systemctl restart cups.service
At this point you'll want to configure your printer in CUPS through the Web UI:
if you have an older printer and will be using "classic drivers", follow these directions,
for a more modern printer which supports driverless printing follow these directions.
Remember to check the share printer option, otherwise CUPS will restrict access to the printer.
You can also add printers via the /etc/cups/printers.conf file while cupsd is stopped, if you also add a corresponding /etc/cups/ppd PPD file of the same name. Editing the printers.conf file manually is not recommended, and the options available are undocumented2. See this incomplete documentation from Apple for moree info on each option. Below is mine:
NextPrinterId 3

<DefaultPrinter printer>
PrinterId 1
UUID urn:uuid:fb026ac7-8613-3eb4-5b51-9749073f7704
AuthInfoRequired none
Info HP LaserJet 4100N
Location Office
MakeModel HP LaserJet 4100 Series hpijs pcl3, 3.21.2
DeviceURI socket://printer.home.arpa
State Idle
StateTime 1686858786
ConfigTime 1680818482
Type 8425500
Accepting Yes
Shared Yes
JobSheets none none
QuotaPeriod 0
PageLimit 0
KLimit 0
OpPolicy default
ErrorPolicy stop-printer
Attribute marker-colors none
Attribute marker-levels 27
Attribute marker-names Toner Cartridge HP C8061X
Attribute marker-types toner
Attribute marker-change-time 1686858786
</DefaultPrinter>

<Printer designjet>
PrinterId 2
UUID urn:uuid:b691f515-4a45-35da-5707-debfda29d917
Info HP DesignJet 650C
Location Office
MakeModel HP DesignJet 650C Foomatic/dnj650c (recommended)
DeviceURI socket://designjet.home.arpa
State Idle
StateTime 1683579922
ConfigTime 1671595356
Type 8450060
Accepting Yes
Shared Yes
JobSheets none none
QuotaPeriod 0
PageLimit 0
KLimit 0
OpPolicy default
ErrorPolicy stop-printer
</Printer>
Both printers I have configured are communicating via the AppSocket protocol via socket:// aka TCP port 9100 over the local network. I use pfSense running on a VM as my home router, which provides DNS resolution via .home.arpa, the recommended home DNS suffix, which is why they aren't IP addresses. I also recommend configuring your router to assign static IPs (through DHCP) to network devices like printers so that configurations like this can use the IP address. Alternatively, if your printer or network card is sophisticated enough (like the later EIO careds), you can use an mDNS address with a URI like dnssd://HP-LaserJet-4100n._pdl-datastream._tcp.local (optionally with ?uuid=). The problem with using mDNS for this is that now your printer will be advertising itself and will show up in the Mac print dialogue if it advertises _ipp._tcp., so I disable mDNS on the printer itself.
You will also need a PPD under /etc/cups/ppd that is either created via the CUPS UI wizard or uploaded manually (e.g. when fetched from openprinting.org). CUPS PPD files support extensions atop Adobe PPD version 4.33.
CUPS will eventually deprecate using printer drivers with PPDs, in favor of using a Printer Application (as described in A New Way to Print in Linux) or PAPPL. A PAPPL-based app is one that presents an IPP interface which accepts PDFs and then converts them (the same way that CUPS does internally) to the custom or raster format of the actual printer, and sends it over the appropriate interface. There are already printer apps for HP printers that use hplip (such as my HP LaserJet 4100n), hp-printer-app, for printers that use a GhostScript driver (such as my HP DesignJet 650c), ghostscript-printer-app, and for printers that use a GutenPrint driver, gutenprint-printer-app. I've yet to migrate to these printer apps but plan to do so, I've run into the following issues:
Through snap, I can't configure hp-printer-app to consider its hostname hp-printer-app.home.arpa. This means the UI can be available at a custom local domain and proxied via nginx, but links will redirect to localhost:8000.
Once I make :8000 available via firewall and add an Avahi service file to advertise AirPrint, printing via it fails with Get-Jobs client-error-not-found (printer-uri ipp://misc.local.:8000/printers/HP_LaserJet_4100n not found.). I need to know how to construct the printer URI for the rp field in the service definition.
After the printer is configured, ensure you print a test page to ensure CUPS can communicate to the printer and the chosen driver works with your model.
Configuring Avahi
Once that's done, you'll need to generate your Avahi service config. It's not difficult to write on manually, the below is what I use for my HP LaserJet and is at /etc/avahi/services/AirPrint-printer.service:
AirPrint devices don’t browse for all IPP printers—they browse only for the subset of IPP printers that support Universal Raster Format (URF).
The service for my HP DesignJet is very similar, but I made some changes (some necessary, some for curiosity's sake). I'll illustrate the changes I made:
Added a TLS record, changed kind to reflect a large format printer, toggled Duplex off, toggled Color on, and changed PaperMax and PaperCustom to illustrate that the printer can print to large formats:
and omitted the printer-state and printer-type fields.
If you have a Mac, you can use the Discovery app to see mDNS services available on the local network; which is useful for debugging as this is what your iPhone sees when it searches for nearby AirPrint-enabled printers.
Discovery app showing mDNS services on my local network
The important services are under _ipp._tcp., you should see one per Avahi service file. Expanding a service should display each txt-record option as a row.
If Printer Sharing is enabled in CUPS and Avahi is installed, an IPP service will be advertised via mDNS but it won't have the necessary TXT records for AirPrint which indicate what capabilities the printer has. You should disable Printer Sharing to avoid duplicate printers (one driver-less, one conventional Bonjour) showing on a Mac. More information on each TXT record is available in the Bonjour Printing specification, in Table 2 on page 17 for description records and in Table 3 on page 23 for capability records.
Once your Avahi service is configured, you should see your printer on your iPhone. Try printing a page of a PDF, if it prints successfully congratulations. If not,
If an error is returned, determine if it is a printer fault or a software issue.
Ensure printing a test page from CUPS works, so that we can rule out a CUPS issue.
Ensure the Avahi service being advertised points at your CUPS server and is accessible from your local network. Ensure the firewall is not blocking mDNS or IPP.
Use ipptool to print a test job to the IP, port, and rp path that the mDNS service advertises.
If the request is reaching CUPS, look at the CUPS admin UI under printers and jobs for job status
Ensure the printer isn't paused (by default it will be paused after a failed job)
Look at the systemctl status cups.service output and logs
Using Nginx as a CUPS UI proxy
If you'd like to make CUPS available on the standard HTTP/HTTPS port, you can install nginx:
; sudo dnf install nginx
For a TLS-enabled server, add this configuration to /etc/nginx/conf.d/cups.conf:
With a TLS-enabled server, you need to create some PKI and add the cert to both the server running CUPS and your laptop. The easiest way to set up PKI is using cfssl. By setting server_name to cups.home.arpa, a DNS alias I added in my router (pfSense) which points to the same IP that DHCP assigns to the VM, I'm able to host multiple web interfaces for different sites on the same VM.
Why print in 2023?
Aside from the ocassional form, I often print recipes from the NYT Cooking app. Their iOS app produces beautiful and readable print-outs in crisp black-and-white serif text, with ingredients on the left-hand column and steps on the right. Printing recipes allows me to dirty my hands cooking without needing to constantly unlock my phone.
CUPS parses the printers.conf file in the cupsdLoadAllPrinters routine, which contains the names of the options. man printers.conf notes: "The name, location, and format of this file are an implementation detail that will change in future releases of CUPS." ↩︎
Adobe no longer hosts a copy of the spec, but MIT hosts a copy of several Adobe tech notes; which can be accessed by replacing the file name in the URL with the orignal Adobe file name e.g. 5003.PPD_Spec_v4.3.pdf. ↩︎
https://connor.zip/posts/2023-06-06-zapata-historyHistory of ZapataJim Dixon2023-06-06T00:00:00-05:00A History of Zapata Telephony and how it relates to Asterisk PBX.
A history of the Zapata project, taken from zaptelephony.com, is reproduced below. The legacy of the Zapata and the Zaptel drivers from the early 2000s live on in the the Digium T1 and TDM cards and in the DAHDI drivers. Jim Dixon passed away in December, 2022.
About 25-30 or so years ago, AT&T started offering an API (well, one to an extent, at least) allowing users to customize functionality of their Audix voicemail/attendant system which ran on an AT&T 3BX usually 3B10) Unix platform. This system cost thousands of dollars a port, and had very limited functionality.
In an attempt to make things more possible and attractive (especially to those who didnt have an AT&T PBX or Central Office switch to hook Audix up to) a couple of manufacturers came out with a card that you could put in your PC, which ran under MS-DOS, and answered one single POTS line (loopstart FXO only). These were rather low quality, compared with today's standards (not to mention the horrendously pessimal environment in which they had to run), and still cost upwards of $1000 each. Most of these cards ended up being really bad sounding and flaky personal answering machines.
In 1985 or so, a couple of companies came out with pretty-much decent 4 port cards, that cost about $1000 each (wow, brought the cost down to $250 per port!). They worked MUCH more reliably then their single port predecessors, and actually sounded pretty decent, and you could actually put 6 or 8 of them in a fast 286 machine, so a 32 port system was easy to attain. As a result the age of practical Computer Telephony had begun.
As a consultant, I have been working heavily in the area of Computer Telephony ever since it existed. I very quickly became extremely well- versed in the hardware, software and system design aspects of it. This was not difficult, since I already had years of experience in non-computer based telephony.
After seeing my customers (who deployed the systems that I designed, in VERY big ways) spending literally millions of dollars every year (just one of my customers alone would spend over $1M/year alone, not to mention several others that came close) on high density Computer Telecom hardware.
It really tore me apart to see these people spending $5000 or $10000 for a board that cost some manufacturer a few hundred dollars to make. And furthermore, the software and drivers would never work 100% properly. I think one of the many reasons that I got a lot of work in this area, was that I knew all the ways in which the stuff was broken, and knew how to work around it (or not).
In any case, the cards had to be at least somewhat expensive, because they had to contain a reasonable amount of processing power (and not just conventional processing, DSP functionality was necessary), because the PC's to which they were attached just didnt have much processing power at that time.
Very early on, I knew that someday in some "perfect" future out there over the horizon, it would be commonplace for computers to handle all of the necessary processing functionality internally, making the necessary external hardware to connect up to telecom interfaces VERY inexpensive and in some cases trivial.
Accordingly, I always sort of kept a corner of an eye out for what the "Put on your seatbelts, youve never seen one this fast before" processor throughput was becoming over time, and in about the 486-66DX2 era, it looked like things were pretty much progressing at a sort of fixed exponential rate. I knew, especially after the Pentium processors came out, that the time for internalization of Computer Telephony was going to be soon, so I kept a much more watchful eye out.
I figured that if I was looking for this out there, there must be others thinking the same thing, and doing something about it. I looked, and searched and waited, and along about the time of the PentiumIII-1000 (100 MHz Bus) I finally said, "gosh these processors CLEARLY have to be able to handle this".
But to my dismay, no one had done anything about this. What I hadn't realized was that my vision was 100% right on, I just didnt know that I was going to be one that implemented it.
In order to prove my initial concept I dug out an old Mitel MB89000C "ISDN Express Development" card (an ISA card that had more or less one-of-everything telecom on it for the purpose of designing with their telecom hardware) which contained a couple of T-1 interfaces and a cross-point matrix (Timeslot- Interchanger). This would give me physical access from the PC's ISA bus to the data on the T-1 timeslots (albeit not efficiently, as it was in 8 bit I/O and the TSI chip required MUCHO wait states for access).
I wrote a driver for the kludge card (I had to make a couple of mods to it) for FreeBSD (which was my OS of choice at the time), and determined that I could actually reliably get 6 channels of I/O from the card. But, more importantly, the 6 channels of user-space processing (buffer movement, DTMF decoding, etc), barely took any CPU time at all, thoroughly proving that the 600MHZ PIII I had at the time could probably process 50-75 ports if the BUS I/O didnt take too much of it.
As a result of the success (the 'mie' driver as I called it) I went out and got stuff to wire wrap a new ISA card design that made efficient use of (as it turns out all of) the ISA bus in 16 bit mode with no wait states. I was successful in getting 2 entire T-1's (48 channels) of data transferred over the bus, and the PC was able to handle it without any problems.
So I had ISA cards made, and offered them for sale (I sold about 50 of them) and put the full design (including board photo plot files) on the Net for public consumption.
Since this concept was so revolutionary, and was certain to make a lot of waves in the industry, I decided on the Mexican revolutionary motif, and named the technology and organization after the famous Mexican revolutionary Emiliano Zapata. I decided to call the card the "tormenta" which, in Spanish, means "storm", but contextually is usually used to imply a "BIG storm", like a hurricane or such.
That's how Zapata Telephony started.
I wrote a complete driver for the Tormenta ISA card for *BSD, and put it out on the Net. The response I got, with little exception was "well that's great for BSD, but what do you have for Linux?"
Personally, Id never even seen Linux run before. But, I can take a hint, so I went down to the local store (Fry's in Woodland Hills) and bought a copy of RedHat Linux 6.0 off the shelf (I think 7.0 had JUST been released but was not available on shelf yet). I loaded it into a PC, (including full development stuff including Kernel sources). I poked around in the driver sources until I found a VERY simple driver that had all the basics, entry points, interfaces, etc (I used the Video Spigot driver for the most part), and used it to show me how to format (well at least to be functional) a minimal Linux driver. So, I ported the BSD driver over to Linux (actually wasnt that difficult, since most of the general concepts are roughly the same). It didnt have support for loadable kernel modules (heck what was that? in BSD 3.X you have to re-compile the Kernel to change configurations. The last system I used with loadable drivers was VAX/VMS.) but it did function (after you re-compiled a kernel with it included). Since my whole entire experience with Linux consisted of installation and writing a kernel module, I knew that it had to be just wrong, wrong, wrong, full of bad, obnoxious, things, faux pauses, and things that would curl even a happy Penguin's nose hairs.
With this in mind, I announced/released it on the Net, with the full knowledge that some Linux Kernel dude would come along, laugh, then barf, then laugh again, then take pity on me and offer to re-format it into "proper Linuxness".
Within 48 hours of its posting I got an email from some dude in Alabama (Mark Spencer), who offered to do exactly that. Not only that he said that he had something that would be perfect for this whole thing (Asterisk).
At the time, Asterisk was a functional concept, but had no real way of becoming a practical useful thing, since it didnt, at that time, have a concept of being able to talk directly (or very well indirectly for that matter, being that there wasnt much, if any, in the way of practical VOIP hardware available) to any Telecom hardware (phones, lines, etc). Its marriage with the Zapata Telephony system concept and hardware/driver/ library design and interface allowed it to grow to be a real switch, that could talk to real telephones, lines, etc.
Additionally Mark has nothing short of brilliant insight into VOIP, networking, system internals, etc., and at the beginning of all this had a great interest in Telephones and Telephony. But he had limited experience in Telephone systems, and how they work, particularly in the area of telecom hardware interfaces. From the beginning I was and always have been there, to help him in these areas, both providing information, and implementing code in both the drivers and the switch for various things related to this. We, and now more recently others have made a good team (heck I ask him stuff about kernels, VOIP, and other really esoteric Linux stuff all the time), working for the common goal of bringing the ultimate in Telecom technology to the public at a realistic and affordable price.
Since the ISA card, I designed the "Tormenta 2 PCI Quad T1/E1" card, which Mark marketed as the Digium T400P and E400P, and others have and still are as different part numbers, also). All of the design files (including photo plot files) are available on the this website for public consumption.
As anyone can see, with Mark's dedicated work (and a lot of Mine and other people's) on the Zapata Telephony drivers (now called "DAHDI") and the Asterisk software, the technologies have come a long, long way, and continue to grow and improve every day.
https://connor.zip/posts/2022-11Home Phone ServiceConnor Taffe2022-11-01T00:00:00-05:00A tutorial on how to set up your own home phone service.
Running your own home phone service, this guide will cover the following setups:
Proxying SIP traffic from your home without a static IP or NAT traversal.
Twilio Elastic SIP Trunking (or any SIP provider)
AWS node
Asterisk
Wireguard
HP DL380 G7
VMWare
Pfsense
Wireguard
How to connect a SIP phone, like a Cisco SPA506g.
Any asterisk server
DC adapter, PoE injector, or PoE switch
Cisco SPA506g on the same network
How to connect a lot of analog phones, and even modems, using T1.
HP DL380 G4
PCI slots
Digium TE405P T1 PCI cards
Asterisk
DAHDI drivers (with echo module)
Adit 600
FXS cards
Lucent PortMaster 3
How to connect a remote set of analog phones over Wifi.
Dell Optiplex
PCI slot, molex connector to power card
Digium TDM410P with FXS modules
Asterisk
DAHDI drivers
Using T1
How to connect a lot of analog phones, and even modems, using T1.
The diagram above illustrates the flow of an incoming call to the system. First, the call from the Publically Switched Telephone Network (PSTN) is routed through our Session Initiation Protocol (SIP) service provider, mine is Twilio. Twilio communicates with an Asterisk server via SIP, I use a small VM hosted on AWS for SIP termination for two reasons:
To maintain a static IP using an Elastic IP, so that Twilio can reach us reliably. With a residential connection, your IP may be changed periodically by your ISP.
To ensure that the RTP packets containing audio aren't impacted by NAT.
Once the call is received by Asterisk, it places an outgoing call to the Asterisk server on my home network via Inter-Asterisk eXchange protocol (IAX2). The servers communicate over a Wireguard VPN, which allows Asterisk in the cloud to reach my home network (which may have a dynamic IP) at a static IP provided by the VPN. I use pfSense as my home router, so traffic to and from the WireGuard network is routed transparently on my home network and only the cloud server needs a WireGuard client installed; but using the WireGuard client on two Linux servers is a good and simple solution.
HP DL380 G4
The Asterisk server on my home network is an HP DL380 G4, an old server which I use because of its PCI slots (3.3V), which allow me to use the older and cheaper Digium TE420 PCI cards. Fun fact: the server comes with two gigabit ethernet ports on the back, with Ubuntu Server it's simple to bond these ports together into one 2gpbs connection -- the documentation is detailed but there's a simple wizard at installation time.
Digium TE420
The TE420 cards, like other Digium cards, uses the DAHDI drivers. The driver may need to be compiled manually so that the oslec driver (the echo module in the Linux kernel) can be used for echo cancelation, for more info read this interview: Oslec, the Open Source Line Echo Canceller. For older TDM410 cards, manual compilation is a necessity since they've been disabled. For now they can be re-enabled by adding this entry
to the DEFINE_PCI_DEVICE_TABLE array in drivers/dahdi/wctdm24xxp/base.c.
Once the Asterisk server on my home network receives the call over IAX2, it can route to multiple systems via T1, through the TE420 card:
To an Adit 600, which provides dozens of modem-quality subscriber lines.
To a Lucent PortMaster 3, a digital modem bank providing 56k connections.
Adit 600
The Adit 600 is a Converged Services Access Gateway which is capable of a whole slew of functions that aren't that useful anymore. But when configured with FXS cards, it can act as a channel bank -- converting from T1 to subscriber lines or plain old telephone service (POTS). This means we can use our TE420 card in conjunction with an Adit 600 and a 66 block to break out up to 48 individual telephone lines. On a good day, each is available on eBay for under $100, making this the cheapest way to get this volume of modem-quality POTS lines that I've found.
What does modem quality mean?
A standard POTS line, called narrowband, is sampled at 8 kHz. It's optimized for human voice between 300-4,000 Hz. To produce a 4 kHz signal reliably e.g. to have a Nyquist frequency of 4 kHz, a sampling rate double or 8 kHz is necessary. Twenty four of these PCM streams are time-division multiplexed (TDM) onto a T1 line, so the line operates at 24 times the speed of a single line and each end synchronizes to switch between each line. This is why T1 is synchronous, rather than asynchronous like Ethernet, each line is always "up" and the bandwidth is always available for a call.
This 8 kHz sampling is hijacked by high-speed digital modems. With direct access to a T1 connection, these modems can ensure that each individual sample represents one of the modem sounds, saturating the available bandwidth with encoded data. Since T1 uses bit-robbing to encode signal information, the lowest bit of each eight bit time-slot is clobbered, meaning the maximum data throughput is 8 kHz times 7 bits is 56kbps. Importantly, each bit must make it through the system unharmed. Modern lossy audio compression, and Digium's TDM cards can't provide that fidelity, and so modem communication is unreliable at best.
For more information on T1, I recommend T1: A Survival Guide by Matthew S. Gast. It's one of the few resources on this topic I could find.
Configuring Asterisk
The below is taken from my notes on configuring an already functioning Asterisk installation for a TE420 card once the DAHDI drivers have been installed:
Add wct4xxp to /etc/dahdi/modules.
Edit /etc/dahdi/genconf_parameters and change
echo_can oslec
And also uncomment the below from /etc/dahdi/init.conf:
DAHDI_UNLOAD_MODULES="dahdi echo"
I've not had any issues with oslec, and it works well when using cards with no hardware echo cancellation (which is often expensive).
After running dahdi_genconf, edit /etc/dahdi/system.conf to reflect the channels you actually need. Here I use two channelized T1 or cT1 channels to connect to an Adit 600 channel bank, and two ISDN lines to connect to a Lucent Portmaster 3. Also edit /etc/asterisk/dahdi-channels.conf to reflect the same changes, assign the correct Asterisk orgiginating context, etc. I've added a base configuration to /etc/asterisk/chan_dahdi.conf and edited the generated spans to extend it. Then, I can define specific phones which inherit from their spans and add caller id.
The /etc/dahdi/system.conf file:
# Autogenerated by /sbin/dahdi_genconf on Sat Dec  4 00:28:52 2021
# If you edit this file and execute /sbin/dahdi_genconf again,
# your manual changes will be LOST.
# Dahdi Configuration File
#
# This file is parsed by the Dahdi Configurator, dahdi_cfg
#
# Span 1: TE4/0/1 "T4XXP (PCI) Card 0 Span 1" ESF/B8ZS RED
span=1,1,0,esf,b8zs
# termtype: te
fxols=1-24
echocanceller=oslec,1-24

# Span 2: TE4/0/2 "T4XXP (PCI) Card 0 Span 2" ESF/B8ZS RED
span=2,2,0,esf,b8zs
# termtype: te
fxols=25-48
echocanceller=oslec,25-48

# Span 3: TE4/0/3 "T4XXP (PCI) Card 0 Span 3" ESF/B8ZS RED
span=3,3,0,esf,b8zs
# termtype: te
bchan=49-71
dchan=72
echocanceller=oslec,49-71

# Span 4: TE4/0/4 "T4XXP (PCI) Card 0 Span 4" (MASTER) ESF/B8ZS RED
span=4,4,0,esf,b8zs
# termtype: te
bchan=73-95
dchan=96
echocanceller=oslec,73-95

# Global data

loadzone	= us
defaultzone	= us
The /etc/asterisk/dahdi-channels.conf file:
; Autogenerated by /sbin/dahdi_genconf on Sat Dec  4 00:28:52 2021
; If you edit this file and execute /sbin/dahdi_genconf again,
; your manual changes will be LOST.
; Dahdi Channels Configurations (chan_dahdi.conf)
;
; This is not intended to be a complete chan_dahdi.conf. Rather, it is intended
; to be #include-d by /etc/chan_dahdi.conf that will include the global settings
;

; Span 1: TE4/0/1 "T4XXP (PCI) Card 0 Span 1" ESF/B8ZS RED
[span-1](phones)
group=0,11
context=from-internal
signalling=fxo_ls
dahdichan=1-24

; Span 2: TE4/0/2 "T4XXP (PCI) Card 0 Span 2" ESF/B8ZS RED
[span-2](phones)
group=0,12
context=from-internal
signalling=fxo_ls
dahdichan=25-48

; Span 3: TE4/0/3 "T4XXP (PCI) Card 0 Span 3" ESF/B8ZS RED
[span-3](phones)
group=0,13
context=from-internal
switchtype=national
signalling=pri_net
dahdichan=49-71

; Span 4: TE4/0/4 "T4XXP (PCI) Card 0 Span 4" (MASTER) ESF/B8ZS RED
[span-4](phones)
group=0,14
context=from-internal
switchtype=national
signalling=pri_net
dahdichan=73-95

; Overrides to add caller id or mailboxes
[phone-1](span-1)
callerid=Closet <1001>
In a working system you should see systemctl status dahdi.service report that it is using the wct4xxp driver. The DAHDI drivers will need to be recompiled when the kernel is updated, you may notice on reboot that the DAHDI service reports no drivers because of this.
Adendum
An interesting anecdote about the name T1 taken from Data Comm is reproduced below:
After reading our white paper, a number of customers asked us "where'd the "T" come from in T-1, T-3, etc.? There are many stories floating around (such as T=Time, T= Transmission, T=Terrestrial, Just the next letter in sequence, etc.). We thought the best place to get the true story would be from someone who helped develop this technology. So, we asked our friend Dr John Pan, who worked for Bell Labs during the time T carrier was being developed. Dr Pan is now Vice President of Loop Telecommunications International, our strategic partner in the T-1 DACS, and DSU/access device field since 1997.
Here's what he had to say...
The "T" in T1
The story of the "T" in T1 has its roots way back in 1917, when AT&T deployed the first carrier system, called the "A" system. A total of 7 A-systems, providing four voice channels over an open wire pair, were ever deployed. Then came successive analog frequency division multiplex systems named B, C, D, and so forth. Few of these carrier systems ever saw commercial service. AT&T, being a monopoly, could well afford many dogs. A notable success is the "L" system, providing 600 (L1) and later 1800 (L3) voice channels over a pair of coaxial cables, in long haul service from 1944 to 1984, until breakup of the Bell System forced AT&T to migrate to optical fiber. The last of the analog carrier system is the "N" system and its variants, providing 12 voice channels for intracity short haul. Along with the even more forgettable "O", "P", and "U" systems, the emergence of "T" killed them all.
In 1957, when digital systems were first proposed and developed, the boss decided to skip Q, R, S, and to use T, for Time Division. The idea was this will be the world's first time division system. Interestingly, except for "U", another system that never made it, this naming system ended.
Vaiants of T1, called T1C, T2, T3, and T4, all died. They are survived by signals that would have been carried on all these systems, called DS1, DS2, DS3, and DS4.
Among the successor to T1 vying for success at Bell Labs, digital coaxial cables, digital microwave, satellite, circular waveguide, optical mirror, and optical fiber, none achieved commercial success save fiber.