While server-side logs are the most accurate information on who is accessing what on your site, client side analytics can compliment this by focusing only on browsers which have JavaScript enabled as opposed to any other client.
This blog is an exercise in creating a site from scratch, both code and infrastructure, so Google Analytics is off the table. I'd also like to avoid readers having to load scripts from a third party site, or give that tool access to my readers' behavior. Plausible is an open source solution that I can run myself, where I retain control over all analytics and how they are used.
I've been running Plausible for over a week now, here's what I see when I navigate to my instance:
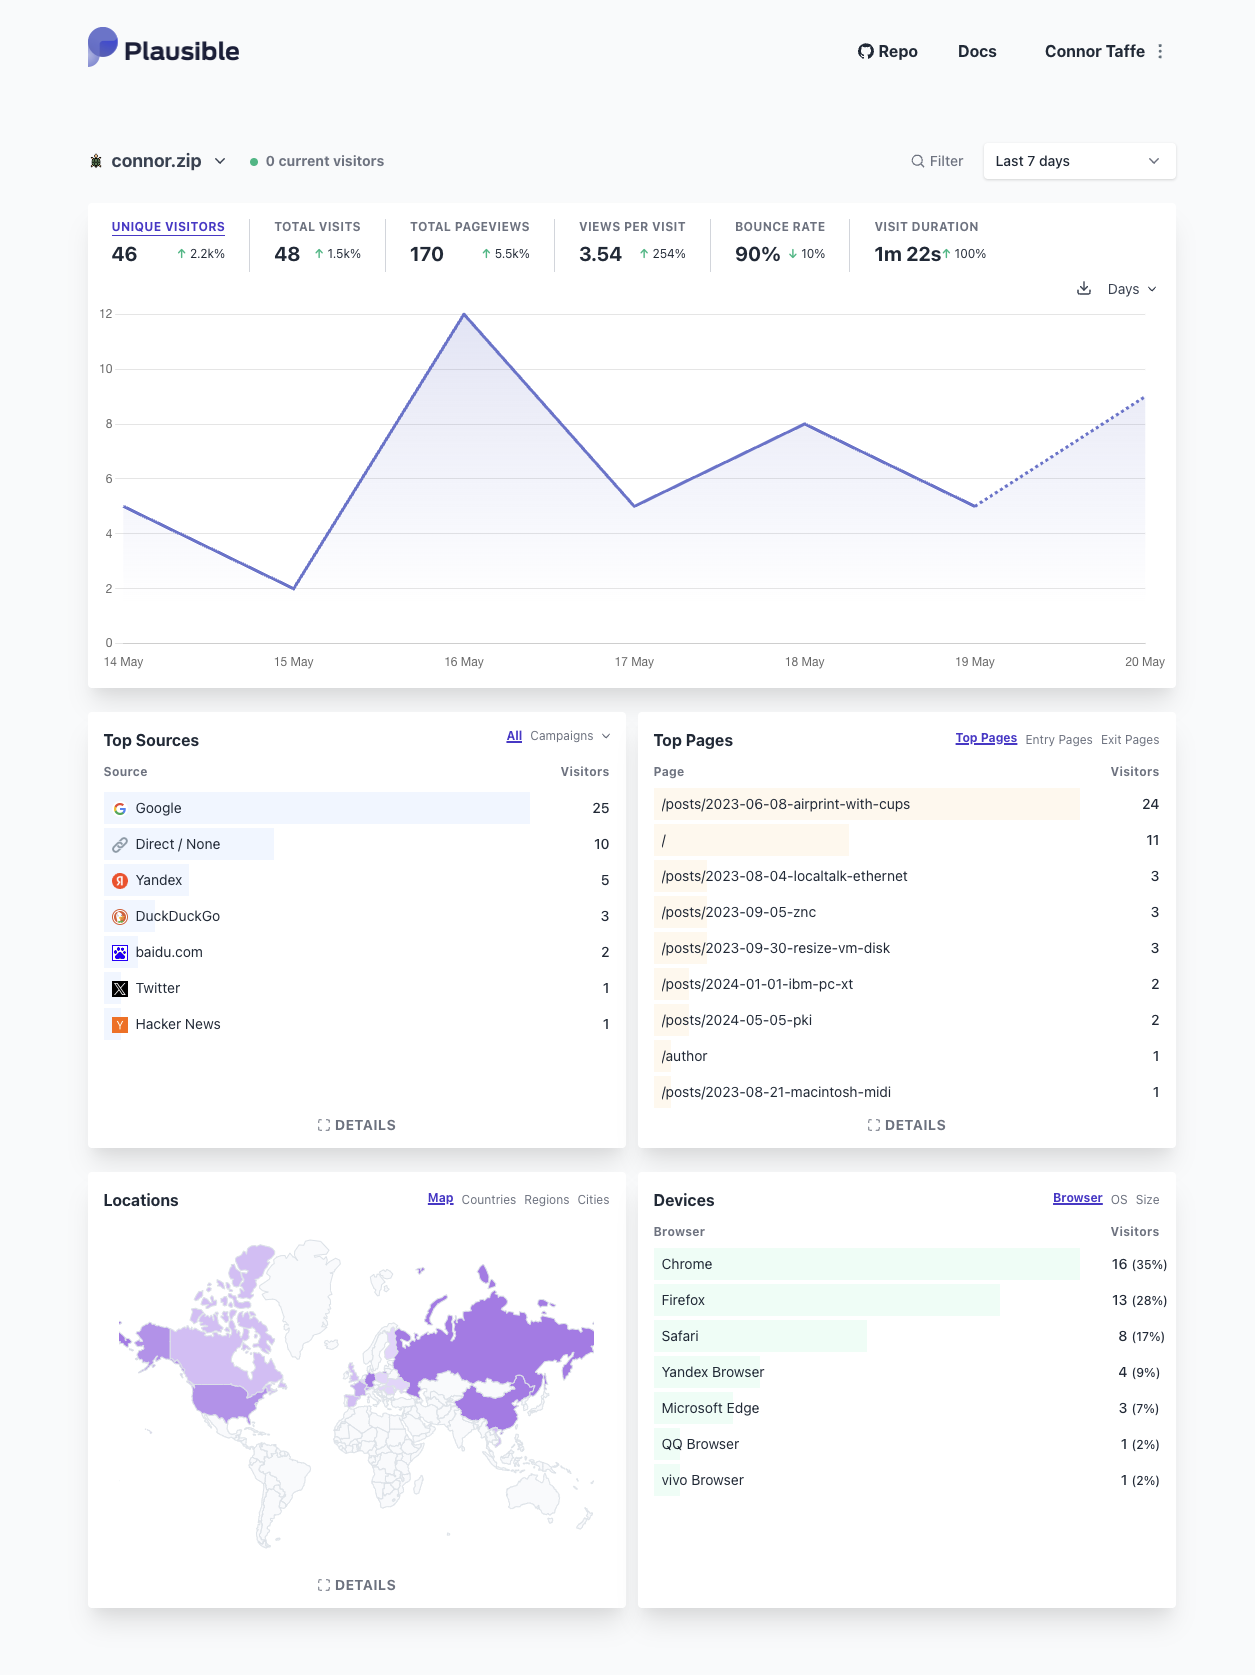
I can quickly see where readers are connecting from geographically, including some countries I wouldn't expect like Russia, China, and Germany; where readers find my content, which is unsurprisingly Google but also some locally popular search engines; and which are my most popular pages, which by far is my article on AirPrint with CUPS. This is all information I didn't have prior to setting up Plausible -- it should be available in the logs, but processing logs is something I haven't taken a whack at yet.
Below I detail how I set up Plausible in my environment. Plausible includes helpful materials in the Community Edition repo including a Docker Compose file I based my Kubernetes configuration on.
Installation
Before we start, you'll need to install PostgreSQL and ClickHouse in your environment.
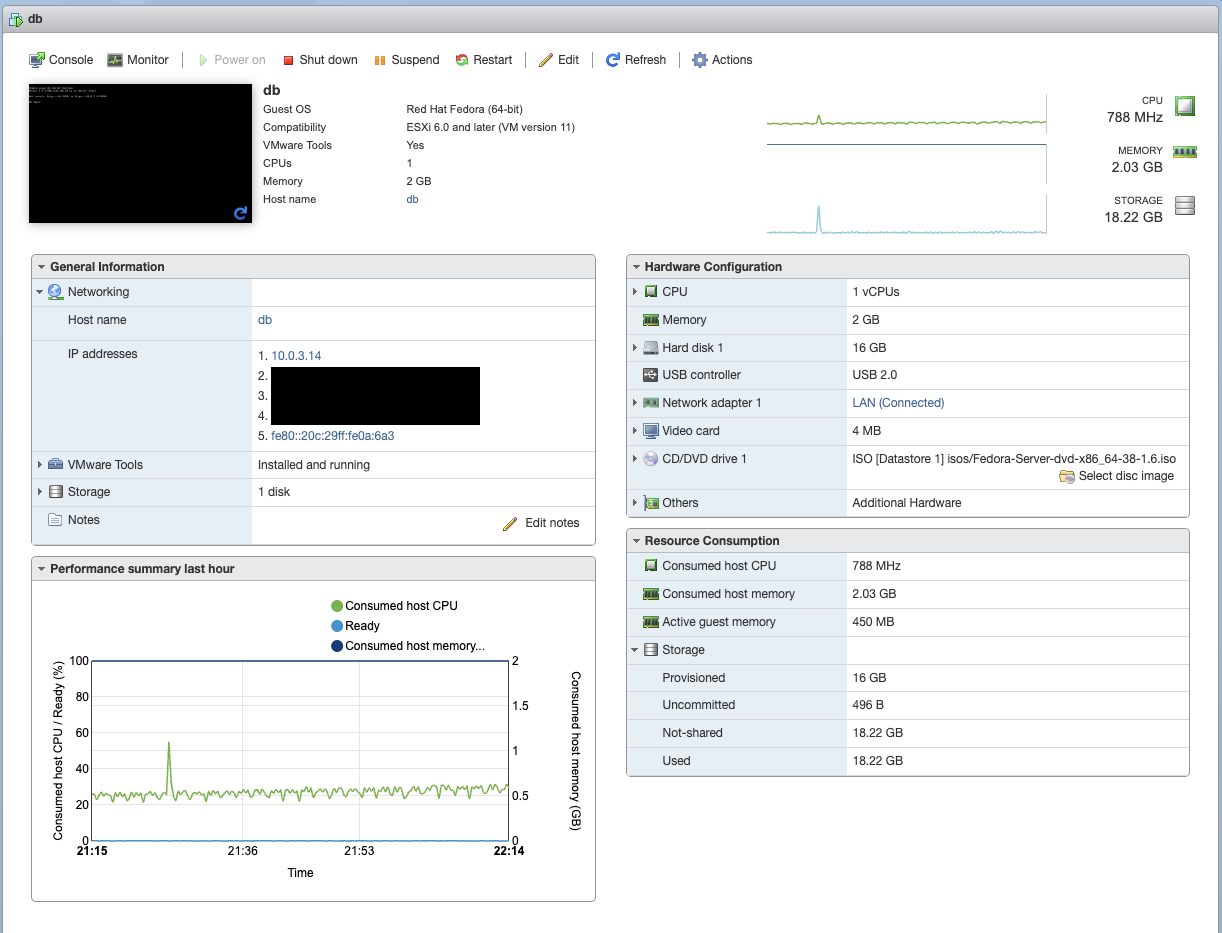
As I haven't yet solved the problem of persistent volumes on Kubernetes at home, I use a dedicated Fedora Linux 38 VM at db.home.arpa running on VMWare to host these databases.
Install PostgreSQL
-
On our database instance, install PostgreSQL:
; sudo dnf install postgresql-server postgresql-contrib ; sudo postgresql-setup --initdb --unit postgresql ; sudo systemctl enable --now postgresql -
Now connect and optionally create a user and database for yourself, so you can login with your own user on the VM. The user name must match your Linux user name for
peerauthentication to succeed.; whoami cptaffe ; sudo -u postgres psql psql (15.4) Type "help" for help. postgres=# CREATE ROLE cptaffe LOGIN; postgres=# CREATE DATABASE cptaffe; -
Login to that new user, and optionally set a password for connecting over the network:
; psql
psql (15.4)
Type "help" for help.

cptaffe=> \password cptaffe
Save this password in a password manager.
-
Edit your file
var/lib/pgsql/data/pg_hba.confto control access, mine looks like:# TYPE DATABASE USER ADDRESS METHOD # "local" is for Unix domain socket connections only local all all peer # IPv4 local connections: host all all 127.0.0.1/32 ident # IPv6 local connections: host all all ::1/128 ident # Allow replication connections from localhost, by a user with the # replication privilege. local replication all peer host replication all 127.0.0.1/32 ident host replication all ::1/128 ident host all all samenet scram-sha-256The important line here is the last one, which enables connections over the network to all users and databases, but only from hosts on the same network and they must authenticate using
scram-sha-256.; sudo systemctl restart postgresql.service -
Add a firewall rule which allows connections to PostgreSQL:
; sudo firewall-cmd --permanent --new-service=postgres ; sudo firewall-cmd --permanent --service=postgres --add-port=5432/tcp ; sudo firewall-cmd --permanent --add-service=postgres ; sudo firewall-cmd --reload -
Now test that you can login over the network. From another machine (assuming you have the same username):
; psql postgres://db.home.arpa
Password for user cptaffe:
psql (14.9 (Homebrew), server 15.4)
WARNING: psql major version 14, server major version 15.
        Some psql features might not work.
Type "help" for help.

cptaffe=>
Install ClickHouse
-
On the same instance, or another dedicated instance, install ClickHouse:
; sudo yum install -y yum-utils ; sudo yum-config-manager --add-repo https://packages.clickhouse.com/rpm/clickhouse.repo ; sudo yum install -y clickhouse-server clickhouse-client ; sudo systemctl enable --now clickhouse-server -
Edit
/etc/clickhouse-server/config.xmlto enable listening for remote connections:<listen_host>::</listen_host>I also set
<display_name>db.home.arpa</display_name>and commented out any unused protocols like
mysql_port,postgresql_port, etc. -
Generate a random password and a hash for that password:
; PASSWORD=$(base64 < /dev/urandom | head -c8); echo "$PASSWORD"; echo -n "$PASSWORD" | sha256sum | tr -d '-'Save this password in a password manager.
Then edit `` and add the line:
<password_sha256_hex>xyz</password_sha256_hex>where
xyzis replaced with the password hash from the above command. -
Restart the service
; sudo systemctl restart clickhouse-serverand ensure you can connect to it:
; clickhouse-client Password for user (default): db.home.arpa :) -
Add firewall rules to allow connection to ClickHouse:
; sudo firewall-cmd --permanent --new-service=clickhouse
; sudo firewall-cmd --permanent --service=clickhouse --add-port=9000/tcp
; sudo firewall-cmd --permanent --service=clickhouse --add-port=8123/tcp
; sudo firewall-cmd --permanent --add-service=clickhouse
; sudo firewall-cmd --reload
Credentials
Next, we should create dedicated accounts on both systems for Plausible, to limit access.
From our VM, run the following commands for PostgreSQL, replacing xyz with a secure random password.
sudo -u postgres psql
psql (15.4)
Type "help" for help.

postgres=# CREATE DATABASE plausible;
postgres=# CREATE USER plausible WITH ENCRYPTED PASSWORD 'xyz';
postgres=# GRANT ALL PRIVILEGES ON DATABASE plausible TO plausible;
postgres=# GRANT ALL ON SCHEMA public TO plausible;
Next do the same for ClickHouse:
; clickhouse-client
Password for user (default):

db.home.arpa :) CREATE USER plausible IDENTIFIED WITH sha256_password BY 'xyz';
db.home.arpa :) CREATE DATABASE plausible;
db.home.arpa :) GRANT SELECT, INSERT, ALTER, CREATE DATABASE, CREATE TABLE, CREATE VIEW, CREATE DICTIONARY, DROP DATABASE, DROP TABLE, DROP VIEW, DROP DICTIONARY, TRUNCATE ON plausible.* TO plausible;
Kubernetes
What follows is the Kubernetes configuration I use for my Plausible setup.
-
First, create a new namespace for Plausible:
apiVersion: v1 kind: Namespace metadata: name: plausible -
Create a secret in that namespace populated with the login information from above:
apiVersion: v1
kind: Secret
metadata:
name: plausible
namespace: plausible
type: Opaque
stringData:
BASE_URL: https://plausible.example.com
SECRET_KEY_BASE:
MAXMIND_LICENSE_KEY:
MAXMIND_EDITION: GeoLite2-City
GOOGLE_CLIENT_ID:
GOOGLE_CLIENT_SECRET:
DATABASE_URL: postgres://plausible:xyz@db.home.arpa:5432/plausible
CLICKHOUSE_DATABASE_URL: http://plausible:xyz@db.home.arpa:8123/plausible
DISABLE_REGISTRATION: invite_only
See the documentation for details on configuration. Replace
BASE_URLwith the Internet-accessible domain name of your instance.A new
SECRET_KEY_BASEvalue can be generated simply with:; head -c 64 < /dev/urandom | base64 -
Create the deployment which will be configured by the secret:
apiVersion: apps/v1 kind: Deployment metadata: name: plausible namespace: plausible spec: selector: matchLabels: app: plausible template: metadata: labels: app: plausible spec: containers: - name: plausible image: plausible/analytics:latest command: ["/bin/sh"] args: [ "-c", "sleep 10 && /entrypoint.sh db createdb && /entrypoint.sh db migrate && /entrypoint.sh run", ] ports: - name: http containerPort: 8000 envFrom: - secretRef: name: plausible -
Create the service which will make our Plausible instance accessible on our local network:
apiVersion: v1
kind: Service
metadata:
name: plausible
namespace: plausible
spec:
selector:
    app: plausible
ports:
    - name: http
    port: 80
    targetPort: http
Once Plausible is running, navigate to it and set up your account. On my network, pfSense delegates
k8s.home.arpato Kubernetes, so we can navigate tohttps://plausible.plausible.svc.k8s.home.arpa/. -
Finally, create a new Ingress which will make the service available from the Internet. On my cluster,
kubernetes-pfsense-controllersyncs the Ingress configuration to HAProxy running on pfSense.apiVersion: networking.k8s.io/v1 kind: Ingress metadata: name: plausible namespace: plausible spec: ingressClassName: traefik rules: - host: plausible.example.com http: paths: - backend: service: name: plausible port: name: http path: / pathType: Prefix
DNS
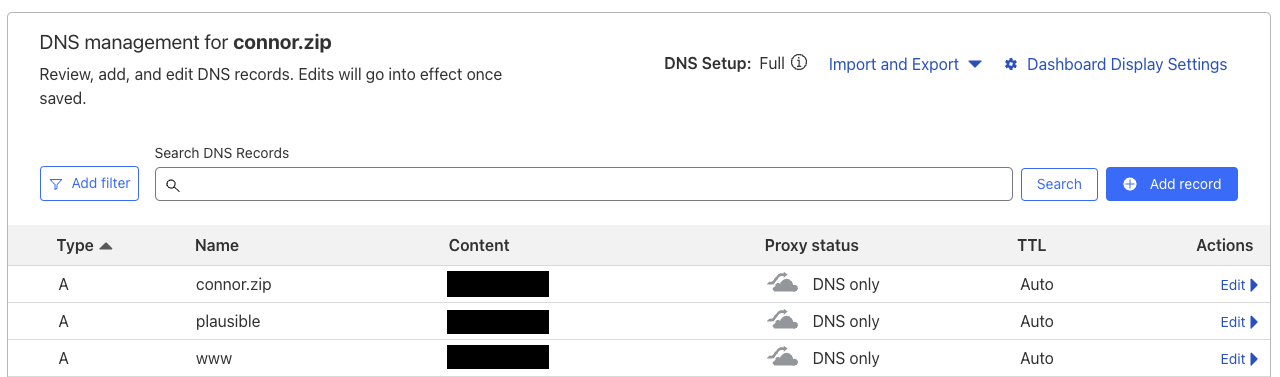
We need a new DNS entry for our Plausible server's domain. Navigate to your DNS provider and mirror the A or AAA records for your main domain for your new Plausible domain.
pfSense
Configuration of HAProxy is automatically handled by kubernetes-pfsense-controller, so we only need to ensure our ACME certificate can handle our new plausible.example.com domain.
- Navigate to Services, ACME Certificates.
- Click edit on your certificate.
- In the Domain SAN List, add our new domain name; copy the e.g. webroot configuration from other domains.
- Then back at the certificates list, click Issue/Renew on the certificate to ask Let's Encrypt to issue a new certificate with the updated domains list.
If successful, we have our updated certificate and HTTPS will work on our Plausible services.
Setup
Now that our Plausible server is accessible from the Internet, and we've created an account, we can add the analytics script to our site. For each page or template, add the following XML1 snippet to the bottom of the <header> tag:
<script async="async" data-domain="example.com" src="https://plausible.example.com/js/script.js"></script>
This differs from the snippet Plausible provides in two ways:
-
It uses the
attribute="attribute"form to side-step XML's lack of support for valueless attributes. -
It uses
asyncinstead ofdefer. A script usingdeferwill not block the parsing of the HTML, but will block rendering of the page; whereasasyncwill not block rendering of the page. This means thatdeferwill break your page if the Plausible server is unreachable, slow, etc.I ran into this issue firsthand when I navigated to my blog and realized that my employer blocks
.zipdomains from resolving via DNS until they are allow-listed. My blog resolved without issue, but the subdomain failed to resolve and failed to render the page. I believe this condition can be replicated using a DNS-based ad-blocker like a Pi-hole.
-
Yes, HTML 5 supports XML serialization. ↩︎