Last Sunday I was able to partake in Little Rock's annual Cornbread Festival, which takes place in my neighborhood. We sampled blueberry cornbread, mexican cornbread, cornbread and chili, cornbread and barbeque, corndogs, and mealie bread, among others. On the way back, we stopped by a local thrift store operating out of the bottom of a Methodist church and stumbled upon a collection of floppy disks.

Among them were these:
- Microsoft Windows for Workstations on eight disks
- MS-DOS 6.22 on three disks
- Sound Blaster 16 on four disks, including one for a text-to-speech program
- ATi Mach 64 drivers on three disks
alongside seventeen other miscelaneous disks.
Imaging
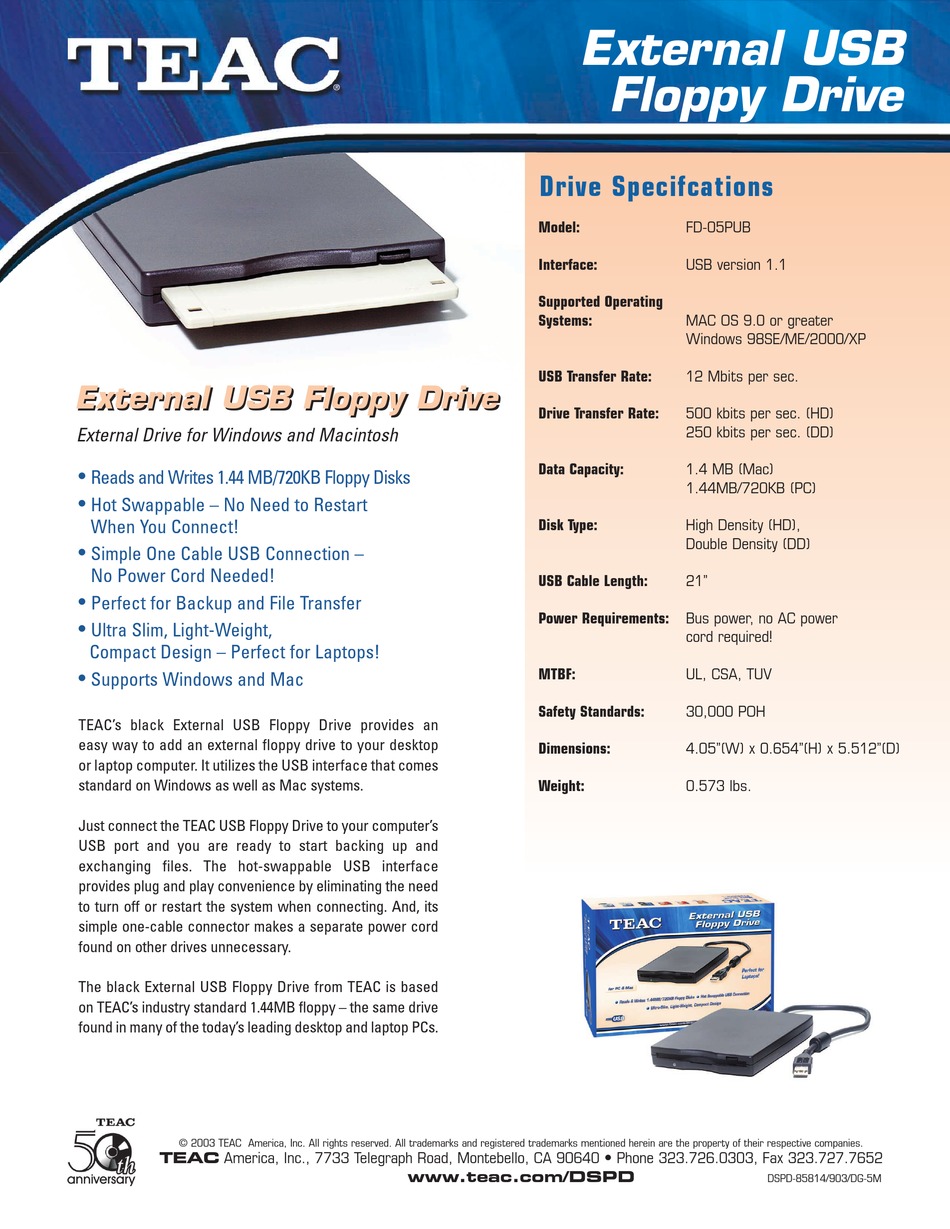
I had obtained a Dell Floppy Drive Module, a USB 3.5" floppy disk drive, from Goodwill some time ago but hadn't any high density disks to test it with. Although rebadged Dell, it is a TEAC FD-05PUB:
It didn't work initially with an Apple USB C to USB adapter on my MacBook Pro, but plugging it into my Dell Monitor which was itself attached to the MacBook over USB C worked. The floppy disks showed up as any other external drive would, and using dd I was able to make some images.
; diskutil list external physical
/dev/disk6 (external, physical):
   #:                       TYPE NAME                    SIZE       IDENTIFIER
   0:                            MSWFW1                 *1.5 MB     disk6
I wrote a little script at ~/bin/fdimage:
#!/usr/bin/env bash
set -euo pipefail

name=""
while getopts "o:" opt; do
  case $opt in
    o)
      name="$OPTARG"
      ;;
    *)
      echo "Usage fdimage [-o out.dmg]" > /dev/stderr
      exit 1
      ;;
  esac
done

disks=$(diskutil list -plist external physical | plutil -extract 'AllDisksAndPartitions' json - -o -)
ndisks=$(jq -r length <<< "$disks")

if [[ "$ndisks" -ne 1 ]]
then
  echo "Expected one external disk, but found $ndisks" > /dev/stderr
  diskutil list external physical > /dev/stderr
  exit 1
fi

disk=$(jq -r first <<< "$disks")

volume=$(jq -r '.VolumeName // empty' <<< "$disk")
if [[ -z "$name" && ! -z "$volume" ]]
then
  name="${volume}.dmg"
fi
if [[ -z "$name" ]]
then
  echo "Disk has no name, provide one with -o" > /dev/stderr
  exit 1
fi

# Unmount disk
dev=$(jq -r .DeviceIdentifier <<< "$disk")
dev="/dev/$dev"
mount=$(jq -r '.MountPoint // empty' <<< "$disk")
if [[ ! -z "$mount" ]]
then
  diskutil umount "$dev"
fi

sudo dd if="$dev" of="$name" bs=512 conv=noerror,sync status=progress
It assumes you'll only have one external disk drive plugged in, and uses diskutil to image the file into a .dmg. The .dmg can be mounted just like any other .dmg, by double clicking it. Usage looks like this, using one of the mach64 disks as an example since they don't have a unique name, which forces the use of -o.
; fdimage -o "MACH64 3.dmg"
Volume NO NAME on disk6 unmounted
Password:
  1442304 bytes (1442 kB, 1409 KiB) transferred 64.089s, 23 kB/s
2880+0 records in
2880+0 records out
1474560 bytes transferred in 64.642070 secs (22811 bytes/sec)
To simplify the imaging of multiple disks in a series which do hae a unique name, I wrote another script ~/bin/fdimages:
#!/usr/bin/env bash
set -euo pipefail

# TODO: Disks with no name have no UUID
check_disks() {
  disks=$(diskutil list -plist external physical | plutil -extract 'AllDisksAndPartitions' json - -o -)
  ndisks=$(jq -r length <<< "$disks")

  if [[ "$ndisks" -eq 1 ]]
  then
    disk=$(jq -r first <<< "$disks")
    dev=$(jq -r .DeviceIdentifier <<< "$disk")
    dev="/dev/$dev"
    name=$(jq -r '.VolumeName // empty' <<< "$disk")
    uuid=$(diskutil info -plist "$dev" | plutil -extract VolumeUUID raw - || {
      echo "Disk has no UUID, fdimages can't detect disk removal. Use fdimage instead." > /dev/stderr
      exit 1
    })
  fi
}

prevuuid=""
while true
do
  check_disks
  if [[ "$ndisks" -gt 1 ]]
  then
    echo "Expected one external disk, but found $ndisks" > /dev/stderr
    diskutil list external physical > /dev/stderr
    exit 1
  fi

  # Wait for a different disk to be inserted
  if [[ "$ndisks" -lt 1 || "$uuid" = "$prevuuid" ]]
  then
    echo "Waiting for new disk to be inserted..." > /dev/stderr
  fi
  while [[ "$ndisks" -lt 1 || "$uuid" = "$prevuuid" ]]
  do
    sleep 1
    check_disks
  done

  echo "Imaging disk $name" > /dev/stderr

  # Unmount disk
  mount=$(jq -r '.MountPoint // empty' <<< "$disk")
  if [[ ! -z "$mount" ]]
  then
    diskutil umount "$dev"
  fi

  sudo dd if="$dev" of="${name}.dmg" bs=512 conv=noerror,sync status=progress
  prevuuid="$uuid"
done
The Windows for Workgroups and MS-DOS disks have names and unique UUIDs in diskutil, which makes it simple to detect if a new disk has been inserted and to create unique files for each disk. Here's an example from the Sound Blaster 16 disks:
; mkdir "Sound Blaster 16"
; cd "Sound Blaster 16"
; fdimages
Waiting for new disk to be inserted...
Imaging disk INSTALL
Volume INSTALL on disk6 unmounted
  1442304 bytes (1442 kB, 1409 KiB) transferred 63.385s, 23 kB/s
2880+0 records in
2880+0 records out
1474560 bytes transferred in 63.938421 secs (23062 bytes/sec)
Waiting for new disk to be inserted...
Imaging disk APPLICATION
Volume APPLICATION on disk6 unmounted
  1442304 bytes (1442 kB, 1409 KiB) transferred 64.143s, 22 kB/s
2880+0 records in
2880+0 records out
1474560 bytes transferred in 64.694649 secs (22793 bytes/sec)
Waiting for new disk to be inserted...
Imaging disk ACCESSORIES
Volume ACCESSORIES on disk6 unmounted
  1442304 bytes (1442 kB, 1409 KiB) transferred 63.345s, 23 kB/s
2880+0 records in
2880+0 records out
1474560 bytes transferred in 63.899592 secs (23076 bytes/sec)
Waiting for new disk to be inserted...
Imaging disk T2S DISK
Volume T2S DISK on disk6 unmounted
  1442304 bytes (1442 kB, 1409 KiB) transferred 63.367s, 23 kB/s
2880+0 records in
2880+0 records out
1474560 bytes transferred in 63.919394 secs (23069 bytes/sec)
Waiting for new disk to be inserted...
^C
In the end we have the following files:
ACCESSORIES.dmg
APPLICATION.dmg
INSTALL.dmg
T2S DISK.dmg
In writing this I learned about diskutil's -plist option, which outputs info in a property list XML format. The tool plutil is handy for extracting info from these or converting the output, but contrary to its man page, when using the json format it will not output to stdout but instead write to a <stdout> file unless -o - is provided. After converting to JSON, we can use the incredibly useful jq utility to wrangle it. I was bitten by this issue where jq -r (raw output) outputs nothing for an empty string but the string null for missing properties, which we solve with // empty. I also learned about dd's status=progress option, which will display live information about the copy operation instead of waiting until the end.
VMWare
To test these disks out, I wanted to spin up a VM in VMWare ESXi 6.0. First we need to install DOS 6.22, then install Windows for Workgroups atop it. ESXi has some quirks with the floppy drive: it must be connected on VM power on because it cannot be connected afterwards, it must contain a disk, and the VM will not boot from the hard drive if a floppy disk is present. This necessitates booting from a floppy disk if we wish to use a floppy drive.
-
Create a new VM. I selected Windows as the Guest OS family and Windows 3.1 as the version.
-
Add a floppy disk drive. Rename the
.dmgfiles we created to.flp, then upload them. Select the firt DOS 6.22 disk. Enable the "Connect" checkbox, the floppy disk cannot be connected after the VM is started. -
Start the VM, follow the DOS Setup wizard. When it asks for the next disk: suspend the VM, edit settings and select the next disk, then resume the VM.
-
Once DOS is installed, stop the VM. Configure the floppy disk drive with the first DOS disk again. Start the VM.
-
Exit the Setup wizard with F3 from Actions, Guest OS, Send Keys. Then again to confirm.
-
Suspend the VM, edit settings and configure the floppy disk drive with the first Windows for Workgroups disk. Resume the VM.
-
From
A:runsetup -
Continue through the Windows Setup wizard
-
When it asks for the next disk, once again suspend the VM, edit settings and update the floppy disk drive disk, and resume.
-
Once the wizard concludes, we need to edit the
CONFIG.SYSfile from MS-DOS:Navigate to
C:\DOS, runedit \CONFIG.SYS(or runeditand using Alt+F, navigate to Open. Navigate up one directory with..and change the*to*.SYS. HighlightCONFIG.SYSand open it).Edit the path to
HIGHMEM.SYSfromC:\DOStoC:\WINDOWS. Save the file and exit.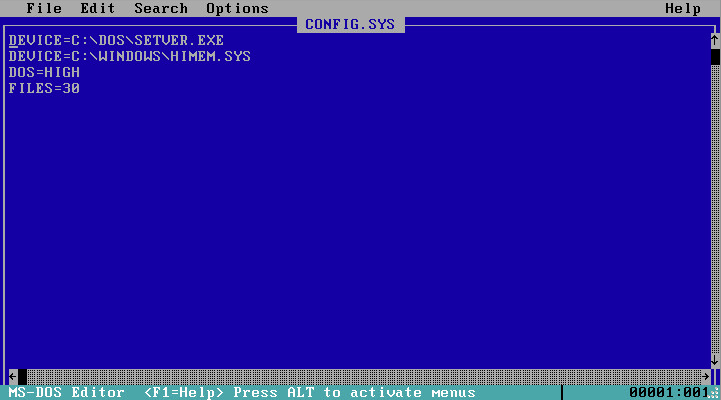
Editing CONFIG.SYS -
Shut down the VM. Disconnect the floppy disk drive. If we boot from the DOS disk, we won't have the correct
CONFIG.SYSsettings loaded for Windows. -
Start up the VM. Navigate to
C:\WINDOWSand runwin. -
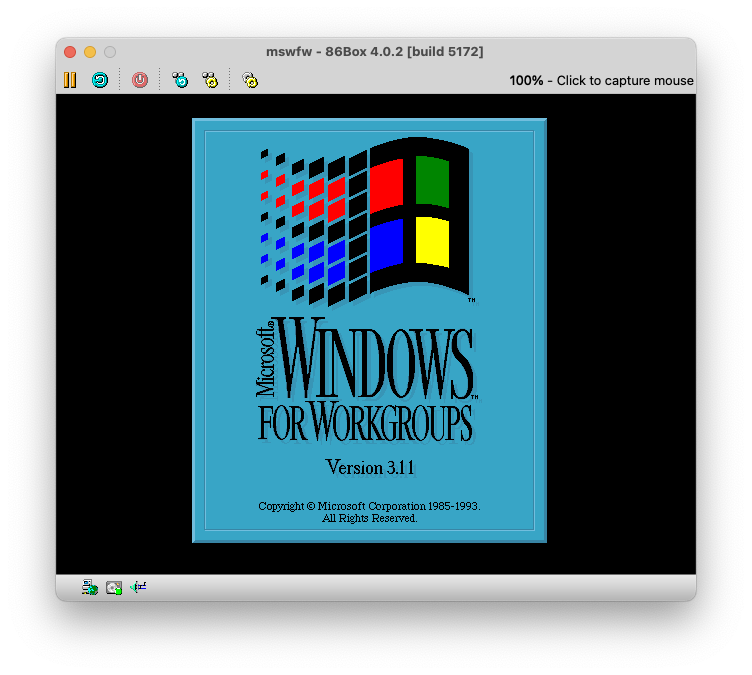
Windows 3.1 should start.
Microsoft Windows for Workgroups
Unfortunately, this setup has neither a working mouse or networking. For Windows NT, an old version of VMWare Tools did the trick, but Windows for Workgroups is too old to have ever been supported. VMWare also reports an error if a sound card is configured.
86Box
For a better emulated experience of these disks, with emulated hardware, we can use 86Box. I used the MacBox user interface for 86Box. The 86Box project even has a video tutorial on installing Windows for Workgroups with options ideal for sound, video, and networking. They also have an IRC channel, #86Box at irc.ringoflightning.net: connect with TLS on 6697 and register your nick with NickServ, then connect using SASL.
-
Download the zipped
MacBox.appfrom the latest release, unzip it, and copy it into the Applications folder. -
Open MacBox, you'll need to allow it via the Privacy & Security settings pane.
-
Click the red icon at the bottom left indicating that 86Box is not installed, this will bring you to the Jenkins build page for the latest release for your architecture1. Click the highlited release, unzip it, and copy it into the Applications folder.
-
Download the necessary ROMs from the latest release, unzip it, and copy it into
~/Library/Application Support/net.86box.86Box/roms. -
Add a new VM in MacBox, when you attempt to edit settings it will try to open 86Box, you'll need to allow it via the Privacy & Security settings pane.
-
When editing settings:
- choose the i386DX machine type and the AMI 386DX Clone machine with 16MB of memory,
- choose the ATI Mach64 GX video card,
- choose the Logitech/Microsoft Bus Mouse,
- choose the Sound Blaster 16 sound card,
- choose the 3COM EtherLink II network card and SLiRP,
- created a new 100MB hard disk,
- chose the Western Digital ISA16 hard drive controller,
- configured a 3.5" 1.4MB floppy disk (not the PS/2 version)
-
On initial boot, you'll need to configure the BIOS with F1. The clone provides a much simpler BIOS interface than some of the earlier machines. Choose standard setup and navigate to C:, enter the cylinders, heads, and sector information from the settings. Choose a 3.5" 1.4MB floppy disk drive for A:.
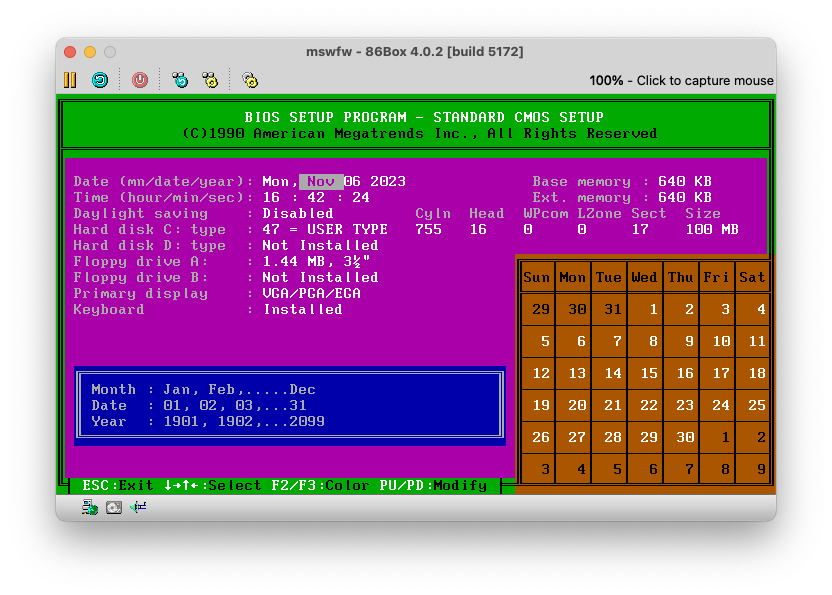
BIOS Setup Program -
Open the first MS-DOS floppy disk image (rename it to
.flp), then -
MS-DOS setup will start, swap disks as prompted. (middle click to free the mouse)
-
Boot into DOS, insert the first Windows for Workgroups disks. Navigate to
A:and runsetup. -
Follow the setup instrunctions, swapping through Windows disks as needed.
Windows for Workgroups Setup -
Choose to install the windows network (see the section below on TCP/IP)
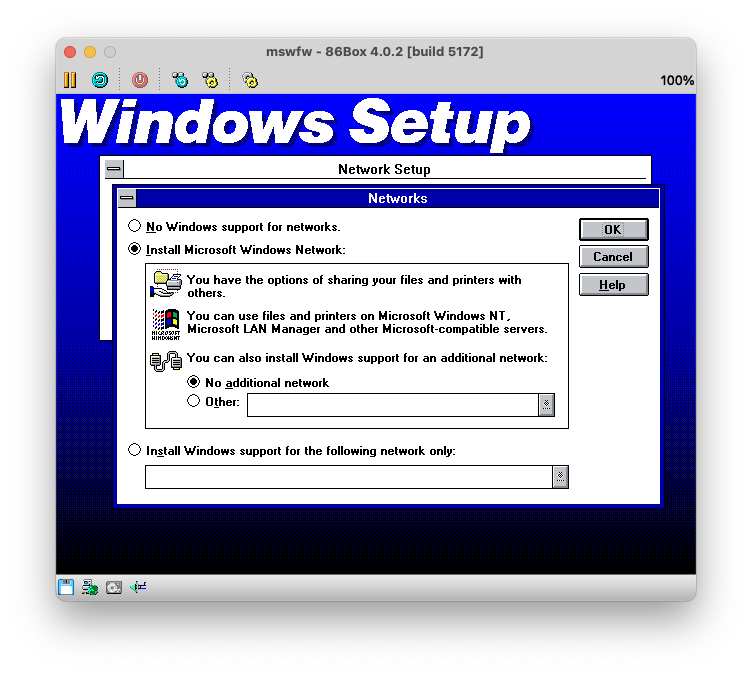
Windows Setup: Networks -
Choose the network card driver to install, in our case the 3COM EtherLink II
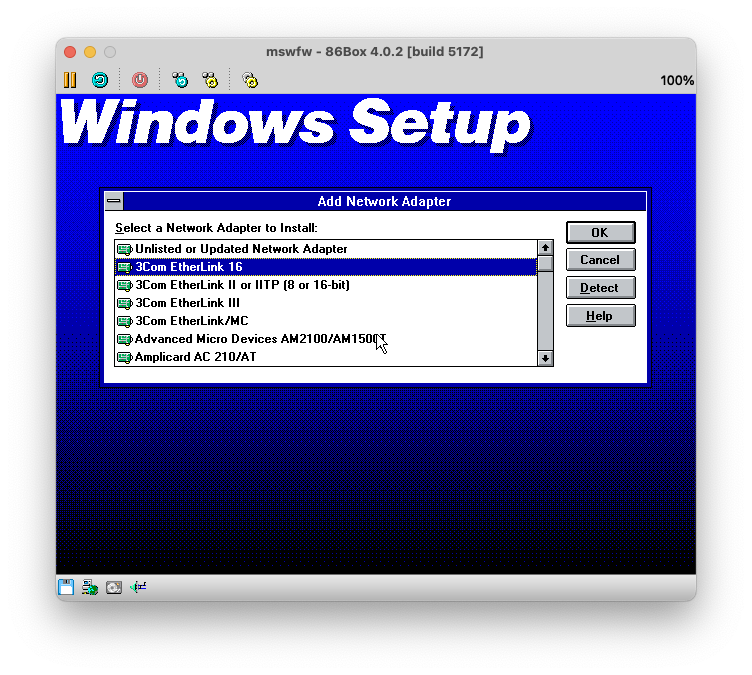
Windows Setup: Add Network Adapter and set the address it operates at (available under Settings, Network, then Configure next to the adapter)
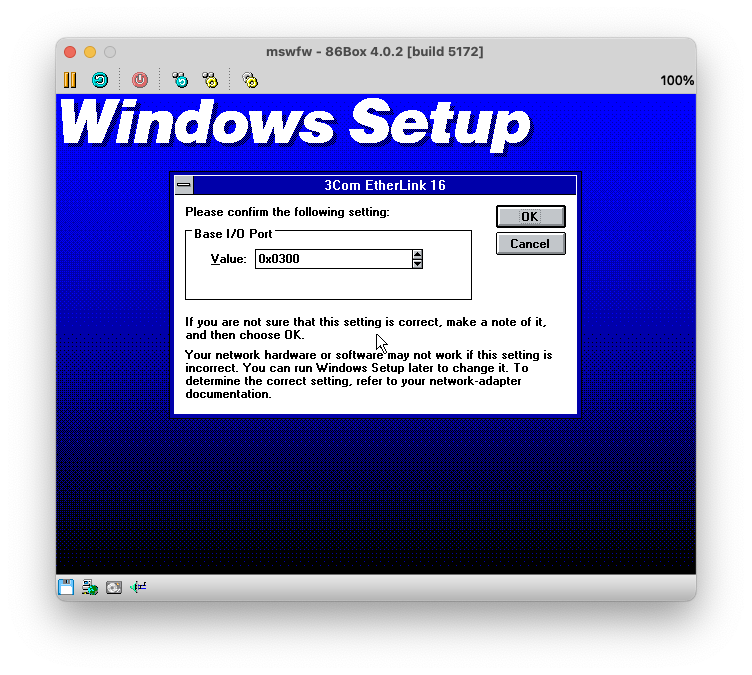
Windows Setup: 3Com EtherLink 16 at this point the installer will ask for disks seven and eight after copying some files.
-
Upon reboot, start windows from MS-DOS:
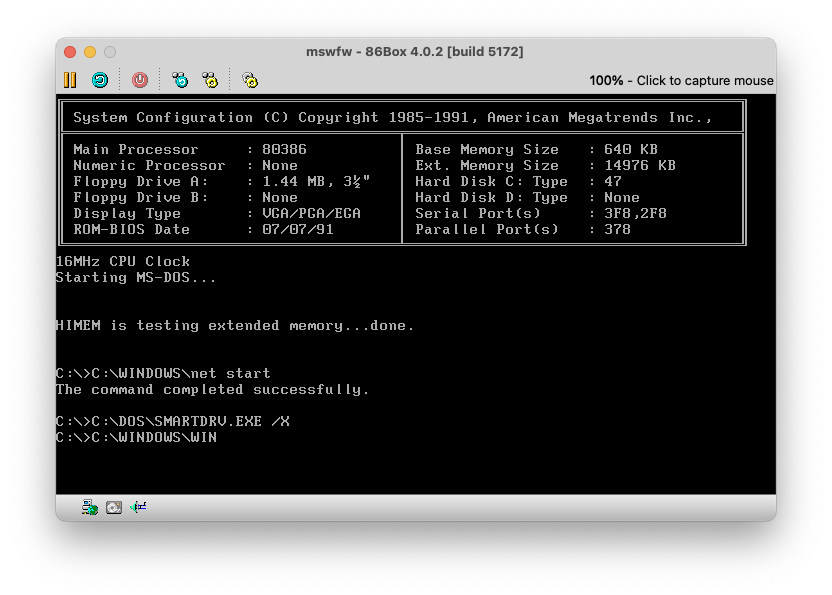
Start Windows from MS-DOS and you should see the startup screen!
Windows Startup Screen You will get an error about the network card, because SLiRP doesn't work with networks besides IP.
Mouse
If, like me, you configured the mouse after installing Windows, follow these instructions:
- open Windows Setup, confirm that the Mouse entry is empty,
- choose the Options menu with Alt+O, choose System Settings,
- tab to Mouse, arrow key through the list and choose the Logitech option,
- insert Windows for Workgroups disk two as prompted,
- reboot.
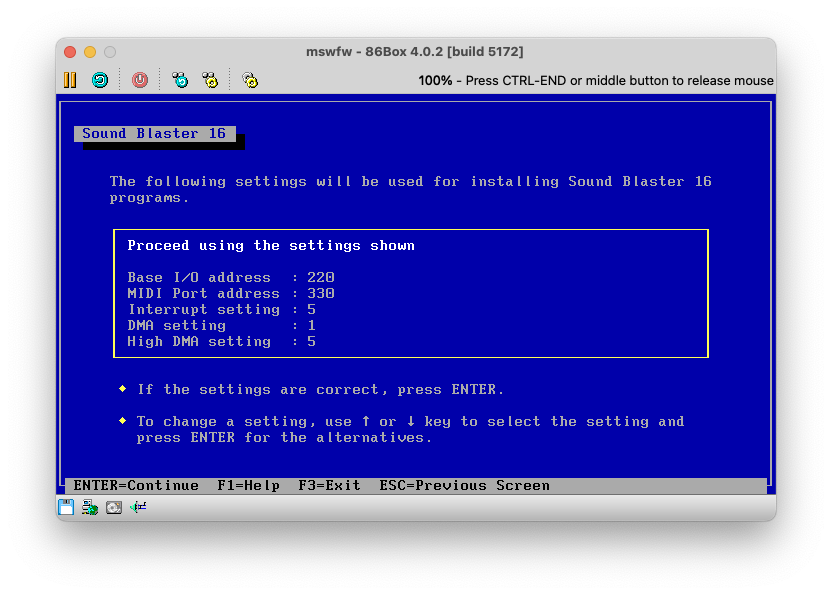
Sound Blaster 16
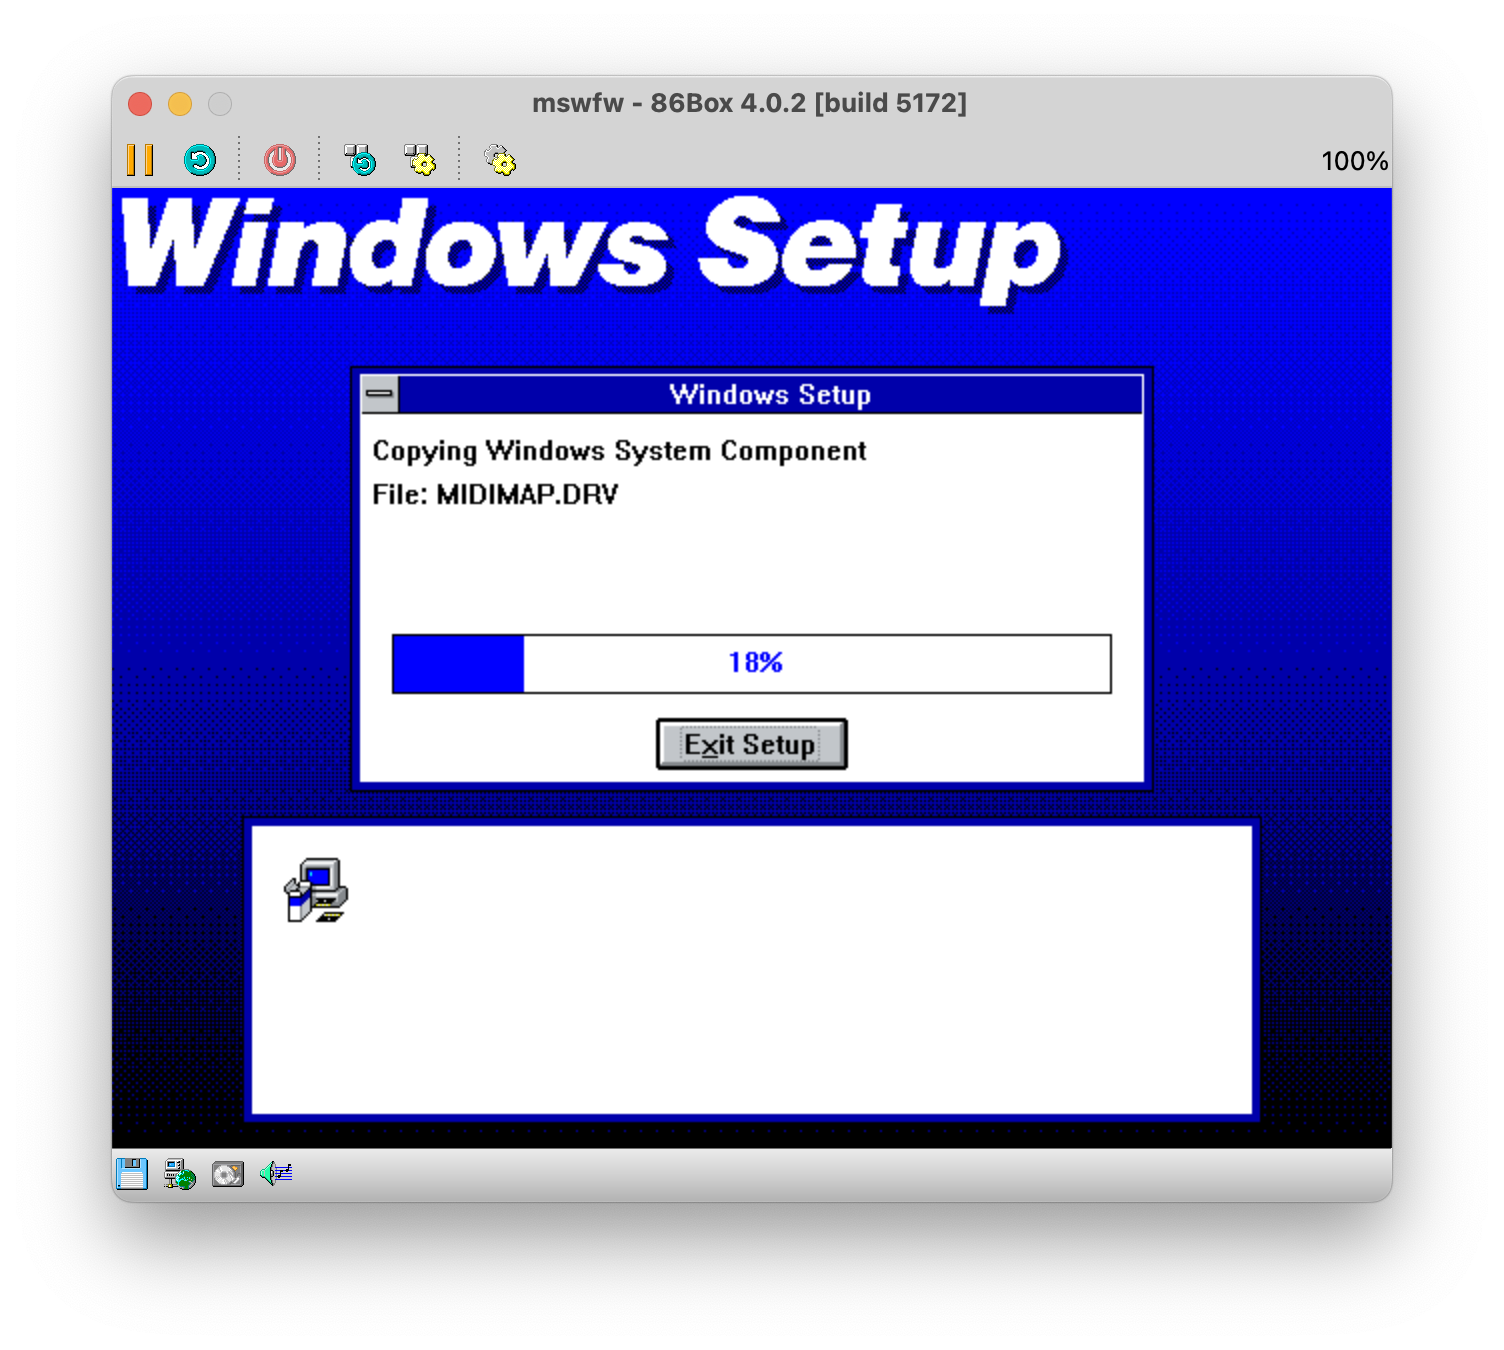
Open the the Sound Blaster 16 INSTALL disk, navigate to A: in the File Manager, and open install.exe. The installer will open as a full-screen text installer, follow the direction onscreen and swap out disks accordingly.
The installer performs an install in a DOS-compatible way at the root of the C: drive, before copying some Windows 3.1 specific files into C:\WINDOWS\SYSTEM.
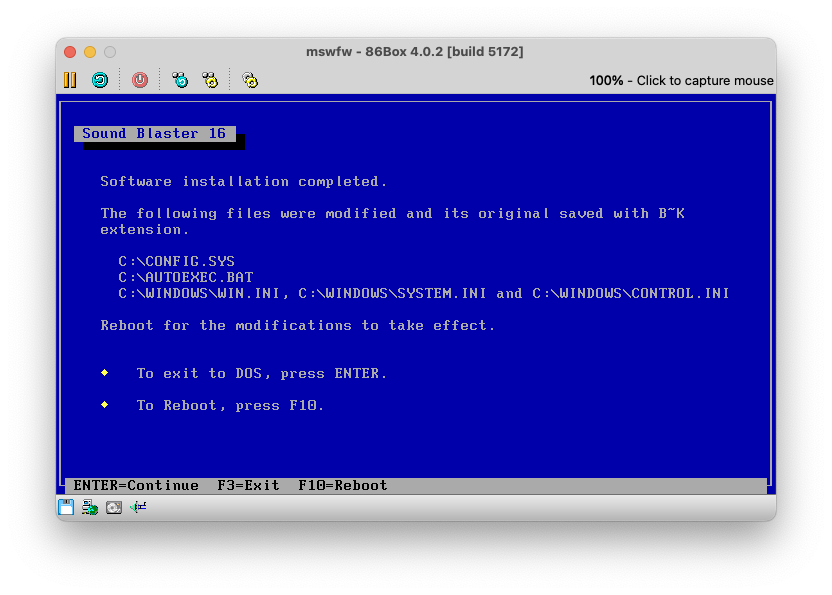
Remove the disk and reboot. Upon reboot, you'll be greeted with the Creative DOS Multimedia Architecture copyright notice and the additional AUOTEXEC.BAT commands in the DOS prompt.
In fact, we can leverage this same AUTOEXEC.BAT file to automatically start Windows for Workgroups when we start our emulator, simply add the line:
C:\WINDOWS\WIN
to the end with edit autoexec.bat, save and exit, reboot.
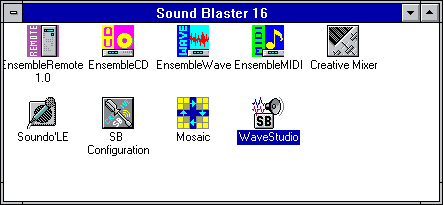
Upon first running Windows after Sound Blaster installation, you'll be prompted to create a Sound Blaster 16 program group window, click OK. You should now see the following window populate:
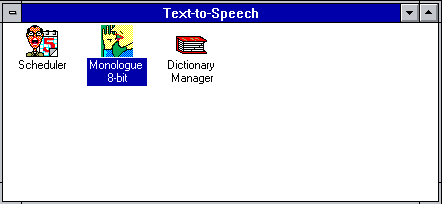
Open the T2S DISK disk and open it in the File Manager by navigating to A:, double click install.exe. This application is a Windows installer:

Continue using the default options. Once finished, you'll have the Text to Speech program group:
To hear sounds via the Sound Blaster 16 emulated card, we need to turn up the volume via the Creative Mixer app in the Sound Blaster 16 program group. Slide all sliders to max, and you should hear a sound from e.g. the Test button in Sound under Control Panel.

In the emulator settings, navigate to Sound, then Configure and check the Control PC Speaker.
ATi Mach 64
Open the first mach64 disk and exit Windows to return to DOS (installation cannot be run under the Windows DOS Box). Run A:\INSTALL, you should see
Invalid EEPROM status. Press any key to initialize...
At this point the system hung, so I reset the emulator and ran install again. This time, I get a wizard:
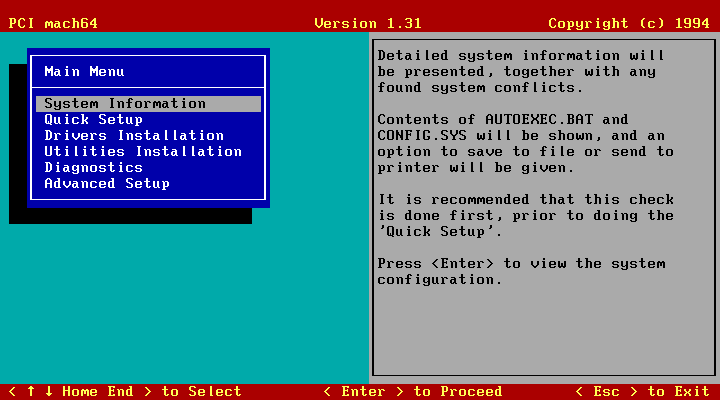
- First, run Quick Setup and choose
VESA-std 75 Hz 20" 1280x1020or another large resolution. - Then select Drivers Installation and choose Microsoft Windows and swap to disk two as instructed.
- Choose Install the Windows 3.1 Driver
- Choose Display drivers and confirm the paths (MVA fails)
- Exit setup with ESC
- Start Windows with
WINfrom the DOS prompt
Open ATi Dekstop, then the FlexDesk+ control panel, and configure a larger resolution and higher color depth. To take full effect you must reboot. Unfortunately, ATi changes to font to a larger size which is unweildy and a bit ugly.
TCP/IP
To use an IP network (e.g. SLiRP), we need an IP stack. Like the Macintosh System Software releases of this era, an IP stack isn't included as part of the OS. The one I used is Microsoft's TCP/IP-32 for Windows for Workgroups, which requires a 32-bit processor like the i386. As described in How to Install the TCP/IP Protocol, often a TCP/IP stack was included with your web browser such as the one included with the dailer in Internet Explorer 3.02. The article What It Was Like to Build a World Wide Web Site In 1995 mentions the shareware Trumpet Winsock as another popular alternative.
-
Place the
Disk01.imgin the virtual floppy drive -
In File Manager, create a new folder e.g.
C:\TCPIP -
Copy the
tcp32b.exefrom the A drive into our new folder -
Open the executable, it's a self-extracting archive which will expand in our new directory
-
From the Network program group, open Network Setup
-
Next to the 3Com ethernet adapter, click Drivers, then Add Protocol, choose Unlisted or Updated Protocol and click OK
-
In the dialogue box, type our directory path
C:\TCPIP, it will list Microsoft TCP/IP-32 3.11b, click OK. -
Our new TCP/IP protocol is now installed! Remove the Microsoft NetBEUI protocol since we won't be using it
-
Upon closing the window, a Microsoft TCP/IP Configuration window opens. According to the 86Box docs:
The virtual router provides automatic IP configuration to the emulated machine through DHCP
So we can check the Enable Automatic DHCP Configuration box and click OK.
-
At this point you'll be prompted to reboot.
-
After rebooting, we can delete our temporary
C:\TCPIPdirectory.
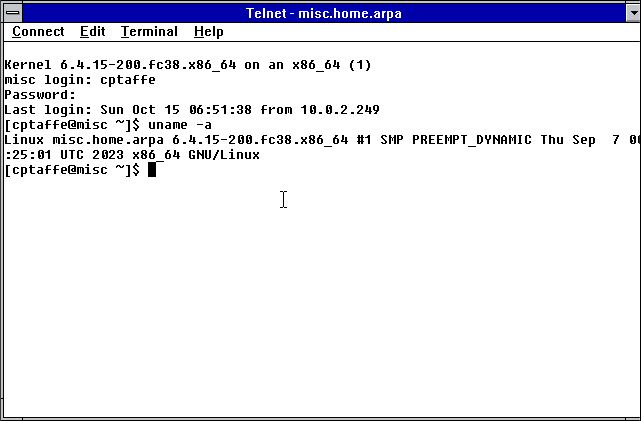
If all went well, we should now be able to use tools like Telnet:
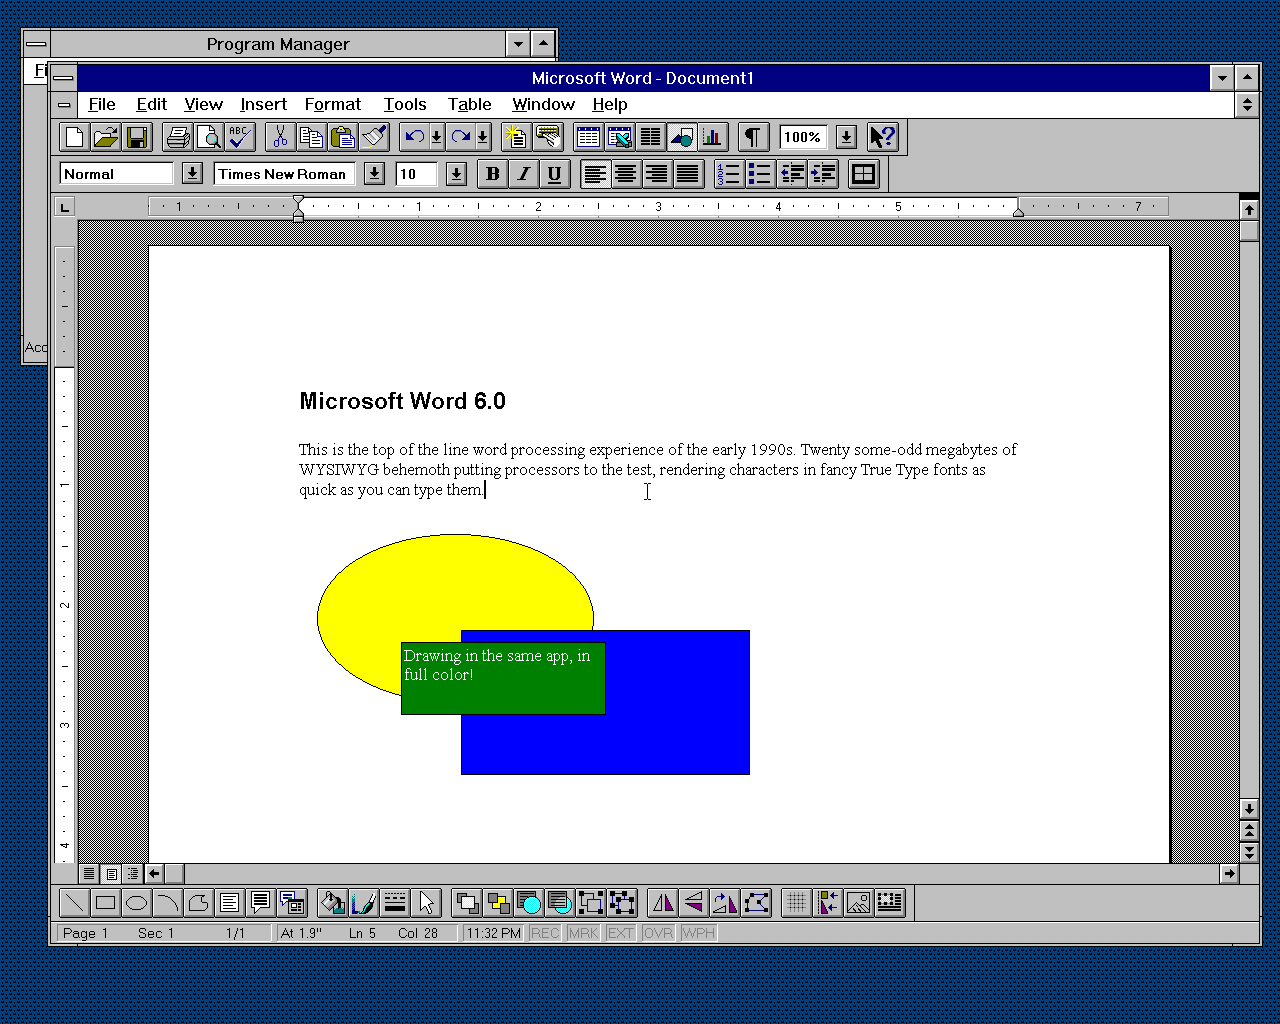
Microsoft Word 6.0
Microsoft Word 6.0 was the version released for Windows 3.1 (with a version for NT), and was distributed on nine 3.5" 1.4MB floppy disks, larger than Windows for Workgroups itself. I've used the significantly smaller Word 4 and 5 on my System 6 and System 7 Macintosh SEs. After a painfully long and dull install process, we can finally lay our eyes upon the word processing behemoth.